Investing in high-tech winter gear transforms your outdoor experience, keeping you incredibly warm during freezing temperatures. However, when the time comes to clean that expensive outerwear, panic often sets in. You might stare at the power cables and heating elements, terrified that water will ruin the complex electrical system. Fortunately, caring for your winter apparel is much simpler than it appears.
Modern thermal gear is designed to withstand moisture and gentle agitation, provided you follow the correct procedures. That is exactly why we created this guide on how to wash a heated jacket safely and effectively. By mastering a few straightforward techniques, you can keep your favorite winter staple looking pristine and functioning perfectly for years to come. This comprehensive guide will walk you through every necessary precaution to protect those vital heating elements.
Why Learning to Clean Your Heated Gear Matters
Mastering the proper cleaning techniques for your thermal gear is absolutely crucial for outdoor enthusiasts and campers. Dirt, sweat, and body oils naturally accumulate in the fabric fibers after long hikes or chilly evenings around the campfire. If you leave these contaminants on the fabric, they can break down the waterproof coatings and degrade the material over time. Clean fabric simply performs better, breathing more efficiently and insulating your body more effectively.
Furthermore, improper cleaning methods pose a severe risk to the delicate carbon fiber heating elements woven throughout the garment. Harsh chemicals or aggressive wringing can snap these wires, rendering your expensive investment completely useless. By learning the correct maintenance protocols, you protect your wallet and guarantee your comfort on future expeditions. Taking a few extra minutes to care for your garment ensures it will always be ready to provide reliable warmth when the temperature plummets.
Tools and Materials You’ll Need
Gathering the right supplies before you begin the cleaning process prevents unnecessary stress. Having everything within reach ensures you can move through the steps smoothly and protect your garment from accidental damage.
- A mild, liquid laundry detergent designed for delicate fabrics
- A large mesh laundry bag to protect the garment from snagging
- A clean, dry towel for soaking up excess moisture
- A flat drying rack positioned in a well-ventilated area
- A soft-bristled toothbrush for spot-cleaning minor stains
- Optional: A specialized tech-wash solution formulated specifically for waterproof outdoor apparel to help preserve the exterior weatherproofing
Step-by-Step Guide on Cleaning Your Heated Jacket
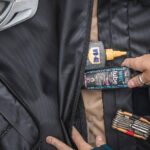
Step 1 – Disconnect and Remove the Battery Power Bank
The very first action you must take involves locating the power source. Unzip the dedicated battery pocket, which usually sits on the lower left or right interior side of the garment. Carefully disconnect the battery pack from the connecting cable. You must never submerge the lithium-ion battery in water, as this will instantly destroy the power bank and create a serious safety hazard.
Place the battery unit in a safe, dry location far away from your cleaning area. Take a moment to inspect the battery terminals for any dirt or debris, gently wiping them with a dry cloth if necessary. Completely removing the power source is the most critical safety measure you can take. Double-check all other pockets just in case you stored a spare battery or other electronic devices inside the garment.
Step 2 – Secure the Connecting Cables and Zippers
Once you remove the battery pack, you will notice the power cable hanging loosely inside the pocket. You need to protect this vulnerable component from water exposure and physical damage during the wash cycle. Most brands design these cables with a protective silicone cap attached to the wire. Push this cap firmly over the metal plug to seal out moisture.
If your garment lacks a protective cap, tuck the wire deep into the battery pocket. Zip the pocket completely shut to ensure the cable remains safely contained. Next, go around the entire garment and close every single zipper, including the main front zipper and all exterior pockets. Fasten any Velcro straps or snap buttons as well. Securing these closures prevents metal teeth from snagging the fabric or stretching the material while agitating in the water.
Step 3 – Pre-Treat Stubborn Stains Carefully
Before exposing the entire garment to water, inspect the exterior shell for any obvious dirt patches, mud splatters, or food stains. Outdoor adventures often leave marks on the cuffs and collar area. Apply a tiny drop of your mild liquid detergent directly to the stained area.
Take your soft-bristled toothbrush and gently massage the soap into the fabric using light, circular motions. You must avoid scrubbing aggressively, as harsh friction can damage the waterproof coating or disturb the internal heating coils hidden beneath the surface. Allow the detergent to sit on the fabric for about ten minutes to break down the grime. This targeted approach handles the worst dirt, allowing you to use a much gentler cycle for the overall wash. When considering how to wash a heated jacket, gentle stain removal always beats harsh chemical treatments.
Step 4 – Place the Garment in a Mesh Laundry Bag
Physical protection during the cleaning cycle extends the lifespan of your thermal outerwear significantly. Even when you wash on a delicate setting, the agitator or drum can twist and pull at the fabric. Take your large mesh laundry bag and slide the secured garment inside.
The mesh bag acts as a physical barrier, preventing the sleeves from wrapping around other items or the machine’s central agitator. It also protects the exterior shell from scraping against the metal drum. If you do not own a specialized mesh laundry bag, a large, clean cotton pillowcase serves as an excellent alternative. Simply place the garment inside the pillowcase and tie the top securely with a piece of string. This simple protective measure dramatically reduces mechanical stress on the internal carbon fiber wires.
Step 5 – Select the Gentle Wash Cycle and Cold Water
Machine settings determine whether your garment survives the cleaning process intact. You must select the delicate or gentle cycle on your washing machine. This setting uses minimal agitation, slowly swaying the clothing rather than violently tossing it around.
Equally important is the water temperature. Set your machine to cold water only. Hot water poses a massive threat to the internal wiring insulation and can easily melt the protective adhesives holding the heating elements in place. High temperatures also strip away the durable water repellent finish on the exterior shell. By combining low agitation with cold water, you mimic the gentleness of hand washing while benefiting from the machine’s efficiency. Learning exactly how to wash a heated jacket means respecting these strict temperature boundaries.
Step 6 – Add the Right Type of Mild Detergent
Choosing the correct cleaning agent is vital for preserving the technical fabrics and internal electronics. Pour a small amount of mild, liquid laundry detergent into the machine’s dispenser. You must absolutely avoid using bleach, fabric softeners, or powdered detergents.
Bleach corrodes the metal connections, while fabric softeners leave a waxy residue that clogs the pores of breathable fabrics and traps odors. Powdered detergents often fail to dissolve completely in cold water, leaving abrasive granules trapped inside the jacket’s lining. If you purchased the optional tech-wash solution, use that instead of standard detergent, following the manufacturer’s recommended dosage. Using minimal soap prevents excess suds from building up, ensuring the rinse cycle can easily wash away all chemical residues without requiring a second wash.
Step 7 – Remove Immediately After the Wash Cycle Ends
Do not let your wet thermal gear sit idle inside the washing machine for hours. As soon as the final spin cycle concludes, remove the mesh bag from the drum. Leaving wet fabric crumpled in a damp environment encourages mildew growth and can cause a musty odor that is difficult to eliminate.
Take the garment out of the protective mesh bag and gently shake it to remove wrinkles. You will notice the jacket feels quite heavy due to the retained water. Resist every urge to wring or twist the fabric to remove this excess moisture. Twisting the material puts immense pressure on the internal heating coils, easily snapping the delicate carbon fibers. Instead, handle the heavy, wet garment with care as you prepare for the drying phase.
Step 8 – Lay the Garment Flat to Air Dry
Proper drying techniques are just as important as the washing phase. Never place your thermal gear in a mechanical clothes dryer, as the extreme heat will warp the wiring and destroy the waterproof membrane. Instead, lay your clean, dry towel across a flat drying rack or a clean table in a well-ventilated room.
Place the wet garment flat on top of the towel, shaping it to its natural dimensions. If the jacket is dripping wet, you can place a second towel on top and press down gently with your hands to absorb excess moisture. Keep the item away from direct sunlight or heavy heat sources like radiators, as these can fade the fabric. Allow the garment to air dry completely, which typically takes between twenty-four and forty-eight hours depending on the ambient humidity.
Step 9 – Inspect and Reconnect the Power Bank
Patience is mandatory during this final step. You must verify that the garment is one hundred percent bone dry before you even think about reconnecting the power source. Feel the interior lining, especially deep inside the battery pocket and along the thickest seams.
Once you are absolutely certain no moisture remains, unzip the battery pocket. Remove the silicone protective cap from the power cable or pull the tucked wire back out. Carefully plug your fully charged battery bank back into the connecting cable. Turn the battery on and press the chest power button to activate the heating zones. Let the garment warm up for a few minutes to ensure all heating elements function correctly. Your freshly cleaned thermal gear is now fully prepared for your next freezing outdoor adventure.
Common Mistakes When Cleaning Heated Outerwear
Many people ruin their expensive thermal gear simply by treating it like ordinary clothing. The most frequent and destructive mistake is tossing the garment into a standard machine dryer. Even on a low heat setting, the tumbling action combined with warm air severely damages the internal wiring and melts the adhesive bonding the heating panels. You must always exercise patience and rely strictly on air drying.
Another incredibly common error involves aggressive wringing. When people pull a soaking wet coat from the wash, their natural instinct is to twist the fabric tightly to squeeze out the water. This twisting motion forcefully snaps the delicate carbon fiber heating elements hidden inside the lining. Once those wires break, the electrical circuit fails, and the coat will never produce heat again. You should only ever press the water out gently using a dry towel.
Finally, relying on dry cleaning services is a disastrous mistake. Many users assume dry cleaning is the safest option for high-end garments. However, the harsh chemical solvents used in the dry cleaning process quickly dissolve the insulation surrounding the heating cables. These chemicals also strip away the durable water repellent coatings on the exterior shell. You must strictly avoid commercial dry cleaners and stick to gentle, at-home washing methods using mild detergents.
Expert Tips for Maintaining Battery-Powered Gear
Extending the life of your thermal apparel goes beyond the occasional deep clean. Spot cleaning should be your primary line of defense. Instead of running the entire garment through a washing machine every time you get a smudge on the sleeve, simply wipe the affected area with a damp cloth and a tiny bit of soap. Limiting full wash cycles dramatically reduces wear and tear on the electrical components.
Additionally, you need to manage your power bank carefully during the off-season. Never store your lithium-ion battery fully depleted for months at a time, as this degrades the cell’s capacity. Charge the battery to roughly fifty percent before storing it in a cool, dry place during the summer. Furthermore, store your garment on a wide, padded hanger rather than folding it tightly into a drawer. Folding creates sharp creases that can eventually stress and break the internal heating wires over time.
Frequently Asked Questions
Can I wash my thermal jacket in a top-loading machine?
You can use a top-loading machine if it lacks a center agitator. Machines with large center agitators can easily catch the fabric, stretching the internal wires and causing permanent damage. If your top-loader has a central agitator pole, you should highly consider hand washing the garment in a large basin or bathtub to ensure the electrical components remain completely safe.
How often should I clean my heated apparel?
You should wash your thermal gear as infrequently as possible to prolong its lifespan. For most outdoor enthusiasts, washing the garment once or twice per season is perfectly adequate. Rely on spot cleaning with a damp cloth for minor dirt and stains. Only run the garment through a full machine cycle when it becomes heavily soiled or develops noticeable odors.
What happens if water gets inside the battery pocket?
Water inside the battery pocket is not an immediate disaster if the power bank is removed. The connecting cables are designed to withstand temporary water exposure. However, you must ensure the pocket and the metal cable plug dry completely before reconnecting the battery. Connecting a battery to a wet cable can cause a short circuit and destroy the heating system.
Is it safe to iron the jacket if it gets wrinkled?
You must never use a hot iron on battery-powered thermal garments. The intense, direct heat from an iron will easily melt the synthetic exterior fabrics and severely damage the internal heating coils. To remove wrinkles, hang the fully dry garment in a steamy bathroom for a few minutes. The gentle steam will help the fabric relax without exposing the wires to dangerous contact heat.
Can I use waterproofing sprays after washing?
Yes, you can apply specialized waterproofing sprays to the exterior shell to revive the durable water repellent finish. Wait until the garment is completely dry before applying any treatments. Spray the solution evenly across the exterior, avoiding the battery pocket area. Allow the spray to cure completely according to the manufacturer’s instructions before wearing or storing the outerwear.
Conclusion
Taking care of your high-tech winter apparel does not have to be an intimidating or complicated chore. By understanding the vulnerabilities of the internal wiring and respecting the fabric’s requirements, you can easily maintain the performance of your favorite winter gear. Remembering to remove the power source, utilizing cold water on a gentle cycle, and relying strictly on air drying are the foundational rules of safe maintenance.
Now that you know how to wash a heated jacket, you no longer need to worry about dirt or campfire smells ruining your investment. Embrace your winter adventures with total confidence, knowing you can easily restore your gear to perfect condition afterward. Treat your thermal wear with the gentle care it deserves, and it will continue to provide reliable, comforting warmth through many freezing seasons to come. Keep this guide handy for your next laundry day, and stay warm out there!
About Caleb
Caleb Merritt is a Virginia-based outdoor writer and gear analyst who has spent over a decade sleeping on the ground, crossing mountain passes, and obsessively shaving grams off his pack weight. He holds a Bachelor of Science in Environmental Science from James Madison University, where he also served as president of the university’s outdoor recreation club. After graduating, he spent three years as a wilderness educator with a backcountry youth program in the Shenandoah Valley — teaching Leave No Trace ethics, backcountry navigation, and campcraft — before moving into full-time writing in 2018.
His work focuses on one core belief: the best gear is the gear you understand. Whether he’s doing a side-by-side weight comparison of ultralight shelters or writing a beginner’s guide to building a sub-20-lb base weight kit, Caleb writes with the same directness you’d expect from a trusted trail partner. He has logged more than 4,000 miles across iconic routes including the John Muir Trail, the Wind River Range, Vermont’s Long Trail, and the Collegiate Peaks Loop in Colorado.
Areas of Expertise
- Ultralight backpacking systems and base weight optimization
- Tent, tarp, and shelter testing across three-season and shoulder-season conditions
- Sleeping bag and quilt temperature rating verification
- Backpacking nutrition, meal planning, and calorie-per-ounce analysis
- Leave No Trace principles and wilderness ethics
- Campfire safety, bear country protocols, and water treatment methods
- Gear care, repair, and long-term durability assessment
Education
James Madison University — B.S. in Environmental Science, 2015
During his time at JMU, Caleb served as President of the Outdoor Recreation Club, where he planned and led more than 30 backcountry trips annually across the Blue Ridge Mountains and Appalachian Trail corridor. The role sharpened his ability to assess gear performance under real conditions, manage group safety in remote environments, and develop the kind of practical trail knowledge that no classroom can teach.
Professional Experience
Gear Writer & Senior Contributor — [Your Website Name]
Produces in-depth gear reviews, buyer’s guides, and how-to content across backpacking, camping, and ultralight hiking categories. Tests all gear in real field conditions before publishing recommendations.
Wilderness Educator & Trip Leader — Shenandoah Backcountry Youth Program — 2015–2018 Led multi-day backcountry expeditions for teens and young adults throughout Shenandoah National Park and George Washington National Forest. Taught LNT principles, orienteering, first aid awareness, and campcraft fundamentals.
Outdoor Recreation Club President — James Madison University — 2013–2015 Organized and led university-sponsored hiking, backpacking, and camping trips in the Blue Ridge Mountains and Appalachian Trail corridor. Managed club budget, safety protocols, and trip logistics for a membership of 120+ students.
Editorial Standards
Every piece of gear Caleb recommends has been personally tested in the field — not just unboxed and described. His review process includes a minimum of two overnight trips per shelter, a full-season evaluation for sleep systems, and side-by-side comparisons wherever possible. He does not accept payment for positive reviews. Affiliate relationships, where they exist, are always disclosed in accordance with FTC guidelines.
All factual claims about gear specifications, trail distances, and safety recommendations are cross-referenced against manufacturer data sheets and established sources such as the Leave No Trace Center for Outdoor Ethics and the American Hiking Society before publication.