Nothing feels quite as good as lacing up a fresh pair of athletic shoes before heading out the door. After a few weeks of heavy use, those pristine mesh uppers and distinct foam soles often accumulate a thick layer of dust, grime, and street dirt. You might notice the bright colors fading under a coat of mud or find that the breathable fabric feels slightly stiffer than usual. Restoring them to their original glory might seem like a daunting task, especially if you worry about damaging the delicate materials.
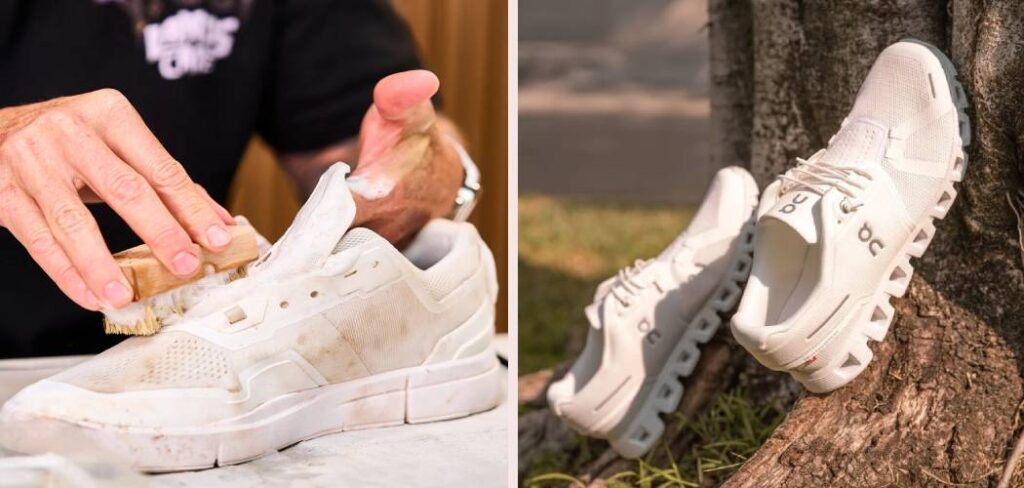
Fortunately, learning how to clean on cloud sneakers is a straightforward process that anyone can master at home. You do not need expensive professional services or harsh chemicals to get the job done right. This guide provides a complete, beginner-friendly walkthrough to help you refresh your favorite footwear safely and effectively.
Why Shoe Maintenance Matters for Outdoor Beginners
Stepping onto a dirt trail or setting up a campsite for the first time brings a sense of adventure and freedom. Campers and outdoor beginners quickly learn that nature leaves its mark on everything, especially your footwear. Mud, pine needles, and trail dust work their way into the fabric and grooves of your shoes during every hike. Leaving that debris sitting on your gear does more than just ruin the aesthetic appeal.
Dried mud draws moisture out of synthetic fibers, causing the mesh uppers to become brittle and prone to tearing over time. Dirt also clogs the specialized foam pods on the bottom of the shoe, drastically reducing your traction on slippery rocks or wet grass. Mastering proper maintenance extends the lifespan of your gear and protects your investment. Clean shoes ensure you maintain maximum grip and optimal foot support during all your upcoming outdoor excursions.
Tools and Materials You Will Need
Gathering the right supplies before you start prevents you from scrambling with wet hands later in the process. You will need a soft-bristle brush to safely scrub the delicate mesh without causing any fraying or snags. If you do not have a specialized shoe brush, an old, clean toothbrush works perfectly for reaching tight spaces. You also need a small bowl filled with warm water and a gentle liquid laundry detergent or mild dish soap.
Keep at least two clean microfiber cloths nearby to wipe away dirty suds and absorb excess moisture during the drying phase. Microfiber is ideal because it traps dirt rather than just pushing it around the fabric. For added convenience, grab a melamine foam sponge, commonly known as a magic eraser. This optional tool works wonders for lifting stubborn scuff marks off the rubber soles with minimal physical effort.
Step-by-Step Guide on Restoring Your Footwear
Step 1 – Remove the Shoelaces and Insoles
Start the cleaning process by completely unlacing your shoes and pulling out the removable foam insoles. Leaving the laces in place traps hidden dirt underneath the eyelets and prevents you from thoroughly scrubbing the tongue. Taking the shoe apart gives you full access to every crevice and allows each component to dry properly later on. Understanding how to clean on cloud sneakers always begins with dismantling the shoe into its core parts.
Set the laces and insoles aside on a dry towel to wash them separately. Taking out the insoles also airs out the interior footbed, which holds onto trapped sweat and odor-causing bacteria. You will immediately notice how much easier it is to handle the shoe once it is empty. This simple preparation step guarantees a much deeper, more effective wash for the entire shoe structure.
Step 2 – Brush Away Loose Dirt and Dry Mud
Take your dry, soft-bristle brush and vigorously sweep it over the entire surface of the shoe. Your goal here is to knock off any loose dust, crusty mud, or dried leaves before introducing any water. Applying water directly to dry mud just creates a soupy mess that pushes dirt deeper into the breathable mesh. Perform this step outdoors or over a trash can to avoid sweeping grit all over your floor.
Pay special attention to the deep crevices along the foam midsole and the fabric toe box. You might hear a satisfying scratching sound as the brush dislodges stubborn clumps of earth from the seams. Take your time with this dry brushing phase to make the wet washing steps significantly easier. Removing the top layer of grime reveals the true stains that need your focused attention.
Step 3 – Mix a Gentle Cleaning Solution
Fill a small bowl with roughly two cups of warm water to create your washing bath. You want the water to be comfortably warm to the touch, not boiling hot, as extreme heat can melt the shoe adhesives. Add just a few drops of mild liquid laundry detergent or gentle dish soap to the water. Avoid using harsh chemical cleaners, heavy degreasers, or chlorine bleach, which will strip the vibrant colors from the fabric.
Agitate the water with your brush until a thick, frothy layer of bubbles forms on the surface. You only need a mild soapy mixture to lift everyday dirt and organic stains from synthetic materials. The soap acts as a surfactant, breaking down the oils from road grime and sweat so they easily wipe away. Keep this bowl close to your workspace so you can constantly dip and rinse your brush.
Step 4 – Scrub the Uppers Gently
Dip your soft brush into the soapy water, tapping off the excess liquid so it is damp rather than dripping wet. Begin scrubbing the mesh uppers using light, circular motions, starting from the toe box and working your way back toward the heel. Apply very gentle pressure to prevent the stiff bristles from roughing up or snagging the delicate woven fabric. You will see the soap foam turn slightly gray as it pulls embedded dirt out of the textile fibers.
Wipe the area immediately with a clean, dry microfiber cloth to lift away the dirty suds. Do not let the dirty soap sink back into the material, or you will end up with permanent water stains. Repeat this process of gently scrubbing and wiping until the fabric looks noticeably brighter and feels clean. Work in small sections to ensure you maintain total control over the moisture levels in the shoe.
Step 5 – Tackle the Signature CloudTec Soles
The unique hollow pods on the bottom of these shoes require special attention because they act like magnets for gravel and mud. Flip the shoe over and use your brush to firmly scrub the rubber outsoles and the sides of the foam pods. If you encounter trapped pebbles or packed dirt inside the hollow spaces, use the handle of your brush to carefully pry them out. Anyone wondering how to clean on cloud sneakers effectively must focus heavily on clearing these specific structural gaps.
For stubborn scuffs on the white foam midsole, dampen your melamine foam sponge and gently rub the affected areas. You will watch the dark friction marks magically disappear, restoring that crisp, factory-fresh white appearance. Be careful not to rub the sponge on the painted or fabric sections, as it acts like ultra-fine sandpaper. Wipe the entire sole down with your microfiber cloth once the dirt and scuffs are gone.
Step 6 – Clean the Laces Separately
Drop your dirty shoelaces directly into the bowl of soapy water and let them soak for about five minutes. Soaking breaks down the sweat and oils that make laces feel stiff or look discolored after months of use. Once they have soaked, take the laces between your hands and rub the fabric together vigorously. You can also pinch the lace between your thumb and a soapy brush, pulling it through to scrape off heavy stains.
If your white laces look extremely dull, you can massage a tiny drop of pure laundry detergent directly into the fabric. Rinse the laces thoroughly under cold running water until the water runs completely clear and all soap bubbles vanish. Squeeze out the excess water tightly with your hands, and hang them over a chair or towel rack. They will usually air dry completely within a few hours.
Step 7 – Wash the Removable Insoles
Lay the foam insoles flat on a clean surface and lightly dip your brush into the soapy water. Scrub the top fabric layer of the insole using firm, sweeping strokes from the heel down to the toe. Insoles absorb the vast majority of your foot sweat, so giving them a thorough wash is crucial for eliminating lingering odors. Pay close attention to the toe area, where dark friction stains frequently accumulate.
Wipe the dirty soap off immediately with your microfiber cloth, pressing down firmly to extract as much moisture as possible. Avoid submerging the insoles entirely in water, as soaking the dense foam makes it incredibly difficult to dry out and invites mildew. If they still smell faintly sour after washing, sprinkle a light dusting of baking soda over them once they dry. Shake off the excess powder before sliding them back into the shoes.
Step 8 – Rinse Away the Soap Residue
Even though you wiped away most of the suds during the scrubbing phase, some invisible soap residue always remains in the mesh. Take a fresh microfiber cloth and dampen it lightly with clean, warm water from the sink. Wipe down the entire exterior of the shoe, pressing slightly into the fabric to pull out any lingering detergent. Leaving soap in the material can cause the mesh to feel crunchy or attract new dirt much faster.
Rinse your cloth frequently under the tap to ensure you are not just spreading soap back onto the shoe. You want the fabric to feel damp but completely free of any slippery or slimy texture. Run your fingers over the toe box and heel counter to verify the surface feels smooth and clean. This crucial rinsing step guarantees a soft, flexible finish once the footwear fully dries.
Step 9 – Absorb Excess Moisture
Your shoes will be quite damp at this stage, and pulling out that remaining moisture speeds up the drying timeline. Grab a dry, highly absorbent microfiber cloth or a thick cotton towel and wrap it around the shoe. Press firmly against the outside of the upper, squeezing the fabric to force water into the towel. You will feel the towel growing heavy as it pulls dampness out of the padded heel collar and tongue.
Next, crumple up several sheets of plain newspaper, white paper towels, or clean cotton rags. Stuff these tightly into the cavity of the shoe, pushing them all the way down into the toe box. The stuffing acts as an internal sponge, drawing moisture out of the inner lining while helping the shoe hold its original shape. Change the stuffing out after a few hours if it becomes completely saturated with water.
Step 10 – Air Dry Your Sneakers Completely
Place your freshly stuffed shoes in a well-ventilated area indoors, preferably near an open window or a circulating fan. Good airflow is the absolute most important factor for drying athletic footwear quickly and safely. Never place your shoes in a mechanical tumble dryer, as the intense heat will melt the industrial glues holding the soles together. Similarly, keep them away from direct heat sources like radiators, space heaters, or roaring campfires.
Allow the shoes to sit undisturbed for at least twenty-four to forty-eight hours to ensure the deep padding dries completely. Wearing damp shoes causes terrible blisters and encourages nasty fungal growth inside the footbed. Once the mesh feels totally dry to the touch, remove the paper stuffing, slide the clean insoles back in, and re-thread the laces. Your shoes are now thoroughly refreshed, smelling great, and ready for your next big adventure.
Common Mistakes When Washing Running Footwear
Many people ruin their favorite athletic shoes by throwing them directly into the washing machine. While it seems like a brilliant time-saving shortcut, the aggressive spinning and tumbling action violently degrades the structural integrity of the shoe. The prolonged soaking breaks down the specialized glues connecting the foam sole to the upper fabric, eventually causing the sole to peel away entirely. Washing machines also snag delicate mesh on the agitator, leaving you with frayed, unsightly tears across the toe box. Hand washing remains the only truly safe method to preserve the complex materials used in modern running gear.
Another frequent error involves drying footwear under direct, blistering sunlight to speed up the process. UV rays rapidly fade vibrant dyes, turning a bright neon shoe into a dull, washed-out shadow of its former self. Extreme solar heat also causes rubber outsoles to shrink, harden, and crack, completely ruining the shoe’s shock-absorbing properties. People also frequently forget to wash the insoles, mistakenly believing that cleaning the outside is enough to freshen the shoe. Ignoring the internal footbed allows odor-causing bacteria to thrive, meaning your newly washed shoes will still smell terrible the moment your feet heat up. Always clean the entire shoe system to ensure maximum longevity and comfort.
Expert Tips for Long-Term Shoe Maintenance
Adding a protective barrier to your footwear right after cleaning makes future maintenance incredibly easy. Once your shoes are completely dry, spray the uppers with a high-quality, breathable water and stain repellent designed for sneakers. This invisible coating causes spilled liquids and wet mud to bead up and roll right off the fabric instead of soaking in. You will find that simple wipe-downs replace heavy scrubbing sessions if you reapply the spray every few months.
Between deep washes, make it a habit to knock your shoes together after every single hike to dislodge loose trail dirt. Storing your shoes with cedar shoe trees inside them is another excellent trick used by footwear experts. The natural cedar wood instantly absorbs internal foot sweat and neutralizes sour odors naturally without harsh chemical sprays. Keeping the shoes properly stuffed also prevents deep creases from forming across the toe box, preserving that brand-new silhouette for years.
Frequently Asked Questions
Can I put my shoes in the washing machine?
You should absolutely avoid using a washing machine for your athletic footwear. Full submersion and aggressive tumbling break down the structural adhesives that hold the rubber soles to the fabric uppers. The harsh spinning cycle also damages the internal foam padding and frays the breathable mesh. Always opt for a gentle hand wash to protect the specialized materials and extend the overall lifespan of your gear.
How do I remove stubborn mud from the bottom pods?
The hollow pods on the outsole frequently trap hard, compacted dirt and small rocks during trail runs. Wait for the mud to dry completely, then use the plastic handle of a small brush to carefully dig out the debris. Once the large chunks fall out, scrub the deep grooves with a wet toothbrush and warm, soapy water. Rinsing under a high-pressure hose outdoors also helps blast away deep-seated gravel effectively.
Is baking soda safe to use on white mesh?
Baking soda acts as a fantastic, totally safe cleaning agent for brightening up dull white synthetic fabrics. You can create a thick paste by mixing equal parts baking soda and warm water in a small dish. Rub this natural paste gently into the stained white mesh and let it sit in a shaded area for twenty minutes. Wipe the dried paste away with a damp cloth to reveal a noticeably brighter, refreshed surface without harsh bleach.
How often should I perform a deep wash on my trail shoes?
The frequency of your maintenance routine depends entirely on your running environment and personal usage habits. If you frequently run through deep mud, dirty puddles, or dusty trails, you should clean them every two to three weeks. Casual pavement runners can easily wait a few months between deep scrubbing sessions. Always perform a spot clean immediately if you step in corrosive materials like road salt or deep chemical puddles.
Do I need to buy a specialized shoe cleaning solution?
You do not need to purchase expensive, branded shoe cleaning chemicals to achieve professional-level results at home. A simple mixture of warm water and a few drops of mild liquid dish soap cuts through dirt and grease perfectly. Standard laundry detergent also works exceptionally well for lifting heavy sweat stains out of synthetic fabrics. Save your money and rely on these common household staples for safe, effective daily maintenance.
Conclusion
Taking the time to care for your footwear properly transforms how you experience your outdoor activities and daily runs. When you remove abrasive dirt and corrosive sweat from the delicate materials, you dramatically extend the functional life of your gear. You also preserve the vital traction and support systems that keep your feet comfortable and safe on unpredictable terrain. Knowing exactly how to clean on cloud sneakers empowers you to tackle muddy trails and dusty paths without stressing over permanent stains.
You can easily restore that fresh, vibrant look using just a few simple household tools and a little bit of patience. Your shoes work incredibly hard to support your every step, so giving them a proper wash is the least you can do in return. Grab your brush, mix up some soapy water, and bring your favorite sneakers back to life today.

About Caleb
Caleb Merritt is a Virginia-based outdoor writer and gear analyst who has spent over a decade sleeping on the ground, crossing mountain passes, and obsessively shaving grams off his pack weight. He holds a Bachelor of Science in Environmental Science from James Madison University, where he also served as president of the university’s outdoor recreation club. After graduating, he spent three years as a wilderness educator with a backcountry youth program in the Shenandoah Valley — teaching Leave No Trace ethics, backcountry navigation, and campcraft — before moving into full-time writing in 2018.
His work focuses on one core belief: the best gear is the gear you understand. Whether he’s doing a side-by-side weight comparison of ultralight shelters or writing a beginner’s guide to building a sub-20-lb base weight kit, Caleb writes with the same directness you’d expect from a trusted trail partner. He has logged more than 4,000 miles across iconic routes including the John Muir Trail, the Wind River Range, Vermont’s Long Trail, and the Collegiate Peaks Loop in Colorado.
Areas of Expertise
- Ultralight backpacking systems and base weight optimization
- Tent, tarp, and shelter testing across three-season and shoulder-season conditions
- Sleeping bag and quilt temperature rating verification
- Backpacking nutrition, meal planning, and calorie-per-ounce analysis
- Leave No Trace principles and wilderness ethics
- Campfire safety, bear country protocols, and water treatment methods
- Gear care, repair, and long-term durability assessment
Education
James Madison University — B.S. in Environmental Science, 2015
During his time at JMU, Caleb served as President of the Outdoor Recreation Club, where he planned and led more than 30 backcountry trips annually across the Blue Ridge Mountains and Appalachian Trail corridor. The role sharpened his ability to assess gear performance under real conditions, manage group safety in remote environments, and develop the kind of practical trail knowledge that no classroom can teach.
Professional Experience
Gear Writer & Senior Contributor — [campeox.com]
Produces in-depth gear reviews, buyer’s guides, and how-to content across backpacking, camping, and ultralight hiking categories. Tests all gear in real field conditions before publishing recommendations.
Wilderness Educator & Trip Leader — Shenandoah Backcountry Youth Program — 2015–2018 Led multi-day backcountry expeditions for teens and young adults throughout Shenandoah National Park and George Washington National Forest. Taught LNT principles, orienteering, first aid awareness, and campcraft fundamentals.
Outdoor Recreation Club President — James Madison University — 2013–2015 Organized and led university-sponsored hiking, backpacking, and camping trips in the Blue Ridge Mountains and Appalachian Trail corridor. Managed club budget, safety protocols, and trip logistics for a membership of 120+ students.
Editorial Standards
Every piece of gear Caleb recommends has been personally tested in the field — not just unboxed and described. His review process includes a minimum of two overnight trips per shelter, a full-season evaluation for sleep systems, and side-by-side comparisons wherever possible. He does not accept payment for positive reviews. Affiliate relationships, where they exist, are always disclosed in accordance with FTC guidelines.
All factual claims about gear specifications, trail distances, and safety recommendations are cross-referenced against manufacturer data sheets and established sources such as the Leave No Trace Center for Outdoor Ethics and the American Hiking Society before publication.