Cooking a warm meal outdoors brings a special kind of joy to any camping trip. Nothing quite compares to the smell of fresh coffee and sizzling bacon greeting you early in the morning at your campsite. However, looking at a portable gas burner for the first time can feel slightly intimidating if you have never handled outdoor cooking equipment before. You might worry about handling the fuel correctly or struggling to get a steady flame going in the wind. We understand that hesitation completely.
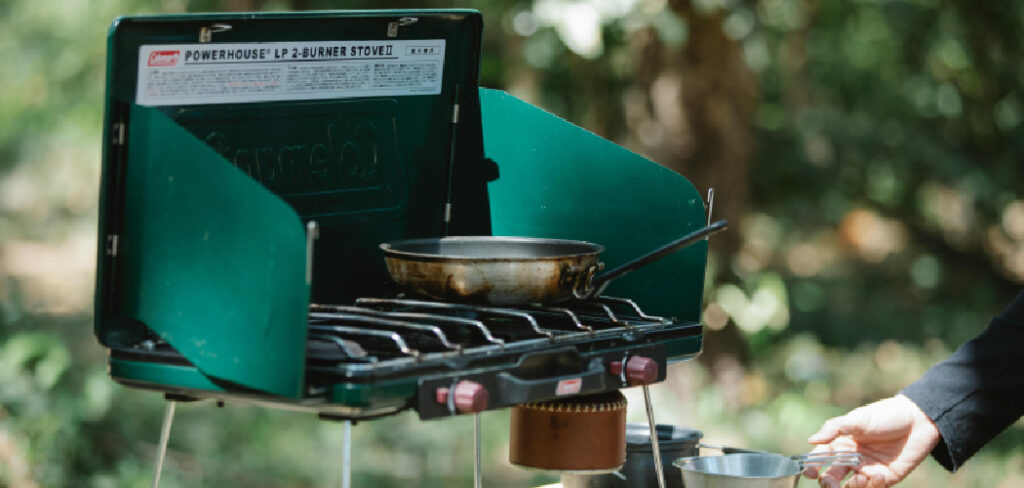
Learning how to use coleman camp stove takes only a few minutes of practice, and it opens up a whole new menu of outdoor culinary possibilities. Once you understand the basic mechanics, you will feel completely confident managing the fuel and controlling the flame. This guide provides a clear, step-by-step walkthrough to help you safely set up, ignite, and maintain your cooking equipment on your next adventure.
Why Mastering Your Camp Stove Matters
Understanding your outdoor cooking equipment transforms a good camping trip into an unforgettable experience. Beginners often rely on cold sandwiches or basic snacks because they feel uncertain about operating gas burners. When you build the confidence to cook proper meals, you elevate your outdoor comfort significantly. Warm food restores your energy after a long hike and keeps you comfortable when evening temperatures drop.
Knowing your equipment also keeps you safe. When you understand the mechanics of fuel regulation and ventilation, you minimize the risk of accidents or fuel leaks. You become self-reliant, capable of boiling water for sanitation, making hot drinks to stay warm, and cooking hearty meals for your family. Ultimately, mastering this simple outdoor skill gives you independence and turns the campsite into your own personal kitchen.
Tools and Materials You’ll Need
Before you head out to the campsite, you want to make sure you have all the necessary components ready to go. Missing a single piece can delay your dinner, so packing carefully is highly recommended.
Here are the essential items you need to gather:
- A standard two-burner propane camping stove
- A one-pound green propane fuel cylinder
- The brass and metal regulator pipe (usually stored inside the stove casing)
- A reliable long-barrel lighter or waterproof matches
- A sturdy, flat, and non-flammable camping table or cooking surface
- Heavy-duty cast iron or aluminum camping cookware
- Soapy water in a small spray bottle for checking leaks
- Optional: A protective silicone mat to catch grease splatters and make cleanup easier
10 Step-by-Step Guide on How To Use Coleman Camp Stove
Step 1 – Selecting and Setting Up Your Cooking Space
Finding the right spot to place your equipment is the foundation of safe outdoor cooking. You need a completely flat and stable surface to prevent pots from sliding off the burners. Look for a sturdy picnic table or a dedicated metal camp kitchen stand. You must keep the cooking area far away from your tent, overhanging tree branches, and dry brush.
Clear away any dry leaves, paper towels, or flammable materials from the immediate vicinity. Give yourself plenty of room to move around without bumping into the table. You also want to consider the wind direction before you start setting up. Position the back of the metal casing against the prevailing wind to give your burners extra protection. Setting up a dedicated, clean, and safe workspace makes the entire cooking process much more enjoyable and prevents dangerous accidents.
Step 2 – Opening the Case and Securing the Wind Baffles
Once you have your cooking station prepared, unlatch the front clasp to open the main lid. Lift the metal top straight up so it stands vertically like a wall. Inside the main cooking area, you will find two metal flaps resting flat against the grate. These are your wind baffles, and they play a critical role in keeping your flame strong.
Swing these side panels outward so they connect with the main upright lid. You will notice small metal clips or slots on the edges of the baffles that hook directly into the sides of the lid. Secure them tightly to create a three-sided shield around your burners. This barrier prevents sudden gusts of wind from blowing out your flame while you cook. It also reflects heat back toward your pots, helping your food cook faster and saving your precious fuel.
Step 3 – Inspecting the Propane Cylinder and Regulator
Before attaching any fuel components, take a moment to inspect them carefully. Look closely at the threads on your green propane cylinder to ensure they are free of dirt, sand, or damage. Debris in the threads can prevent a tight seal, which leads to unwanted gas leaks.
Next, examine the metal regulator pipe that you removed from inside the casing. Check the rubber O-ring inside the brass fitting to make sure it looks intact and is not cracked or missing. It is always better to catch a faulty piece of equipment before you open the gas valve. If everything looks clean and undamaged, you are ready to proceed. Taking this quick visual inventory gives you peace of mind and ensures your equipment operates exactly as the manufacturer intended.
Step 4 – Attaching the Metal Regulator Pipe to the Stove
Now it is time to connect the fuel line to the main burner assembly. Look at the right side or the back right corner of the casing to find the small protruding metal connection point. Take the metal regulator pipe and gently insert the smooth end into this port.
You need to push it in firmly but without forcing it, ensuring it sits flush against the housing. Most models have a small threaded collar or a pressure fitting that holds the pipe securely in place. Give it a gentle tug to verify that it is locked in and will not vibrate loose while you are cooking. This pipe acts as the bridge between your high-pressure fuel tank and the delicate burner valves, so a secure connection here is absolutely vital for safe operation. Figuring out how to use coleman camp stove smoothly relies heavily on this step.
Step 5 – Screwing in the Propane Fuel Canister
With the regulator firmly attached to the main body, you can now attach your fuel source. Hold the green propane cylinder upright and align the top threads with the brass fitting on the regulator pipe. Begin turning the cylinder clockwise using a slow, steady motion to avoid cross-threading the metal.
You will feel the resistance increase as the valve inside the cylinder opens. Continue twisting until the connection feels completely snug and hand-tight. You do not need to use tools or extreme force to tighten this joint, as overtightening can damage the internal rubber seals. If you hear a continuous hissing sound or smell a strong odor of rotten eggs, unscrew the cylinder immediately and check the threads for debris. A proper connection will be completely silent and odor-free.
Step 6 – Turning the Burner Knob to Open the Gas Flow
Before you release the gas, grab your lighter and have it ready in your dominant hand. Locate the burner control knob on the front panel that corresponds to the burner you want to use. Turn the knob slowly counter-clockwise to open the valve and release the propane.
You should hear a faint, soft hissing sound as the gas begins to travel through the regulator and out of the burner rings. Do not open the valve all the way immediately, as too much gas can create a surprisingly large flare-up when ignited. A quarter turn is usually enough to establish a good flow of fuel. You only want a small, controlled amount of propane escaping while you prepare to light the flame.
Step 7 – Igniting the Burner with a Match or Lighter
As soon as you hear the soft hiss of gas, bring your lighter close to the edge of the burner grate. Ignite your lighter and hold the flame directly next to the small holes on the burner ring. The escaping propane will catch the flame instantly, creating a ring of blue fire.
If you are using matches, strike the match first and hold it near the burner before you turn the gas knob. Never let the gas run for more than a few seconds without a flame. If it does not light right away, turn the knob completely off, wait a minute for the gas to dissipate, and try again. Keeping your face and loose clothing pulled back during this step guarantees your safety while igniting the fuel. Mastering the timing here is a key part of how to use coleman camp stove safely.
Step 8 – Adjusting the Flame for Optimal Cooking
Once the burner is lit, you need to adjust the heat to suit your meal. Turn the control knob further counter-clockwise for a larger, hotter flame, or turn it clockwise to lower the heat to a gentle simmer. A healthy flame should look predominantly blue with very little yellow or orange at the tips.
If your flame is burning entirely orange and leaving black soot on your pots, the burner might be dirty or not getting enough oxygen. You will notice that outdoor cooking requires slightly higher heat than your home kitchen due to the surrounding ambient air temperature. Play with the dial to find the sweet spot where your food sizzles evenly without burning to the bottom of your pan. Consistent heat control is the secret to perfect campsite meals.
Step 9 – Safely Turning Off the Gas Supply
When your food is fully cooked and you are ready to eat, it is time to shut everything down. Turn the burner control knob completely clockwise until it stops moving and the flame extinguishes entirely. Even after the flame goes out, you must take one additional step to secure the equipment.
Reach over to the green propane cylinder and carefully unscrew it from the brass regulator fitting. You might hear a tiny, brief hiss as the remaining pressurized gas escapes from the pipe, which is completely normal. Disconnecting the fuel source ensures that no gas can accidentally leak if someone bumps the control knobs while you are eating. Always separate the fuel from the burners when the equipment is no longer actively being used.
Step 10 – Cooling Down and Packing Away the Equipment
Patience is required before you can pack up your cooking station. The metal grates and wind baffles retain intense heat long after the flames are gone. Leave the lid open and allow the entire unit to cool down in the open air for at least twenty minutes while you enjoy your meal.
Once the metal is completely cool to the touch, use a damp cloth to wipe away any grease splatters or food debris. Remove the metal regulator pipe and place it back into its storage clip inside the casing. Fold the side wind baffles flat against the grate, lower the main lid, and secure the front latch. Store the unit in a dry place to prevent rust, keeping it ready for your next beautiful morning in the outdoors.
Common Mistakes When Handling Your Equipment
Many beginners make the mistake of leaving the propane cylinder attached to the regulator while traveling or storing the equipment overnight. Leaving the fuel connected puts unnecessary pressure on the delicate internal valves and creates a significant risk of a slow gas leak. Always detach the green cylinder the moment you finish cooking. Another frequent error involves using oversized heavy pots that extend past the metal grates and touch the wind baffles. This traps intense heat underneath the pan, which can warp the metal casing or melt the control knobs.
People often struggle because they turn the gas on full blast before striking their match, creating a dangerous cloud of invisible fuel. The resulting flare-up can easily singe your eyebrows or catch nearby paper towels on fire. You must strike your match or ignite your lighter first, hold it near the burner, and only then slowly open the gas valve. Finally, novice campers sometimes attempt to clean the brass regulator fitting with harsh chemicals or abrasive brushes. Doing this damages the soft metal threads and ruins the rubber O-rings. You should only use a soft, dry cloth to wipe away dust from the connection points.
Expert Tips for Better Camp Cooking
To elevate your outdoor cooking experience, always bring a backup fuel cylinder. Propane tanks have a habit of running empty right in the middle of cooking dinner, and having a spare saves your meal. If you plan to cook in freezing temperatures, keep your propane cylinder inside your vehicle or wrapped in a blanket before use. Cold weather causes the gas pressure to drop, resulting in a very weak flame.
You can also improve your cooking efficiency by placing lids on all your pots and pans. Lids trap the heat, allowing water to boil significantly faster and saving your fuel supply for future meals. Finally, listen to your equipment while you cook. A sputtering, coughing flame usually indicates that your fuel is running low or that a spider web is blocking the internal manifold pipe.
Frequently Asked Questions
Can I use my camping stove inside a tent or RV?
You must never use a portable propane burner inside a tent, car, or enclosed RV. These units consume oxygen and produce deadly carbon monoxide gas, which is completely invisible and odorless. Always operate your cooking equipment outdoors in a well-ventilated area to prevent carbon monoxide poisoning and eliminate the risk of starting a fire inside your shelter.
How long does one small propane cylinder last?
A standard one-pound green propane cylinder typically lasts between one and two hours if you are running both burners on a high setting. If you only use one burner on a medium simmer, a single cylinder can last for several days of basic meal preparation. Packing two cylinders for a weekend trip provides a safe buffer.
Why is my flame orange and leaving black soot on my pots?
An orange, sooty flame indicates incomplete combustion, usually caused by poor airflow or a dirty burner. Dust, food grease, or even tiny insect nests can block the air intake tubes behind the burner rings. You need to turn off the gas, let the unit cool completely, and clean the burner rings with a stiff brush.
Is it safe to leave the equipment out in the rain?
While the metal casing provides some protection, leaving your equipment exposed to heavy rain encourages severe rust and degrades the internal valves. Water can also pool inside the burner rings, making it extremely difficult to light the next day. You should always wipe the unit dry and store it under a tarp or in your vehicle.
Can I connect my portable burner to a large 20-pound propane tank?
Yes, you can easily connect your portable setup to a standard 20-pound barbecue tank. You will need to purchase a specific high-pressure adapter hose designed for this exact purpose. The hose connects the large tank directly to the metal regulator pipe, providing you with days of uninterrupted cooking fuel for longer camping trips.
Conclusion
Cooking outdoors does not have to be an intimidating or stressful part of your camping trip. By taking the time to set up a safe workspace, connecting your fuel carefully, and managing your flame with purpose, you elevate your entire outdoor experience. The freedom to brew fresh coffee at sunrise or simmer a hearty chili under the stars makes all the preparation worthwhile.
Now that you understand the mechanics and safety protocols, you are completely ready to head into the wilderness with confidence. Remember to always disconnect your fuel after cooking and keep your equipment clean to ensure it lasts for years of adventures. Knowing how to use coleman camp stove properly empowers you to leave behind the cold trail mix and enjoy delicious, hot meals no matter where you set up camp. Pack up your ingredients, grab your gear, and get ready to create some amazing culinary memories on your next trip into nature.

About Caleb
Caleb Merritt is a Virginia-based outdoor writer and gear analyst who has spent over a decade sleeping on the ground, crossing mountain passes, and obsessively shaving grams off his pack weight. He holds a Bachelor of Science in Environmental Science from James Madison University, where he also served as president of the university’s outdoor recreation club. After graduating, he spent three years as a wilderness educator with a backcountry youth program in the Shenandoah Valley — teaching Leave No Trace ethics, backcountry navigation, and campcraft — before moving into full-time writing in 2018.
His work focuses on one core belief: the best gear is the gear you understand. Whether he’s doing a side-by-side weight comparison of ultralight shelters or writing a beginner’s guide to building a sub-20-lb base weight kit, Caleb writes with the same directness you’d expect from a trusted trail partner. He has logged more than 4,000 miles across iconic routes including the John Muir Trail, the Wind River Range, Vermont’s Long Trail, and the Collegiate Peaks Loop in Colorado.
Areas of Expertise
- Ultralight backpacking systems and base weight optimization
- Tent, tarp, and shelter testing across three-season and shoulder-season conditions
- Sleeping bag and quilt temperature rating verification
- Backpacking nutrition, meal planning, and calorie-per-ounce analysis
- Leave No Trace principles and wilderness ethics
- Campfire safety, bear country protocols, and water treatment methods
- Gear care, repair, and long-term durability assessment
Education
James Madison University — B.S. in Environmental Science, 2015
During his time at JMU, Caleb served as President of the Outdoor Recreation Club, where he planned and led more than 30 backcountry trips annually across the Blue Ridge Mountains and Appalachian Trail corridor. The role sharpened his ability to assess gear performance under real conditions, manage group safety in remote environments, and develop the kind of practical trail knowledge that no classroom can teach.
Professional Experience
Gear Writer & Senior Contributor — [campeox.com]
Produces in-depth gear reviews, buyer’s guides, and how-to content across backpacking, camping, and ultralight hiking categories. Tests all gear in real field conditions before publishing recommendations.
Wilderness Educator & Trip Leader — Shenandoah Backcountry Youth Program — 2015–2018 Led multi-day backcountry expeditions for teens and young adults throughout Shenandoah National Park and George Washington National Forest. Taught LNT principles, orienteering, first aid awareness, and campcraft fundamentals.
Outdoor Recreation Club President — James Madison University — 2013–2015 Organized and led university-sponsored hiking, backpacking, and camping trips in the Blue Ridge Mountains and Appalachian Trail corridor. Managed club budget, safety protocols, and trip logistics for a membership of 120+ students.
Editorial Standards
Every piece of gear Caleb recommends has been personally tested in the field — not just unboxed and described. His review process includes a minimum of two overnight trips per shelter, a full-season evaluation for sleep systems, and side-by-side comparisons wherever possible. He does not accept payment for positive reviews. Affiliate relationships, where they exist, are always disclosed in accordance with FTC guidelines.
All factual claims about gear specifications, trail distances, and safety recommendations are cross-referenced against manufacturer data sheets and established sources such as the Leave No Trace Center for Outdoor Ethics and the American Hiking Society before publication.