Quick answer: To maintain your Katadyn purification system, disassemble the unit and gently wash the filtration element with clean, warm water. Scrub ceramic parts with a soft pad, or vigorously shake hollow fiber membranes to dislodge trapped sediment. Always let the device air dry completely before packing it away to prevent harmful mold growth.
Clean drinking water keeps you alive and healthy during challenging outdoor excursions. You rely on your filtration equipment to remove harmful bacteria, protozoa, and sediment from questionable water sources. Over time, those microscopic pores fill up with dirt and debris, severely restricting water flow.
Figuring out how to clean katadyn water filter systems correctly ensures you always have safe hydration on the trail. Proper maintenance protects the delicate internal membranes from permanent damage. Neglecting this crucial chore forces you to work twice as hard to pump a single liter of water.
You do not need an advanced degree to keep your gear in peak condition. The process requires only a few basic supplies and a small amount of your time. By establishing a solid maintenance routine, you protect your health and your financial investment simultaneously.
Why Maintaining Your Water Filter Matters for Campers
Regular maintenance directly impacts the performance and longevity of your Katadyn hydration device. A clogged filtration membrane forces the internal pump mechanism to work under extreme pressure. This excessive strain often leads to broken handles, blown seals, or cracked plastic housings right when you need water the most.
Clean equipment filters water significantly faster than dirty equipment. You want to spend your valuable daylight hiking, setting up camp, or relaxing by the fire. You certainly do not want to spend forty-five minutes struggling to filter two liters of cloudy puddle water.
According to [Katadyn Guide, 2024], heavily soiled filtration elements can eventually allow contaminants to bypass the safety barriers. Keeping the pores clear ensures the device performs to its stated specifications. You simply cannot afford to take risks with gastrointestinal illnesses while miles away from professional medical care.
Tools and Materials You’ll Need
Gathering the correct supplies beforehand makes the entire process smooth and efficient. You want to avoid using harsh household chemicals that might degrade the sensitive filtration membranes.
- Clean, warm water (preferably filtered or RO water)
- The manufacturer-provided cleaning pad or a soft sponge
- A clean towel or drying rack
- A clean bowl or basin for soaking parts
- A mild, unscented soap for the exterior plastic casing
- Katadyn Micropur tablets (optional for deep sanitization)
Step-by-Step Guide on how to clean katadyn water filter
Following a systematic approach prevents you from losing small parts or damaging the internal components. Learning how to clean katadyn water filter elements properly requires patience and a gentle touch.
Step 1 – Inspect the Exterior Casing
Examine the outer plastic housing for any visible cracks, deep scratches, or worn gaskets. A damaged casing can introduce dirty water into your clean water supply. Replace any compromised plastic parts before taking the device on another trip.
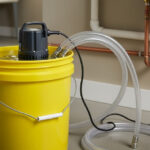
Step 2 – Disassemble the Filtration Unit
Carefully unscrew the top cap and separate the main housing from the pumping mechanism. Keep track of all small O-rings and silicone gaskets during this process. Lay all the individual pieces on a clean towel in a well-lit workspace.
Step 3 – Remove the Filtration Element
Extract the central filtration cartridge from the main plastic body. Handle this component by the solid plastic end caps rather than touching the delicate filtering material. Setting the element down heavily can crack ceramic cores or crush hollow fibers.
Step 4 – Prepare the Cleaning Basin
Fill a clean bowl with warm, purified water to serve as your washing station. You must use clean water to wash the filter to avoid introducing new contaminants into the core. Keep the water temperature below 120 degrees Fahrenheit to prevent warping the plastics.
Step 5 – Soak the Element Safely
Place the dirty filtration cartridge gently into the bowl of warm water. Allow the unit to sit submerged for approximately ten minutes to loosen stubborn mud and algae. This soaking phase makes the subsequent physical scrubbing much more effective.
Step 6 – Agitate the Hollow Fibers
If you own a hollow fiber model like the BeFree, shake the submerged filter vigorously back and forth. The rapid movement of the water dislodges trapped dirt particles from inside the microscopic tubes. Repeat this shaking motion until the water coming out looks completely clear.
Step 7 – Scrub the Ceramic Core
If your model features a ceramic core, take the provided abrasive pad and gently brush the outer surface. Use smooth, even strokes running vertically along the length of the cylinder. Wash away the top layer of discolored ceramic to expose the fresh, white material underneath.
Step 8 – Rinse All Plastic Components
Take the plastic housing, hoses, and pump handle to a sink running with clean tap water. Flush out any residual grit or sand from the threading and the pump shaft. Wash the exterior surfaces with a tiny drop of unscented soap, then rinse them thoroughly.
Step 9 – Sanitize the System
Fill a fresh bowl with clean water and dissolve one Katadyn Micropur tablet into the solution. Submerge the filtration element and pump clean water through the hoses to kill residual bacteria. Let the sanitizing mixture sit inside the system for thirty minutes to ensure complete purification.
Step 10 – Air Dry Completely
Shake off the excess moisture and place all components in a warm, well-ventilated area away from direct sunlight. Leave the system disassembled for at least forty-eight hours to ensure zero moisture remains inside. Storing a damp filtration system guarantees a massive mold outbreak before your next camping trip.
Common Mistakes When Cleaning Your Filter
Many beginners accidentally destroy their expensive equipment by using overly aggressive maintenance techniques. Using high-pressure water jets from a garden hose easily shreds the delicate hollow fiber membranes. You must always rely on gentle swishing or low-pressure rinsing to remove debris safely.
Freezing presents another massive danger to your outdoor hydration equipment. Leaving a damp filter outside in freezing temperatures causes the residual water to expand and shatter the internal matrix. You should always sleep with your filter inside your sleeping bag if nighttime temperatures threaten to drop below freezing.
Using bleach or harsh household detergents permanently ruins the taste of your future drinking water. These aggressive chemicals also degrade the rubber O-rings and silicone gaskets that keep the system watertight. Stick to warm water and specifically designed purification tablets for all sanitizing needs.
Read More: How to Sterilize a Water Bottle
Expert Tips
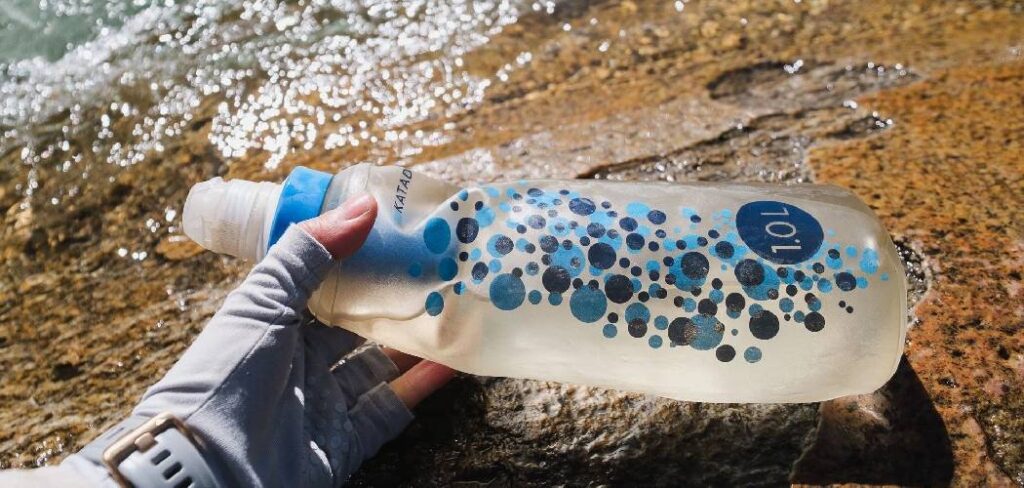
Using a pre-filter significantly reduces the amount of cleaning your main system requires. Tying a clean coffee filter or a dense bandana over the intake hose blocks large debris from entering the pump. This simple trick extends the lifespan of your expensive primary cartridge dramatically.
You should always process the clearest water available to minimize sediment buildup. If you must pull water from a muddy puddle, scoop the water into a bucket first and let the silt settle to the bottom for an hour. Pumping from the clear top layer keeps your internal membranes functioning smoothly for much longer.
Keep a spare set of O-rings and a small tube of silicone lubricant in your maintenance kit. Applying a tiny amount of lubricant to the pump shaft prevents friction wear and keeps the handle plunging easily. Replacing a worn O-ring takes thirty seconds and completely restores a loss of suction pressure.
Frequently Asked Questions
What does it cost to replace the main filtration element?
Replacement cartridges for Katadyn systems generally cost between forty and sixty dollars depending on the specific model. Ceramic filters sit at the higher end of the price spectrum but typically last for many years of heavy use. Hollow fiber replacements cost slightly less but require swapping out more frequently due to natural membrane degradation.
How long does the entire maintenance process take?
The active washing and scrubbing portion of the maintenance routine takes roughly fifteen minutes to complete. The sanitization phase requires an additional thirty minutes of passive soaking time. The final drying phase mandates at least forty-eight hours of resting in a warm room before you can safely pack the gear away.
What are the risks of using untreated tap water for washing?
Untreated tap water contains dissolved minerals like calcium and magnesium that leave hard scale deposits behind. This mineral scale coats the microscopic pores of the filter and drastically reduces your flow rate over time. Using reverse osmosis or distilled water eliminates this scaling issue entirely.
What alternatives exist if I lose the proprietary cleaning pad?
You can safely use a standard non-scratch kitchen sponge to brush the surface of a ceramic core. Avoid using heavy steel wool or highly abrasive scouring pads that will strip away too much material at once. A clean piece of synthetic mesh from a tent door also provides enough gentle friction to remove surface dirt effectively.
Who should use the Micropur purification tablets during maintenance?
Anyone planning to store their filtration equipment for longer than three weeks should utilize purification tablets. The sanitizing agents kill microscopic mold spores and dormant bacteria hiding deep inside the plastic housing. Frequent weekend campers can skip this step, but seasonal backpackers must sanitize their gear before winter storage.
Conclusion
Taking care of your outdoor gear guarantees that it will take care of you when you venture into the wilderness. Learning how to clean katadyn water filter systems properly saves you money, time, and frustrating field failures.
By following these established maintenance protocols, you ensure your equipment delivers crystal clear hydration for years to come. Remember to dry your components completely, lubricate your seals, and always seek out the clearest water sources available. Grab your gear, set up your cleaning station, and get your equipment ready for your next big adventure.
About Caleb
Caleb Merritt is a Virginia-based outdoor writer and gear analyst who has spent over a decade sleeping on the ground, crossing mountain passes, and obsessively shaving grams off his pack weight. He holds a Bachelor of Science in Environmental Science from James Madison University, where he also served as president of the university’s outdoor recreation club. After graduating, he spent three years as a wilderness educator with a backcountry youth program in the Shenandoah Valley — teaching Leave No Trace ethics, backcountry navigation, and campcraft — before moving into full-time writing in 2018.
His work focuses on one core belief: the best gear is the gear you understand. Whether he’s doing a side-by-side weight comparison of ultralight shelters or writing a beginner’s guide to building a sub-20-lb base weight kit, Caleb writes with the same directness you’d expect from a trusted trail partner. He has logged more than 4,000 miles across iconic routes including the John Muir Trail, the Wind River Range, Vermont’s Long Trail, and the Collegiate Peaks Loop in Colorado.
Areas of Expertise
- Ultralight backpacking systems and base weight optimization
- Tent, tarp, and shelter testing across three-season and shoulder-season conditions
- Sleeping bag and quilt temperature rating verification
- Backpacking nutrition, meal planning, and calorie-per-ounce analysis
- Leave No Trace principles and wilderness ethics
- Campfire safety, bear country protocols, and water treatment methods
- Gear care, repair, and long-term durability assessment
Education
James Madison University — B.S. in Environmental Science, 2015
During his time at JMU, Caleb served as President of the Outdoor Recreation Club, where he planned and led more than 30 backcountry trips annually across the Blue Ridge Mountains and Appalachian Trail corridor. The role sharpened his ability to assess gear performance under real conditions, manage group safety in remote environments, and develop the kind of practical trail knowledge that no classroom can teach.
Professional Experience
Gear Writer & Senior Contributor — [Your Website Name]
Produces in-depth gear reviews, buyer’s guides, and how-to content across backpacking, camping, and ultralight hiking categories. Tests all gear in real field conditions before publishing recommendations.
Wilderness Educator & Trip Leader — Shenandoah Backcountry Youth Program — 2015–2018 Led multi-day backcountry expeditions for teens and young adults throughout Shenandoah National Park and George Washington National Forest. Taught LNT principles, orienteering, first aid awareness, and campcraft fundamentals.
Outdoor Recreation Club President — James Madison University — 2013–2015 Organized and led university-sponsored hiking, backpacking, and camping trips in the Blue Ridge Mountains and Appalachian Trail corridor. Managed club budget, safety protocols, and trip logistics for a membership of 120+ students.
Editorial Standards
Every piece of gear Caleb recommends has been personally tested in the field — not just unboxed and described. His review process includes a minimum of two overnight trips per shelter, a full-season evaluation for sleep systems, and side-by-side comparisons wherever possible. He does not accept payment for positive reviews. Affiliate relationships, where they exist, are always disclosed in accordance with FTC guidelines.
All factual claims about gear specifications, trail distances, and safety recommendations are cross-referenced against manufacturer data sheets and established sources such as the Leave No Trace Center for Outdoor Ethics and the American Hiking Society before publication.