Nothing ruins a great pair of shoes faster than a lingering, unpleasant odor coming from the inside. Your footbeds absorb sweat, trap dirt, and become a breeding ground for bacteria over time. Ignoring this hidden part of your footwear can lead to discomfort and bad smells. Fortunately, knowing exactly how to clean shoe insoles can completely revive your favorite sneakers, hiking boots, or daily walkers.
You do not need expensive products or specialized equipment to get the job done right. With a few simple household items, you can restore freshness and extend the lifespan of your footwear. We created this expert guide specifically for beginners. By the end of this article, you will understand the best techniques to scrub away grime, eliminate stubborn odors, and keep your feet feeling fresh every single day.
Why Learning to Clean Insoles is Essential for Hikers
Spending hours on the trail puts intense stress on your footwear. Campers and outdoor beginners often focus on brushing mud off the outside of their boots while completely neglecting the inside. As you hike, your feet sweat profusely, pushing moisture and salt directly into the footbed. This trapped moisture breeds bacteria, which creates that familiar, foul camp odor in your tent.
Mastering this simple maintenance skill directly impacts your comfort on long treks. Clean footbeds maintain their supportive structure much longer than degraded, sweat-soaked ones. Regular washing prevents the foam or cork materials from breaking down prematurely, ensuring you keep that essential arch support. Furthermore, eliminating bacteria drastically reduces your chances of developing blisters or fungal infections in the wilderness. Taking care of the inside of your boots guarantees a safer, more pleasant outdoor experience.
Tools and Materials
Gathering the right supplies makes the washing process incredibly simple and efficient. You probably already have most of these basic items sitting around your house. Avoid using harsh chemical cleaners, as these can easily damage delicate foam, gel, or leather materials.
- A soft-bristled brush (an old toothbrush works perfectly)
- Mild liquid dish soap or gentle laundry detergent
- A small bowl for mixing your cleaning solution
- Warm water (never hot, as high heat warps materials)
- Baking soda for tough stains and deep odor removal
- White vinegar or rubbing alcohol for disinfecting
- Two clean, dry microfiber cloths or small towels
- A spray bottle (optional, but highly recommended for easy application)
10 Step-by-Step Guide on How to Clean Shoe Insoles
Step 1 – Remove the Footbeds from Your Footwear
Always start by taking the inserts completely out of your boots or sneakers. Attempting to wash them while they remain inside the shoe is a guaranteed way to trap moisture and cause mold. Gently grip the heel portion of the insert and slowly pull upward and backward.
Take your time with this step so you do not tear the foam or separate the top fabric layer. If the inserts feel stuck, they might be glued down. In that case, you will need to gently wipe them down in place, but most modern footwear features removable footbeds. Place both inserts flat on a clean, well-lit workspace so you can easily spot all the heavily soiled areas.
Step 2 – Brush Away Loose Dirt and Debris
Before you introduce any water, you must remove all the dry dirt, lint, and dried mud. If you skip this crucial step, adding water will simply turn that loose dirt into a thick layer of mud, making your job significantly harder. Grab your soft-bristled brush or a dry cloth to get started.
Use quick, firm strokes to sweep debris off the top fabric layer. Pay special attention to the toe area and the heel cup, as dust tends to collect heavily in these deep pockets. Flip the inserts over and brush the bottom side as well to knock loose any grit trapped in the foam texture. A thorough dry brushing makes the wet washing phase much more effective.
Step 3 – Prepare a Mild Soapy Cleaning Solution
Creating the right washing mixture prevents accidental damage to your footwear materials. Fill a small bowl with about two cups of warm water. Never use boiling hot water, because extreme temperatures can quickly melt the adhesives holding the different layers of the footbed together.
Add just a few drops of mild liquid dish soap or gentle laundry detergent to the warm water. Stir the mixture gently with your brush or a spoon until light suds begin to form on the surface. You want a mild, soapy solution that cuts through grease and sweat without leaving a thick, sticky residue behind. This gentle mixture acts as the perfect foundation for breaking down daily grime.
Step 4 – Scrub the Surface with a Soft Brush
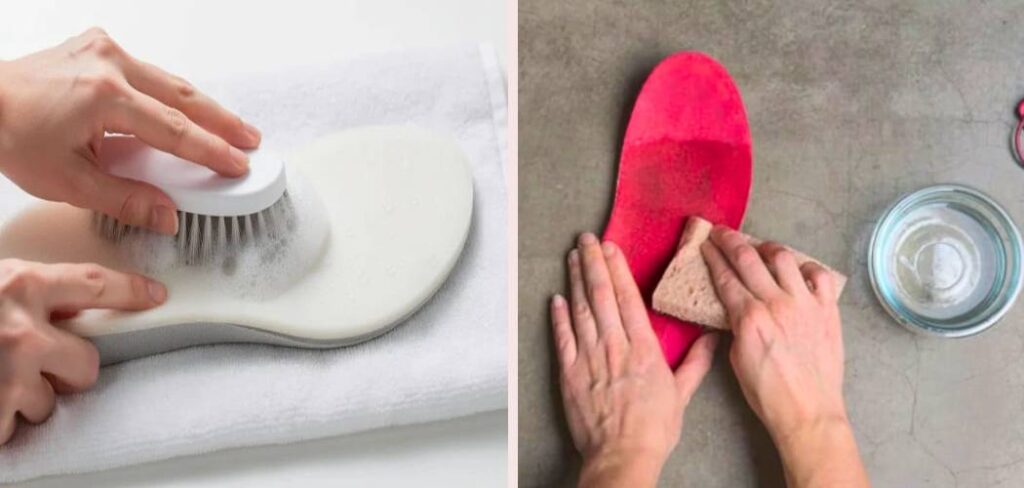
Dip your soft-bristled brush lightly into the soapy water. You want the bristles damp, but not dripping wet, to avoid completely saturating the foam core. Start scrubbing the top fabric layer using small, circular motions.
Work your way methodically from the heel down to the toes, applying slightly more pressure on darkened, heavily soiled spots. The circular motion helps lift dirt trapped deep within the fabric fibers. Ensure you cover the entire surface evenly to prevent water rings from forming as the material dries. If the brush becomes too dirty during the process, rinse it out in clean water before dipping it back into your soapy solution.
Step 5 – Target Stubborn Stains with Baking Soda
Sometimes dish soap alone cannot break down heavy sweat stains or dark pressure marks. When you encounter these stubborn spots, baking soda becomes your best tool. Sprinkle a small pinch of dry baking soda directly onto the stained area while the fabric is still slightly damp from the soapy wash.
Gently massage the baking soda into the stain using your damp brush. The mild abrasive nature of the powder helps lift the discoloration without tearing the delicate top layer. Allow the baking soda paste to sit on the stain for about five to ten minutes. This short resting period gives the powder enough time to absorb both the deep-set grime and any lingering foul odors.
Step 6 – Wipe Away the Soap and Grime
Once you finish scrubbing, you need to remove all the soapy residue and lifted dirt. Leaving soap in the fabric can cause the material to become stiff, slippery, and uncomfortable once it dries. Grab your first clean microfiber cloth and dampen it slightly with fresh, warm water.
Wring the cloth out tightly so it is barely moist. Firmly wipe down the entire surface of the insert, starting from the heel and moving toward the toes. You might need to rinse your cloth a few times during this process to ensure you are actually removing the soap rather than just smearing it around. Continue wiping until the surface feels clean and completely free of any slippery detergent residue.
Step 7 – Disinfect the Footbed to Kill Odors
Even after removing visible dirt, microscopic bacteria often remain trapped in the porous foam materials. These unseen bacteria are the primary cause of returning foot odor. To tackle this, lightly mist the surface with a mixture of equal parts white vinegar and water using a spray bottle.
If you do not have a spray bottle, dampen a corner of your cloth with rubbing alcohol and gently dab it across the entire insert. Both vinegar and rubbing alcohol act as powerful natural disinfectants that destroy odor-causing bacteria on contact. Do not worry about the strong initial smell of the vinegar or alcohol. The strong scent will completely evaporate as the materials dry, leaving behind a neutral, fresh scent.
Step 8 – Press Out Excess Moisture with a Towel
Removing as much water as possible drastically speeds up the drying process and prevents mold growth. Take your second clean, dry towel and lay it flat on a table. Place the freshly washed insert directly in the center of the towel.
Fold the towel over the insert and press down firmly with both hands. Do not twist or wring the insert, as this bending action can permanently warp the shape or tear the foam. Use your body weight to press the towel deeply into the material, allowing the thick fabric to absorb the excess moisture. Repeat this pressing motion a few times until the insert feels only slightly damp to the touch.
Step 9 – Air Dry Completely Away from Direct Heat
Patience is highly required for this crucial drying stage. Place the damp inserts on a dry towel or a drying rack in a well-ventilated room. You must allow them to air dry naturally at room temperature to maintain their structural integrity and shape.
Never place them near a radiator, under a hair dryer, or inside a clothing dryer. Artificial heat easily melts the glues holding the materials together and causes foam to shrink permanently. Leaving them near an open window or setting up a small room fan nearby safely speeds up the evaporation process. Plan to leave them out for at least twelve to twenty-four hours to ensure the dense core is completely moisture-free.
Step 10 – Reinsert the Fresh Footbeds
Before putting your footwear back together, run your hand firmly along the top and bottom of the inserts to confirm they are absolutely dry. Even a tiny amount of leftover moisture can cause mildew once enclosed inside a dark shoe.
Once fully dry, gently slide the inserts back into your footwear. Push the toe section all the way forward first, ensuring it lies completely flat without curling up. Press down firmly on the heel cup to lock the insert into its proper place. Slide your foot inside to verify that everything feels smooth, properly aligned, and comfortably supportive. Enjoy that fresh, like-new feeling as you take your next steps.
Common Mistakes
One of the most frequent errors beginners make is tossing their inserts directly into the washing machine. The aggressive spinning and soaking actions of a standard washing machine will quickly delaminate the fabric top from the foam base. Machine washing permanently destroys the arch support and shape, forcing you to buy costly replacements. Always take the extra few minutes to wash these delicate components carefully by hand.
Another major mistake involves soaking the materials in heavy buckets of water. Submerging porous foam causes it to act like a sponge, drawing water deep into the core where it takes days to dry. Prolonged dampness almost always leads to irreversible mold growth and a terrible, musty smell. You should only ever dampen the surface layer during the cleaning process.
Finally, many people rush the drying phase by placing their wet gear near campfires, space heaters, or hot sunny windows. Extreme heat warps synthetic foams and cracks natural cork bases. Shrinking the material leaves you with an uncomfortable, ill-fitting insert that ruins the fit of your shoe. Always trust the natural air-drying process, no matter how long it takes, to protect your investment.
Expert Tips
To maintain ultimate freshness between deep washes, make it a habit to sprinkle dry baking soda inside your boots after a long day. Let the powder sit overnight to absorb daily sweat, and simply shake it out before wearing them again. This small routine drastically reduces how often you need to perform a full wet wash.
When traveling or camping, pull your inserts slightly out of your boots every single night. Exposing them to fresh air allows trapped daily moisture to evaporate naturally while you sleep. Additionally, consider buying a secondary pair of inserts so you can rotate them every other day. Giving materials a full twenty-four hours to recover their shape and dry completely doubles their lifespan and keeps your feet much happier.
Frequently Asked Questions
Can I put my inserts in the clothes dryer?
No, you should never put them in a clothes dryer. The intense heat tumbling inside the machine will melt the glues that hold the fabric and foam layers together. Furthermore, the heat warps the structural shape, ruining the arch support completely. Always let them air dry naturally at room temperature in a well-ventilated space.
How often should I wash the inside of my shoes?
You should aim to wash them thoroughly every two to three months with regular wear. However, if you use the footwear for intense sports, hiking, or heavy physical labor, you might need to wash them every four weeks. Regular maintenance prevents heavy bacteria buildup and extends the life of the supportive foam.
What should I do if the odor will not go away?
If a strong smell persists after a basic wash, the bacteria are likely deep within the foam. Create a paste using baking soda and a few drops of water, spread it over the surface, and let it sit overnight. The following morning, wipe the dried paste away and spray the area generously with white vinegar.
Can I clean leather footbeds the same way?
Leather requires a slightly different, much gentler approach. You should never use heavy amounts of water or regular dish soap on genuine leather, as it will dry out and crack. Instead, wipe them gently with a damp cloth and apply a specialized leather cleaner or conditioner to maintain the natural oils.
Why do my inserts squeak after washing them?
Squeaking usually happens when moisture or trapped air creates friction between the bottom of the insert and the inside of the shoe. First, ensure the materials are completely dry. If the squeaking continues, sprinkle a tiny amount of baby powder or talcum powder under the insert to reduce the friction and eliminate the annoying noise.
Conclusion
Taking proper care of your footwear goes far beyond wiping mud off the exterior. The inside environment dictates your daily comfort, foot health, and the longevity of your favorite boots or sneakers. By mastering how to clean shoe insoles, you take control over lingering odors and prevent harmful bacteria from ruining your gear. The process requires minimal effort, utilizing standard household items you already own to achieve excellent results.
Remember to take your time during the hand-washing phase and entirely avoid harsh washing machines or intense artificial heat. Treat the materials gently, press out the moisture firmly, and practice patience while they air dry naturally. Implementing this simple maintenance routine will save you money on replacements and keep your gear perfectly supportive. Grab your soft brush, mix up some warm soapy water, and give your hardest-working footwear the refreshing deep clean it truly deserves today.

About Caleb
Caleb Merritt is a Virginia-based outdoor writer and gear analyst who has spent over a decade sleeping on the ground, crossing mountain passes, and obsessively shaving grams off his pack weight. He holds a Bachelor of Science in Environmental Science from James Madison University, where he also served as president of the university’s outdoor recreation club. After graduating, he spent three years as a wilderness educator with a backcountry youth program in the Shenandoah Valley — teaching Leave No Trace ethics, backcountry navigation, and campcraft — before moving into full-time writing in 2018.
His work focuses on one core belief: the best gear is the gear you understand. Whether he’s doing a side-by-side weight comparison of ultralight shelters or writing a beginner’s guide to building a sub-20-lb base weight kit, Caleb writes with the same directness you’d expect from a trusted trail partner. He has logged more than 4,000 miles across iconic routes including the John Muir Trail, the Wind River Range, Vermont’s Long Trail, and the Collegiate Peaks Loop in Colorado.
Areas of Expertise
- Ultralight backpacking systems and base weight optimization
- Tent, tarp, and shelter testing across three-season and shoulder-season conditions
- Sleeping bag and quilt temperature rating verification
- Backpacking nutrition, meal planning, and calorie-per-ounce analysis
- Leave No Trace principles and wilderness ethics
- Campfire safety, bear country protocols, and water treatment methods
- Gear care, repair, and long-term durability assessment
Education
James Madison University — B.S. in Environmental Science, 2015
During his time at JMU, Caleb served as President of the Outdoor Recreation Club, where he planned and led more than 30 backcountry trips annually across the Blue Ridge Mountains and Appalachian Trail corridor. The role sharpened his ability to assess gear performance under real conditions, manage group safety in remote environments, and develop the kind of practical trail knowledge that no classroom can teach.
Professional Experience
Gear Writer & Senior Contributor — [campeox.com]
Produces in-depth gear reviews, buyer’s guides, and how-to content across backpacking, camping, and ultralight hiking categories. Tests all gear in real field conditions before publishing recommendations.
Wilderness Educator & Trip Leader — Shenandoah Backcountry Youth Program — 2015–2018 Led multi-day backcountry expeditions for teens and young adults throughout Shenandoah National Park and George Washington National Forest. Taught LNT principles, orienteering, first aid awareness, and campcraft fundamentals.
Outdoor Recreation Club President — James Madison University — 2013–2015 Organized and led university-sponsored hiking, backpacking, and camping trips in the Blue Ridge Mountains and Appalachian Trail corridor. Managed club budget, safety protocols, and trip logistics for a membership of 120+ students.
Editorial Standards
Every piece of gear Caleb recommends has been personally tested in the field — not just unboxed and described. His review process includes a minimum of two overnight trips per shelter, a full-season evaluation for sleep systems, and side-by-side comparisons wherever possible. He does not accept payment for positive reviews. Affiliate relationships, where they exist, are always disclosed in accordance with FTC guidelines.
All factual claims about gear specifications, trail distances, and safety recommendations are cross-referenced against manufacturer data sheets and established sources such as the Leave No Trace Center for Outdoor Ethics and the American Hiking Society before publication.