Grab a seat by the fire, friend. If you spend enough time working with your hands in the great outdoors, your gear is bound to take a beating. Dirt, sweat, and grime build up over time, turning your favorite hand protection into a stiff, uncomfortable mess. You might think tossing them in the laundry is a quick fix, but that is a sure-fire way to ruin good gear.
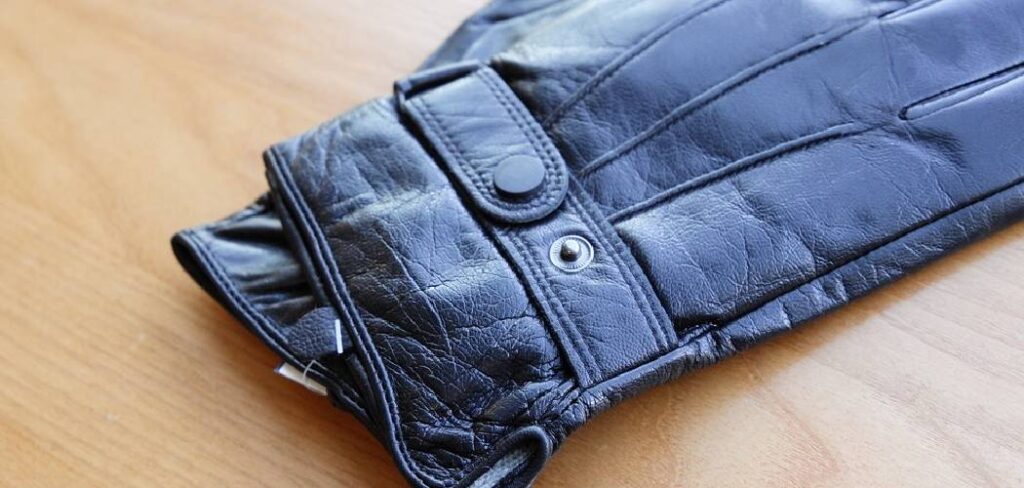
Learning how to wash leather gloves properly is an essential skill for any outdoorsman or hard worker. This guide will walk you through the exact process to bring your trusted gear back to life. You will walk away knowing exactly how to clean, dry, and condition your gear so it stays soft, durable, and ready for your next adventure.
Why Learning How to Clean Leather Gloves Matters
Leather is a natural material that behaves a lot like your own skin. When it gets covered in mud and sweat, its natural oils are stripped away. This leaves the material dry, brittle, and prone to cracking under pressure.
Taking the time to clean your gear does more than just make it look nice. It removes the abrasive dirt particles that grind away at the stitching and fibers every time you close your fist.
Proper maintenance also restores flexibility. A stiff piece of leather restricts your movement and causes hand fatigue when you are chopping wood or handling tools. Regular cleaning ensures you maintain a solid grip and full dexterity out in the field.
Ultimately, good gear is an investment. Taking care of your equipment means it will take care of you when the weather turns harsh. A well-maintained pair can easily outlast five pairs of cheap, neglected alternatives.
Tools and Materials You’ll Need
Before we get our hands dirty, we need to gather the right supplies. Using harsh household chemicals will do more harm than good, so stick to this list:
- A soft-bristled horsehair brush or a dry microfiber cloth
- Saddle soap or a mild, unscented baby shampoo
- Two clean, soft cotton rags or microfiber towels
- A small bowl of lukewarm water
- High-quality leather conditioner or leather wax
Step-by-Step Guide on Cleaning Your Gear
Step 1 – Brush Away Loose Dirt
You want to start by removing any loose debris from the surface. Grab your soft-bristled brush or a dry rag and give the exterior a thorough wipe down. This prevents you from grinding dirt deeper into the pores once you introduce moisture.
Pay special attention to the seams and the areas between the fingers. Dirt loves to hide in these tight creases. If you have caked-on mud, let it dry completely before you try to brush it off. Trying to wipe wet mud will only smear it around and stain the material.
Understanding how to wash leather gloves starts with this critical dry-cleaning phase. It sets the stage for a much smoother and more effective deep clean. Take your time and be thorough with the brush.
Step 2 – Prepare a Gentle Cleaning Solution
Now it is time to get your cleaning agent ready. If you are using saddle soap, slightly dampen one of your clean rags and swirl it around in the tin until you build up a light foam. You do not need a lot of water here. Leather and excessive water are natural enemies.
If you are using mild baby shampoo, mix a few drops into your bowl of lukewarm water. Stir it up until you see some suds forming on the surface. You only want to use the suds, not the water itself, to do the cleaning.
Never use dish soap, laundry detergent, or harsh chemical cleaners. These products are formulated to strip away tough grease, which means they will completely strip away the natural, necessary oils in your gear.
Step 3 – Gently Lather the Exterior
Put one glove on your non-dominant hand. This helps the material hold its natural shape while you work. Take your sudsy rag and begin rubbing the surface using small, circular motions.
Work your way from the fingertips down to the wrist. Apply a bit of extra attention to the palms and the gripping surfaces, as these areas usually hold the most sweat and grime.
Do not scrub aggressively. Let the soap do the heavy lifting. If the rag gets too dirty, switch to a clean section of the cloth, apply a bit more lather, and keep moving. You want the surface to be slightly damp with soap, but never soaking wet.
Step 4 – Wipe Away the Soap
Once you have lifted the dirt with your soapy lather, you need to remove the residue. Take your second clean cloth and lightly dampen it with fresh, lukewarm water. Wring it out as hard as you can until it is barely moist.
Wipe down the entire exterior to remove the soap and suspended dirt. Make sure you get into the seams and between the fingers again. Leaving soap residue behind can clog the pores of the material and prevent it from breathing properly.
If the item was heavily soiled, you might need to rinse your damp cloth, wring it out, and wipe the surface a second time. Just remember to keep moisture to an absolute minimum during this process.
Step 5 – Air Dry the Gloves Naturally
Drying is where many folks ruin their gear. Lay your freshly wiped items flat on a dry towel in a well-ventilated room. Make sure they are resting in their natural, open shape so they do not dry with deep wrinkles or creases.
Keep them far away from direct sunlight, radiators, campfires, or any artificial heat sources. Intense heat causes the material to shrink, warp, and dry out far too quickly, leading to permanent cracking.
Patience is key here. Depending on the humidity in your area, the drying process can take anywhere from several hours to a full day. Let nature take its course.
Step 6 – Massage the Leather While Drying
As the material dries, it has a tendency to stiffen up. You need to intervene a few times during the drying process to keep the fibers relaxed.
Check on your gear every couple of hours. When they feel slightly damp but no longer wet, put them on your hands. Make a few tight fists, flex your fingers, and mimic the motions of gripping a tool.
This gentle stretching trains the material to remember the shape of your hand. It prevents that dreaded cardboard-stiff feeling that usually follows a good cleaning. After a minute of flexing, take them off and lay them back down to finish drying.
Step 7 – Apply a Quality Leather Conditioner
The final step in how to wash leather gloves involves putting the moisture back in. Cleaning removes dirt, but it also removes natural oils. Once the material is bone dry, it is time to condition.
Apply a small, dime-sized amount of leather conditioner or wax to a clean cloth. Rub it evenly over the entire surface, paying close attention to the seams and high-wear areas like the palms.
Let the conditioner soak in for about fifteen minutes. If the material looks greasy after that time, take a dry cloth and buff away the excess. Your gear should now feel soft, supple, and ready for whatever the wild throws at you.
Critical Mistakes When Cleaning
Even well-meaning folks make mistakes that destroy their gear. Avoid these common blunders:
- Soaking them in a bucket of water. This causes irreversible shrinking and damage to the internal structure.
- Drying them on a heater or near a fire. Heat bakes the natural oils right out of the material.
- Using household cleaning sprays. Window cleaners and surface sprays contain alcohol, which dries out and destroys natural hides.
- Storing them while they are still damp. This invites mold and mildew to grow in the lining, which ruins the item permanently.
Expert Tips
If you want to keep your gear in top-notch shape for years, keep these trail-tested tips in mind:
- Spot clean minor stains immediately. A quick wipe down after a muddy hike saves you from doing a deep clean later.
- Condition your gear at least twice a year, even if you have not washed it recently. Before winter sets in and right after spring are the perfect times.
- Keep a dedicated horsehair brush in your gear bag. A quick brush after a day’s work prevents dirt from settling into the seams.
- If your gear gets soaked in the rain, stuff the insides with newspaper to help absorb the moisture from the lining while they air dry.
Frequently Asked Questions
Can I put my leather gloves in the washing machine?
You should never put this type of gear in a washing machine. The total submersion in water combined with the aggressive agitation will completely ruin the structural integrity of the natural hide. The harsh laundry detergents will strip away all the natural oils, leaving the material shriveled, brittle, and prone to cracking the moment you try to put them back on. Always stick to the gentle hand-cleaning method to preserve your investment.
How often should I clean my leather work gloves?
The frequency of cleaning depends entirely on how often you use them and the conditions you work in. If you wear them daily for heavy outdoor labor, giving them a thorough cleaning every three to four months is a solid schedule. For lighter, occasional use, a deep clean once a year is usually sufficient. You should, however, brush off loose dirt and dust after every heavy use to prevent long-term buildup.
What is the best soap to use on leather?
The best cleaning agents are those specifically formulated for natural hides, such as traditional saddle soap. Saddle soap contains mild cleaning agents mixed with lanolin and beeswax, which help protect the material as you clean it. If you do not have saddle soap handy, a very mild, unscented baby shampoo diluted in water is a safe alternative. You just want to ensure whatever soap you use is pH-balanced and free of harsh degreasers.
How do I clean the inside lining of my leather gloves?
Cleaning the inside lining requires a very careful approach so you do not soak the exterior hide from the inside out. Mix a solution of equal parts water and white vinegar in a spray bottle and lightly mist the inside. The vinegar helps kill off odor-causing bacteria without requiring a heavy rinse. After misting, stuff the fingers with dry newspaper and let them air dry completely in a well-ventilated area.
Can I use a hair dryer to speed up the drying process?
Using a hair dryer is a terrible idea and will cause permanent damage to your gear. The concentrated heat from a hair dryer acts just like a campfire or a radiator, baking the material and forcing it to shrink rapidly. This sudden loss of moisture causes the fibers to pull apart and crack. Always practice patience and let your gear air dry naturally at room temperature, no matter how much of a hurry you are in.
Read More: How to Wash a Heated Jacket
Conclusion
Taking care of your equipment is a point of pride for anyone who works hard or plays hard outdoors. Knowing exactly how to wash leather gloves ensures that your most trusted gear remains reliable season after season. It might take a little extra time out of your weekend to brush, lather, and condition them, but the payoff is immense. Your hands will stay protected, your grip will remain secure, and you will not have to waste money replacing ruined gear every year. If you found this guide helpful, share it with a fellow outdoorsman so they can keep their gear in top shape too.
About Caleb
Caleb Merritt is a Virginia-based outdoor writer and gear analyst who has spent over a decade sleeping on the ground, crossing mountain passes, and obsessively shaving grams off his pack weight. He holds a Bachelor of Science in Environmental Science from James Madison University, where he also served as president of the university’s outdoor recreation club. After graduating, he spent three years as a wilderness educator with a backcountry youth program in the Shenandoah Valley — teaching Leave No Trace ethics, backcountry navigation, and campcraft — before moving into full-time writing in 2018.
His work focuses on one core belief: the best gear is the gear you understand. Whether he’s doing a side-by-side weight comparison of ultralight shelters or writing a beginner’s guide to building a sub-20-lb base weight kit, Caleb writes with the same directness you’d expect from a trusted trail partner. He has logged more than 4,000 miles across iconic routes including the John Muir Trail, the Wind River Range, Vermont’s Long Trail, and the Collegiate Peaks Loop in Colorado.
Areas of Expertise
- Ultralight backpacking systems and base weight optimization
- Tent, tarp, and shelter testing across three-season and shoulder-season conditions
- Sleeping bag and quilt temperature rating verification
- Backpacking nutrition, meal planning, and calorie-per-ounce analysis
- Leave No Trace principles and wilderness ethics
- Campfire safety, bear country protocols, and water treatment methods
- Gear care, repair, and long-term durability assessment
Education
James Madison University — B.S. in Environmental Science, 2015
During his time at JMU, Caleb served as President of the Outdoor Recreation Club, where he planned and led more than 30 backcountry trips annually across the Blue Ridge Mountains and Appalachian Trail corridor. The role sharpened his ability to assess gear performance under real conditions, manage group safety in remote environments, and develop the kind of practical trail knowledge that no classroom can teach.
Professional Experience
Gear Writer & Senior Contributor — [Your Website Name]
Produces in-depth gear reviews, buyer’s guides, and how-to content across backpacking, camping, and ultralight hiking categories. Tests all gear in real field conditions before publishing recommendations.
Wilderness Educator & Trip Leader — Shenandoah Backcountry Youth Program — 2015–2018 Led multi-day backcountry expeditions for teens and young adults throughout Shenandoah National Park and George Washington National Forest. Taught LNT principles, orienteering, first aid awareness, and campcraft fundamentals.
Outdoor Recreation Club President — James Madison University — 2013–2015 Organized and led university-sponsored hiking, backpacking, and camping trips in the Blue Ridge Mountains and Appalachian Trail corridor. Managed club budget, safety protocols, and trip logistics for a membership of 120+ students.
Editorial Standards
Every piece of gear Caleb recommends has been personally tested in the field — not just unboxed and described. His review process includes a minimum of two overnight trips per shelter, a full-season evaluation for sleep systems, and side-by-side comparisons wherever possible. He does not accept payment for positive reviews. Affiliate relationships, where they exist, are always disclosed in accordance with FTC guidelines.
All factual claims about gear specifications, trail distances, and safety recommendations are cross-referenced against manufacturer data sheets and established sources such as the Leave No Trace Center for Outdoor Ethics and the American Hiking Society before publication.