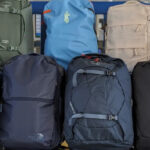
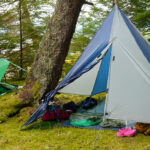
Picture this: you finally arrive at your campsite, set up your gear, and crawl inside your cozy shelter, only to realize your door will not close. A broken slider or misaligned tracks can quickly turn a fun night under the stars into a stressful, buggy ordeal. But you do not need to throw away your favorite shelter just yet.
Learning how to repair a tent zipper is easier than you might think, even if you have zero prior experience. In this guide, we break down the exact tools and techniques you need to fix those pesky tracks. By following these simple steps, you can save money, extend the life of your gear, and ensure your next outdoor adventure remains completely snag-free. Let’s get that closure sliding smoothly again.
Why You Need to Master Basic Gear Maintenance
Understanding the basics of gear maintenance can make or break your wilderness experience. Fasteners face constant exposure to dirt, mud, rain, and aggressive tugging, making them the most common point of failure on outdoor equipment. When you master basic repairs, you gain peace of mind knowing you can handle sudden equipment malfunctions miles away from civilization. Plus, repairing your gear is a fantastic way to practice sustainability.
Instead of sending a perfectly good shelter to the landfill over a small mechanical issue, a simple hardware replacement breathes new life into your investment. Taking a few minutes to clean tracks, apply lubrication, and gently realign bent metal saves you hundreds of dollars in replacement costs while building your confidence as an independent outdoor explorer.
8 Step-by-Step Guide on How to Repair a Tent Zipper
Step 1: Identify the Specific Problem
Before making any adjustments, carefully inspect the tracks and slider to pinpoint the exact issue. Sometimes the teeth simply separate after closing, which usually indicates a worn-out slider rather than a broken track. Look closely for missing teeth, bent metal coils, or accumulated dirt blocking the path. If you notice missing teeth in the middle of the track, you might need a more complex sewing fix. However, if the slider simply fails to interlock the coils properly, a basic replacement will solve the problem. Taking a moment to diagnose the malfunction prevents you from doing unnecessary work.
Step 2: Clean the Tracks Thoroughly Before You Begin
Dirt and grit act like sandpaper against delicate metal and plastic components, causing rapid wear and tear. Grab a small brush, such as an old toothbrush, and vigorously scrub the entire length of the tracks. You can dip the brush in warm, soapy water to help dissolve stubborn mud or sticky tree sap. Wipe the area completely dry with a clean microfiber cloth once the debris is gone. Sometimes, a thorough cleaning magically restores full function without requiring any new parts. Clean tracks also ensure that your newly installed replacement parts glide effortlessly without catching on hidden grit.
Step 3: Gather the Right Tools for How to Repair a Tent Zipper
To execute this repair effectively, you must assemble a few basic items. You need a pair of needle-nose pliers, some replacement end stops, a new slider that matches your specific size and gauge, and wire cutters. Look at the back of your current slider to find a stamped number, which tells you the exact replacement size you need to purchase. Having everything within arm’s reach prevents frustration once you start working on the fabric. A well-prepared workspace keeps tiny metal pieces from getting lost in the grass or falling off your workbench during the process.
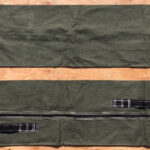
Step 4: Remove the Faulty or Broken Slider
Grab your side cutters or needle-nose pliers to carefully pry off the top stopper located at the very end of the track. You must exercise patience here so you do not accidentally rip the delicate nylon fabric surrounding the track. Once you successfully remove the tiny metal stopper, push the old, worn-out slider all the way to the top and pull it completely off the track. Discard this broken piece so it does not get mixed up with your new hardware. Clearing the track gives you a fresh start for installing the new interlocking mechanism securely.
Step 5: Master How to Repair a Tent Zipper by Attaching the New Slider
Take your brand-new slider and gently thread it onto the top of the track where you just removed the stopper. Ensure the rounded nose of the slider faces the direction of the closure. You might need to wiggle the fabric slightly to encourage the teeth to feed evenly into both sides of the slider channel. Keep the tension even on both sides of the fabric to prevent a misaligned start, which inevitably leads to immediate snagging. Going slowly during this stage ensures the interlocking coils catch perfectly inside the new mechanism.
Step 6: Crimp the Metal Stopper for a Secure Fit
With the new slider successfully resting on the tracks, you need to replace the metal stopper you removed earlier. Take a fresh top stop, place it exactly where the old one sat, and use your needle-nose pliers to squeeze it tightly into place. This vital barrier prevents your brand-new slider from flying off the end of the track the next time you hastily open the door. Press firmly but avoid crushing the metal completely flat. A properly secured stopper guarantees your interlocking mechanism stays firmly on the designated path during high winds.
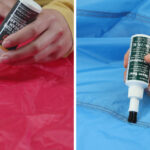
Step 7: Test the Glide and Lubricate the Tracks
Pull the slider up and down the entire length of the tracks several times to ensure everything interlocks flawlessly. If the teeth still separate, use your pliers to gently squeeze the back of the slider slightly tighter. Once it glides securely, apply a specialized lubricant or a simple wax stick along the coils to reduce friction. This protective coating repels future dust buildup and makes opening and closing the door feel completely effortless. Regular lubrication serves as the ultimate preventative maintenance, keeping your outdoor shelter reliable and completely bug-proof for many camping seasons.
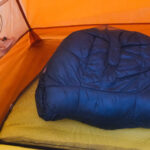
Step 8: Maintain Your Gear Post-Trip
Caring for your equipment does not stop once you return home from the woods. Always pitch your shelter in the backyard and let it dry completely before packing it away in a stuff sack. Moisture trapped inside rolled-up fabric leads to mold, which degrades the nylon and rusts metal components rapidly. Brush off any new dirt collected during your trip and reapply a light coat of wax to the tracks. By treating your gear with respect after every single adventure, you drastically reduce the chances of facing unexpected mechanical failures when you venture out again.
Frequently Asked Questions (FAQ)
Can I Fix A Track With Missing Teeth?
Missing teeth present a significant challenge for basic slider replacements. If the gap sits near the very bottom or top of the track, you can sew over the area to create a new stopping point, making the track slightly shorter. However, if the missing teeth are right in the middle, you will likely need to replace the entire track.
What Causes A Zipper To Separate After Closing?
Separation usually occurs because the metal slider stretches out over time from repeated pulling. When the gap inside the slider widens, it fails to push the coils tightly together. You can often fix this temporarily by gently squeezing the sides of the slider with pliers. If crimping does not hold, a full slider replacement remains necessary.
Is It Better To Use Oil Or Wax For Lubrication?
Always choose a dry wax or a specialized silicone-based lubricant designed specifically for outdoor fabrics. Standard household oils tend to attract dirt, dust, and grime, which creates an abrasive paste. Here are safe options:
- Beeswax sticks
- Silicone sprays
- Paraffin wax
These options protect the metal without collecting harmful debris.
How Do I Find The Correct Replacement Slider Size?
Flip your current slider over and look closely at the flat back surface. Most manufacturers stamp a number, such as 5, 8, or 10, directly onto the metal. This number indicates the width of the tracks in millimeters. You also need to note whether your tracks feature molded plastic teeth or continuous nylon coils before purchasing parts.
Can I Repair A Zipper While At The Campsite?
Absolutely, provided you pack a small emergency repair kit in your backpack. By carrying a few spare sliders, a spare top stop, and a multi-tool with needle-nose pliers, you can perform field repairs in minutes. Addressing the issue immediately prevents bugs from entering your shelter and stops the track from sustaining further permanent damage.
Conclusion
Dealing with broken gear in the wilderness feels incredibly frustrating, but it does not have to ruin your outdoor experience. By identifying the root cause, cleaning the tracks thoroughly, and carefully installing a brand-new slider, you can restore your shelter to its former glory. Remember to keep a small repair kit with pliers and replacement hardware packed in your bag so you always stay prepared for the unexpected.
We highly encourage you to try learning how to repair a tent zipper at home before your next big excursion. It saves you money, boosts your confidence, and keeps reliable equipment out of the landfill. Grab your tools, follow these straightforward steps, and get back to enjoying nature with a secure, fully functional shelter!
About Caleb
Caleb Merritt is a Virginia-based outdoor writer and gear analyst who has spent over a decade sleeping on the ground, crossing mountain passes, and obsessively shaving grams off his pack weight. He holds a Bachelor of Science in Environmental Science from James Madison University, where he also served as president of the university’s outdoor recreation club. After graduating, he spent three years as a wilderness educator with a backcountry youth program in the Shenandoah Valley — teaching Leave No Trace ethics, backcountry navigation, and campcraft — before moving into full-time writing in 2018.
His work focuses on one core belief: the best gear is the gear you understand. Whether he’s doing a side-by-side weight comparison of ultralight shelters or writing a beginner’s guide to building a sub-20-lb base weight kit, Caleb writes with the same directness you’d expect from a trusted trail partner. He has logged more than 4,000 miles across iconic routes including the John Muir Trail, the Wind River Range, Vermont’s Long Trail, and the Collegiate Peaks Loop in Colorado.
Areas of Expertise
- Ultralight backpacking systems and base weight optimization
- Tent, tarp, and shelter testing across three-season and shoulder-season conditions
- Sleeping bag and quilt temperature rating verification
- Backpacking nutrition, meal planning, and calorie-per-ounce analysis
- Leave No Trace principles and wilderness ethics
- Campfire safety, bear country protocols, and water treatment methods
- Gear care, repair, and long-term durability assessment
Education
James Madison University — B.S. in Environmental Science, 2015
During his time at JMU, Caleb served as President of the Outdoor Recreation Club, where he planned and led more than 30 backcountry trips annually across the Blue Ridge Mountains and Appalachian Trail corridor. The role sharpened his ability to assess gear performance under real conditions, manage group safety in remote environments, and develop the kind of practical trail knowledge that no classroom can teach.
Professional Experience
Gear Writer & Senior Contributor — [Your Website Name]
Produces in-depth gear reviews, buyer’s guides, and how-to content across backpacking, camping, and ultralight hiking categories. Tests all gear in real field conditions before publishing recommendations.
Wilderness Educator & Trip Leader — Shenandoah Backcountry Youth Program — 2015–2018 Led multi-day backcountry expeditions for teens and young adults throughout Shenandoah National Park and George Washington National Forest. Taught LNT principles, orienteering, first aid awareness, and campcraft fundamentals.
Outdoor Recreation Club President — James Madison University — 2013–2015 Organized and led university-sponsored hiking, backpacking, and camping trips in the Blue Ridge Mountains and Appalachian Trail corridor. Managed club budget, safety protocols, and trip logistics for a membership of 120+ students.
Editorial Standards
Every piece of gear Caleb recommends has been personally tested in the field — not just unboxed and described. His review process includes a minimum of two overnight trips per shelter, a full-season evaluation for sleep systems, and side-by-side comparisons wherever possible. He does not accept payment for positive reviews. Affiliate relationships, where they exist, are always disclosed in accordance with FTC guidelines.
All factual claims about gear specifications, trail distances, and safety recommendations are cross-referenced against manufacturer data sheets and established sources such as the Leave No Trace Center for Outdoor Ethics and the American Hiking Society before publication.