Nothing ruins a perfect bike ride quite like a dropping chain or that annoying metal scraping sound near your pedals. These frustrating noises usually mean your shifting system needs a little bit of tuning to get back into perfect shape. You might think this repair requires an expensive trip to the local bike shop, but doing it yourself is actually incredibly straightforward.
If you know what screws to turn and where your cables belong, you can solve this mechanical headache right in your driveway. Learning how to adjust front derailer saves you time, keeps your hands clean of unnecessary grease, and builds your mechanical confidence. This guide exists to walk you through the entire process from start to finish so you can get back on the trail.
Why Learning to Adjust Your Front Derailer Matters
Spending time outdoors should be about enjoying nature, breathing fresh air, and escaping the noise of daily life. When you load up your camping gear for a weekend trail ride, the last thing you want is a mechanical failure miles away from civilization. Knowing how to maintain your bicycle gives you ultimate freedom and self-reliance on those remote trails.
You will not have to worry about finding a mechanic or cutting your wilderness trip short just because your gears refuse to shift smoothly. Understanding the mechanics of your drivetrain also helps you spot minor wear and tear before it becomes a major roadside breakdown. By taking control of your bicycle maintenance, you ensure every outdoor adventure stays safe, predictable, and incredibly fun.
Tools and Materials You’ll Need
Before you flip your bike upside down or put it in a stand, gather the right equipment to make this job easy. Having everything within reach prevents frustration and ensures you tune your shifting system accurately.
- A set of metric Allen wrenches (hex keys), specifically the 4mm and 5mm sizes for most cable pinch bolts.
- A reliable Phillips head screwdriver for turning the limit screws.
- A clean rag to wipe away excess grease and grime from your drivetrain.
- A pair of needle-nose pliers to help pull the gear cable tight during tensioning.
- Chain lubricant to keep your drivetrain running smoothly after you finish your mechanical work.
- A bicycle repair stand (optional, but highly recommended) to hold your frame at eye level while you pedal and shift gears.
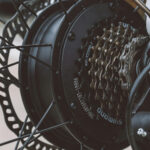
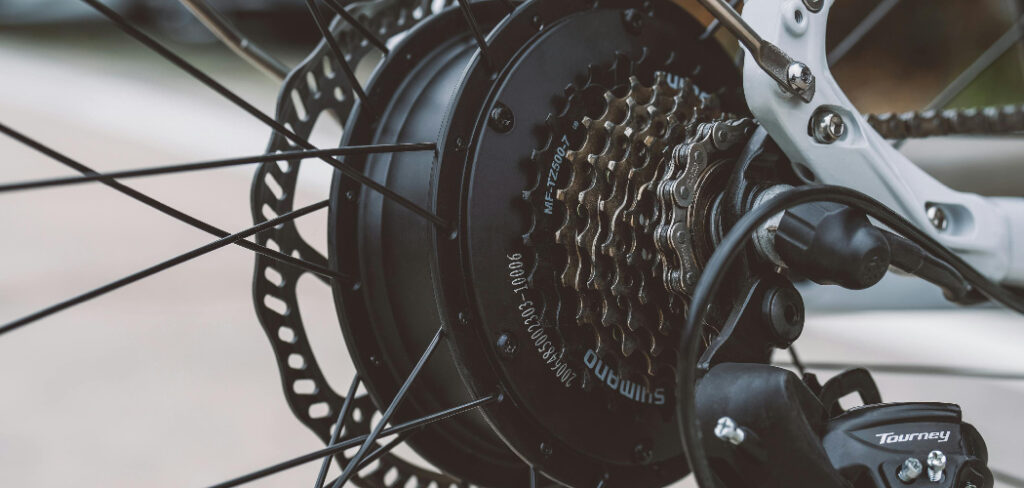
9 Step-by-Step Guide on How to Adjust Front Derailer
Step 1 – Shift to the Correct Starting Gear
Start by placing your bicycle chain into the innermost position near the frame. You want the chain resting on the smallest chainring at the pedals and the largest cog on the rear cassette. Moving your chain into this specific configuration removes all the tension from the shift cable.
A slack cable allows you to work with the natural resting position of the shifting mechanism without fighting against the spring tension. Spin the pedals slowly while you click the shifter down until the chain drops into that lowest gear. You can physically feel the cable go loose near the down tube once you hit the correct spot. This foundational step sets the stage for accurate adjustments moving forward, ensuring you have a clean slate before turning any limit screws.
Step 2 – Inspect the Height and Alignment
Take a close look at the metal cage surrounding your bicycle chain. You need to ensure the outer plate of this metal cage runs perfectly parallel to your largest chainring. If it sits at an angle, your chain will constantly rub against the metal and refuse to shift upward smoothly. Check the vertical height by manually swinging the cage out over the largest chainring.
The gap between the bottom of the outer cage and the teeth of the chainring should remain very small, usually about two millimeters. If the height or angle looks wrong, loosen the mounting bolt slightly to reposition the clamp. Once you align everything perfectly flat and at the right height, tighten the mounting bolt securely to lock the mechanism in place.
Step 3 – Disconnect the Shift Cable
Find the small pinch bolt holding your metal shift cable against the derailleur arm. Use your Allen wrench to loosen this bolt just enough to slip the cable out from underneath the metal washer. You do not need to remove the bolt entirely from the assembly. Releasing the cable ensures that only the internal spring dictates the position of the cage right now.
It prevents old cable tension from throwing off your upcoming low-limit adjustments. While the cable hangs free, take a moment to inspect the metal wire for any frayed edges or rust spots. If you see significant damage, you might need to install a brand new cable before continuing. Otherwise, just leave the loose wire hanging off to the side safely out of the way.
Step 4 – Set the Low Limit Screw
Look at the top of the mechanism for two small screws positioned side by side. One will be marked with an “L” for low, and the other with an “H” for high. Grab your Phillips head screwdriver and focus your attention solely on the “L” screw. This screw physically stops the cage from moving too far inward and dropping the chain onto the frame.
Turn the screwdriver slowly while watching the inner plate of the metal cage move toward or away from the chain. You want to adjust it until there is just a tiny sliver of daylight between the chain and the inner cage plate. Aim for a gap of about one millimeter to ensure zero rubbing when you pedal forcefully.
Step 5 – Reconnect and Tension the Cable
Now it is time to bring the shift wire back into the equation. Figuring out how to adjust front derailer effectively requires proper cable tension from the very beginning. Pull the wire tightly with your fingers or a pair of needle-nose pliers to remove any slack from the housing. Route the wire back under the metal washer exactly how you found it earlier.
Keep the tension firm while you use your Allen wrench to tighten down the pinch bolt. The wire should feel taut like a guitar string, but not so tight that it immediately pulls the cage away from its resting place. Make sure the bolt clamps down securely so the wire cannot slip when you apply pressure to the shifter.
Step 6 – Shift to the Highest Gear Configuration
You need to move the chain completely to the opposite side of the drivetrain. Spin the pedals forward while clicking your rear shifter until the chain drops onto the smallest cog in the back. Next, actuate your left shifter to move the chain up onto the largest chainring in the front. This gear combination puts maximum tension on the system and pushes the cage as far outward as it can go.
Keep pedaling at a steady rhythm while you force the chain into this position. If the chain struggles to climb onto the big ring, apply a little more tension using the barrel adjuster on your handlebars. You need the chain safely seated on the big ring for the next critical step.
Step 7 – Adjust the High Limit Screw
Turn your attention back to those two tiny screws on top of the shifting mechanism. This time, you will work exclusively with the screw marked “H” for the high limit. This screw prevents the cage from throwing the chain completely off the outside of the pedals and onto your crank arm.
Turn the “H” screw with your screwdriver while examining the gap between the chain and the outer metal plate of the cage. You want the outer plate to sit extremely close to the chain without actually touching it. Leave about one millimeter of space to allow for smooth upward shifting momentum. Once you set this correctly, the chain will pop onto the big ring safely without flying off the outer edge.
Step 8 – Fine-Tune Cable Tension for Smooth Shifting
This is where you test your work and dial in the precision. Anyone mastering how to adjust front derailer must learn to use the barrel adjuster located near the handlebars. Spin the pedals and shift back and forth between your front chainrings several times. Listen closely for any hesitation or metallic scraping noises as the chain moves up and down.
If the chain hesitates when climbing to the big ring, turn the barrel adjuster counter-clockwise to increase the tension. If the chain drops down to the small ring too slowly, turn the barrel adjuster clockwise to release a little bit of slack. Make tiny quarter-turns until the chain jumps between the gears instantly and quietly with every click of the shifter.
Step 9 – Road Test and Final Visual Inspection
Your bicycle might behave differently under your body weight compared to hanging freely in a repair stand. Take your bike off the stand and ride it up and down your street or driveway to test your handiwork. Shift through every possible gear combination while applying firm pressure to the pedals.
Pay close attention to how the system reacts when you stand up and sprint versus when you pedal softly. If you notice a tiny bit of chain rub in the extreme gears, make minor tweaks to your barrel adjuster or limit screws. Once the shifting feels crisp and completely silent under a heavy load, park your bike and wipe down the frame. Your drivetrain is now fully optimized and ready for your next big outdoor adventure.
Common Mistakes When Adjusting Your Front Derailer
Making errors during this process happens to almost everyone who picks up a wrench for the first time. The most frequent mistake beginners make involves ignoring the cage height and alignment before turning any limit screws. If the metal cage sits crooked or too high above the chainring, no amount of cable tension or limit screw turning will fix your shifting issues. You must establish that perfect parallel alignment first.
Another incredibly common misstep involves pulling the shift wire far too tightly when reconnecting it to the pinch bolt. Extreme tension forces the cage away from its resting position prematurely, which immediately ruins your low limit screw setting. You only need to pull the wire taut enough to remove the slack, not so hard that you physically move the mechanism.
Finally, many riders turn the limit screws aggressively, expecting massive changes in the shifting behavior. Limit screws control the extreme outer boundaries of the cage movement, not the actual shifting speed. Turning them a full rotation at once usually results in dropped chains and endless frustration. You should only ever adjust limit screws in tiny quarter-turn increments while closely watching the cage plates move.
Expert Tips
Taking your mechanical skills to the next level requires patience and a good ear for moving parts. Professional mechanics always lubricate the pivot points of the shifting mechanism before they begin turning any limit screws. A tiny drop of chain oil on the moving metal joints ensures the spring snaps back instantly when you release cable tension.
You should also routinely inspect your cable housing for kinks or dirt buildup. If your housing is packed with grime, your cable will drag inside the plastic tube, making accurate tensioning totally impossible. When testing your shifts, pedal at a realistic, steady cadence rather than spinning the cranks as fast as humanly possible. Realistic pedaling speed gives you a much better indication of how the bike will behave on an actual trail.
Frequently Asked Questions
What causes my bicycle chain to constantly rub against the metal cage?
Chain rub usually occurs when your cable tension stretches over time or your limit screws vibrate out of position. If the rubbing happens in your lowest gear, your low limit screw is likely too tight. If it happens in your highest gear, you probably need a minor tension increase via your barrel adjuster. Proper alignment of the cage also prevents unwanted contact.
Do I need to buy expensive specialty tools for this repair?
You absolutely do not need to purchase expensive, shop-grade equipment to tune your gears. A basic set of metric Allen wrenches and a standard Phillips head screwdriver will successfully handle almost every modern bicycle drivetrain. While a dedicated repair stand makes the process much friendlier on your lower back, you can achieve the exact same results by carefully leaning your frame against a sturdy wall.
How often should I perform maintenance on my shifting system?
You should visually inspect your drivetrain and test your gears before every major outdoor excursion. A full tuning process is usually necessary only once or twice a year, depending on how often you ride in muddy or wet conditions. If you start hearing new metallic scraping noises or experience delayed gear changes, it is time to check your cable tension immediately.
Why does my chain fall off the outside of the pedal arms?
A chain dropping off the outside of your biggest chainring means your high limit screw is far too loose. The high limit screw acts as a physical barrier preventing the metal cage from pushing the chain past the gears. By tightening the screw marked with an “H” by a half-turn, you will effectively close that boundary and keep the chain safely seated.
Can a damaged shifter cable prevent me from changing gears?
Yes, a frayed, rusted, or severely kinked steel wire will absolutely ruin your ability to shift smoothly. When the wire strands break inside the plastic housing, the cable catches and drags, destroying the precise tension needed for accurate movement. You should always replace rusty or damaged wires before attempting to dial in your limit screws or barrel adjusters.
Conclusion
Taking control of your bicycle maintenance empowers you to handle any mechanical setback with total confidence. You no longer need to rely on busy repair shops or cut your weekend camping trips short over a simple dropped chain. By understanding the relationship between cable tension, limit screws, and cage alignment, you hold the keys to a perfectly silent drivetrain. The process might feel slightly overwhelming the very first time you pick up an Allen wrench, but the mechanical logic quickly clicks into place.
Remember to make your adjustments in small increments and test your gears thoroughly before hitting the mountain trails. Knowing how to adjust front derailer transforms you from a casual rider into a capable, self-reliant outdoor enthusiast. Your future rides will be smoother, faster, and completely free of those annoying metallic scraping sounds. Grab your tools, set your bike up, and enjoy the rewarding feeling of tuning your own equipment today.
About Caleb
Caleb Merritt is a Virginia-based outdoor writer and gear analyst who has spent over a decade sleeping on the ground, crossing mountain passes, and obsessively shaving grams off his pack weight. He holds a Bachelor of Science in Environmental Science from James Madison University, where he also served as president of the university’s outdoor recreation club. After graduating, he spent three years as a wilderness educator with a backcountry youth program in the Shenandoah Valley — teaching Leave No Trace ethics, backcountry navigation, and campcraft — before moving into full-time writing in 2018.
His work focuses on one core belief: the best gear is the gear you understand. Whether he’s doing a side-by-side weight comparison of ultralight shelters or writing a beginner’s guide to building a sub-20-lb base weight kit, Caleb writes with the same directness you’d expect from a trusted trail partner. He has logged more than 4,000 miles across iconic routes including the John Muir Trail, the Wind River Range, Vermont’s Long Trail, and the Collegiate Peaks Loop in Colorado.
Areas of Expertise
- Ultralight backpacking systems and base weight optimization
- Tent, tarp, and shelter testing across three-season and shoulder-season conditions
- Sleeping bag and quilt temperature rating verification
- Backpacking nutrition, meal planning, and calorie-per-ounce analysis
- Leave No Trace principles and wilderness ethics
- Campfire safety, bear country protocols, and water treatment methods
- Gear care, repair, and long-term durability assessment
Education
James Madison University — B.S. in Environmental Science, 2015
During his time at JMU, Caleb served as President of the Outdoor Recreation Club, where he planned and led more than 30 backcountry trips annually across the Blue Ridge Mountains and Appalachian Trail corridor. The role sharpened his ability to assess gear performance under real conditions, manage group safety in remote environments, and develop the kind of practical trail knowledge that no classroom can teach.
Professional Experience
Gear Writer & Senior Contributor — [campeox.com]
Produces in-depth gear reviews, buyer’s guides, and how-to content across backpacking, camping, and ultralight hiking categories. Tests all gear in real field conditions before publishing recommendations.
Wilderness Educator & Trip Leader — Shenandoah Backcountry Youth Program — 2015–2018 Led multi-day backcountry expeditions for teens and young adults throughout Shenandoah National Park and George Washington National Forest. Taught LNT principles, orienteering, first aid awareness, and campcraft fundamentals.
Outdoor Recreation Club President — James Madison University — 2013–2015 Organized and led university-sponsored hiking, backpacking, and camping trips in the Blue Ridge Mountains and Appalachian Trail corridor. Managed club budget, safety protocols, and trip logistics for a membership of 120+ students.
Editorial Standards
Every piece of gear Caleb recommends has been personally tested in the field — not just unboxed and described. His review process includes a minimum of two overnight trips per shelter, a full-season evaluation for sleep systems, and side-by-side comparisons wherever possible. He does not accept payment for positive reviews. Affiliate relationships, where they exist, are always disclosed in accordance with FTC guidelines.
All factual claims about gear specifications, trail distances, and safety recommendations are cross-referenced against manufacturer data sheets and established sources such as the Leave No Trace Center for Outdoor Ethics and the American Hiking Society before publication.