You just spent a small fortune on the perfect setup for the winter season. You hit the mountain, carve through fresh powder, and have the time of your life. Then you toss your gear into the closet and forget about it until the next trip. This is the fastest way to ruin your expensive gear. Proper maintenance is the secret to making your investment last, and that starts with knowing exactly how to clean snowboard boots.
Taking care of your gear prevents awful odors and structural damage. Sweat, melted snow, and parking lot grime break down the materials over time. When you ignore this essential chore, you end up with stiff, smelly, and uncomfortable footwear that ruins your next ride.
Learning the right maintenance routine takes only a few minutes of your time. You will protect the waterproof materials, keep the liners supportive, and ensure your feet stay warm all day.
Why You Should Maintain Your Snowboard Boots
Your boots are arguably the most important part of your entire snowboarding setup. They dictate your comfort, your control over the board, and your overall stamina on the mountain. When you neglect them, the materials break down rapidly. Moisture from sweat and melted snow creates a breeding ground for bacteria, leading to that notorious locker room smell.
Beyond the odor, dirt and road salt chew through the synthetic fabrics and waterproof membranes. This degradation causes the outer shell to soften prematurely. When your boots lose their stiffness, you lose the crucial ankle support needed for sharp turns and safe landings.
Consistent cleaning prevents these issues entirely. You preserve the structural integrity of the shell and the plush comfort of the liner. A well-maintained pair will save you money by delaying the need for a costly replacement.
Tools and Materials You’ll Need
Before you start scrubbing, you need to gather the right supplies. Using the wrong chemicals can permanently damage the waterproofing and synthetic leather.
Gather the following items to create your cleaning kit:
- A large bucket or plastic tub
- Mild laundry detergent or specialized gear wash (like NikWax)
- A soft-bristled toothbrush
- A non-abrasive cleaning sponge
- Clean, dry microfiber cloths
- A leather or mixed-material waterproofing conditioner
- Baking soda or dedicated shoe deodorizing powder
Having everything within arm’s reach makes the process smooth and efficient. You want to avoid using harsh household cleaners, bleach, or stiff wire brushes. Those aggressive tools will scratch the outer shell and destroy the delicate membranes that keep your feet dry.
Step-by-Step Guide on How to Clean Snowboard Boots
Dedicate an hour to this process at the end of the season, or whenever your gear gets exceptionally dirty. Following these steps ensures you do not accidentally damage the heat-sensitive materials. Here is exactly how to clean snowboard boots safely and effectively.
Step 1: Remove the Liners and Insoles
The very first thing you must do is separate the internal components from the outer shell. Loosen the laces, Boa dials, or Velcro straps completely. Pull the tongue of the shell forward to give yourself plenty of working room.
Reach your hand down the back of the shell and grab the liner firmly near the heel. Gently pull the liner forward and upward to slide it out of the shell. Once the liner is out, reach inside it and remove the footbed or insole. Washing these pieces separately is crucial for a deep, thorough clean.
Step 2: Soak the Liners and Insoles
Fill your large bucket with cold water and add a small amount of mild laundry detergent. You must use cold water because the foam inside the liners is highly sensitive to heat. Hot water can cause the liners to shrink or warp, ruining their custom fit.
Submerge the liners and the insoles completely into the soapy water. Let them soak for at least fifteen minutes to loosen the embedded sweat and grime. Agitate the water gently with your hands a few times during the soak to help work the soap into the fabric.
Step 3: Scrub the Interior Components
After the liners have soaked, take your non-abrasive sponge and gently scrub the exterior and interior of the liners. Pay special attention to the toe box and the heel area, as these spots accumulate the most sweat.
Scrub the insoles thoroughly, as they trap a significant amount of odor-causing bacteria. Be gentle to avoid tearing the fabric or degrading the foam structure. Once you are satisfied with the scrubbing, move on to the rinsing phase.
Step 4: Rinse the Liners Thoroughly
Empty the soapy water from your bucket and rinse the bucket completely. Refill it with fresh, cold water, or simply hold the liners under a cold running tap. You need to remove all the detergent residue from the foam and fabric.
Soap left behind in the liner can cause skin irritation and make the material feel stiff once it dries. Squeeze the liners gently to flush out the soapy water, but do not wring or twist them violently. Twisting will distort the shape of the liner permanently.
Step 5: Wash the Outer Shells
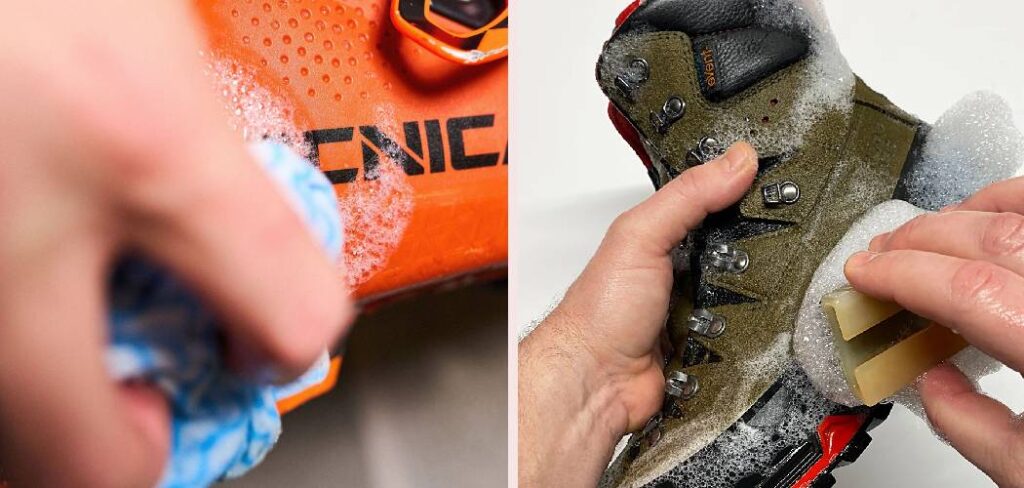
While the liners are setting aside to drain, turn your attention to the tough outer shells. Use a damp sponge to wipe away the loose dirt, mud, and parking lot salt from the exterior. For stubborn mud trapped in the rubber sole or tight seams, use your soft-bristled toothbrush.
You can use a tiny amount of soapy water on the shell, but avoid soaking it entirely. The goal is to clean the surface without saturating the heavy exterior materials. Wipe the entire shell down with a clean, damp cloth to remove any lifted dirt and soap residue.
Step 6: Apply Waterproofing Conditioner
Once the outer shell is clean and slightly damp, it is the perfect time to apply a conditioning treatment. Check the instructions on your specific waterproofing product, as some require a dry surface while others work best on damp fabric.
Rub the conditioner into the outer shell using a clean microfiber cloth. This step rejuvenates the factory waterproofing and prevents the materials from cracking over time. Pay extra attention to the seams and high-flex areas where water typically tries to sneak in.
Step 7: Air Dry Everything Completely
Proper drying is the most critical part of learning how to clean snowboard boots. Place the shells, liners, and insoles in a well-ventilated area away from direct sunlight. Never place them on a radiator, near a fireplace, or in a clothes dryer.
High heat will melt the glues holding the sole together and permanently shrink your custom-molded liners. Let everything air dry for at least twenty-four to forty-eight hours. You can speed up the process slightly by placing dry newspaper inside the liners to absorb ambient moisture.
Step 8: Reassemble and Store
Do not put the boots back together until every single piece is bone dry. Even a small amount of trapped moisture will allow mold to grow while the boots sit in your closet. Once completely dry, slide the insoles back into the liners.
Carefully push the liners back down into the outer shells, ensuring the heel sits flat and the tongue aligns properly. Finally, lace up the boots or tighten the dials just as you would when wearing them. Keeping them laced helps the boots hold their proper shape during the long off-season.
Common Mistakes When Cleaning Snowboard Boots
Many riders accidentally destroy their gear by rushing the cleaning process. The most common and catastrophic mistake is using high heat to dry the equipment. Throwing your liners in the dryer or leaving the shells next to a roaring fireplace will melt the adhesives. The heat alters the shape of the heat-moldable foam, completely ruining the custom fit you worked so hard to break in.
Another frequent error is putting the liners inside a standard washing machine. The harsh agitation of a washing machine cycle tears the delicate stitching and breaks down the internal support structures. Hand washing in cold water is the only safe method to preserve the longevity of your gear.
Finally, riders often store their footwear while it is still damp. Tossing wet gear into a dark, unventilated closet guarantees a nasty mold problem. Always exercise patience and allow for a full two days of air drying before packing your equipment away for the summer.
Expert Tips
You can elevate your maintenance routine with a few insider tricks used by seasoned snowboarders. If you struggle with exceptionally cold feet on the mountain, try placing a thin layer of aluminum foil underneath the insole. The foil acts as a thermal barrier, reflecting your body heat back up into your foot instead of letting it escape through the sole.
When your footwear starts feeling a bit loose after fifty days on the mountain, do not immediately throw them away. Visit a local shop and ask a boot fitter to install J-bars or a stiffer tongue insert. These small foam additions secure your heel and restore the responsive flex you need to carve aggressively.
To manage daily odors during a long winter trip, rely on standard baking soda. Sprinkle a generous amount into the dry liners every evening. Pour it out the next morning, and the powder will take the nasty odors and residual moisture with it.
Frequently Asked Questions
Can I wash my snowboard boot liners in the washing machine?
You should avoid using a washing machine for your liners. The mechanical agitation stretches the materials, and the spin cycle can tear the foam. Hand washing in a bucket of cold water is the safest way to remove sweat and bacteria without causing permanent structural damage.
How do I get the bad smell out of my boots?
Smells are caused by bacteria thriving in damp environments. Ensure you dry your gear thoroughly after every single use. If the smell persists, hand wash the liners with mild detergent and cold water, then use baking soda to absorb ongoing odors between riding days.
Is it safe to use a boot dryer?
Yes, using a dedicated boot dryer is perfectly safe and highly recommended. These devices use gentle, ambient temperature air to circulate through the footwear without applying destructive heat. They prevent bacteria growth by drastically reducing the time your gear stays wet.
How often should I clean my boots?
You should wipe the exterior shells down with a damp cloth after every trip to remove dirt and salt. A deep clean, which involves soaking the liners and conditioning the outer shell, should be done once at the end of the season before putting them into long-term storage.
Why do my snowboard boots feel too big now?
As you ride, the constant pressure and body heat compress the internal foam liners. This “packing out” process makes the interior volume larger over time. If they feel far too loose, you might need a boot fitter to add foam inserts, or it may simply be time to purchase a new pair.
Conclusion
Taking care of your gear does not have to be a complicated or stressful chore. By adopting a simple maintenance routine, you ensure your equipment stays comfortable, supportive, and odor-free for many seasons to come. You spent good money on your setup, and putting in a little elbow grease protects that investment beautifully.
Remember that heat is the ultimate enemy of your gear, and patience during the drying phase is your best friend. Now that you understand exactly how to clean snowboard boots, you can confidently tackle the end-of-season pack down. Treat your footwear with respect, and they will reward you with warm feet and perfect carves the next time the snow starts falling.

About Caleb
Caleb Merritt is a Virginia-based outdoor writer and gear analyst who has spent over a decade sleeping on the ground, crossing mountain passes, and obsessively shaving grams off his pack weight. He holds a Bachelor of Science in Environmental Science from James Madison University, where he also served as president of the university’s outdoor recreation club. After graduating, he spent three years as a wilderness educator with a backcountry youth program in the Shenandoah Valley — teaching Leave No Trace ethics, backcountry navigation, and campcraft — before moving into full-time writing in 2018.
His work focuses on one core belief: the best gear is the gear you understand. Whether he’s doing a side-by-side weight comparison of ultralight shelters or writing a beginner’s guide to building a sub-20-lb base weight kit, Caleb writes with the same directness you’d expect from a trusted trail partner. He has logged more than 4,000 miles across iconic routes including the John Muir Trail, the Wind River Range, Vermont’s Long Trail, and the Collegiate Peaks Loop in Colorado.
Areas of Expertise
- Ultralight backpacking systems and base weight optimization
- Tent, tarp, and shelter testing across three-season and shoulder-season conditions
- Sleeping bag and quilt temperature rating verification
- Backpacking nutrition, meal planning, and calorie-per-ounce analysis
- Leave No Trace principles and wilderness ethics
- Campfire safety, bear country protocols, and water treatment methods
- Gear care, repair, and long-term durability assessment
Education
James Madison University — B.S. in Environmental Science, 2015
During his time at JMU, Caleb served as President of the Outdoor Recreation Club, where he planned and led more than 30 backcountry trips annually across the Blue Ridge Mountains and Appalachian Trail corridor. The role sharpened his ability to assess gear performance under real conditions, manage group safety in remote environments, and develop the kind of practical trail knowledge that no classroom can teach.
Professional Experience
Gear Writer & Senior Contributor — [campeox.com]
Produces in-depth gear reviews, buyer’s guides, and how-to content across backpacking, camping, and ultralight hiking categories. Tests all gear in real field conditions before publishing recommendations.
Wilderness Educator & Trip Leader — Shenandoah Backcountry Youth Program — 2015–2018 Led multi-day backcountry expeditions for teens and young adults throughout Shenandoah National Park and George Washington National Forest. Taught LNT principles, orienteering, first aid awareness, and campcraft fundamentals.
Outdoor Recreation Club President — James Madison University — 2013–2015 Organized and led university-sponsored hiking, backpacking, and camping trips in the Blue Ridge Mountains and Appalachian Trail corridor. Managed club budget, safety protocols, and trip logistics for a membership of 120+ students.
Editorial Standards
Every piece of gear Caleb recommends has been personally tested in the field — not just unboxed and described. His review process includes a minimum of two overnight trips per shelter, a full-season evaluation for sleep systems, and side-by-side comparisons wherever possible. He does not accept payment for positive reviews. Affiliate relationships, where they exist, are always disclosed in accordance with FTC guidelines.
All factual claims about gear specifications, trail distances, and safety recommendations are cross-referenced against manufacturer data sheets and established sources such as the Leave No Trace Center for Outdoor Ethics and the American Hiking Society before publication.