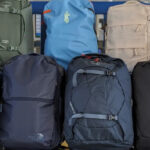
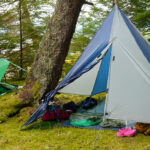
Picture this: you are halfway up a beautiful mountain trail, and suddenly, you hear a loud rip. Your trusty pack is hanging by a thread. A broken strap can quickly ruin a camping trip or travel adventure. Instead of tossing out a perfectly good bag, you can easily mend the damage yourself.
Knowing how to fix straps on a backpack saves you money and rescues your favorite gear from the landfill. You do not need a degree in textile engineering to make these simple repairs. With a few basic supplies and a little bit of patience, anyone can restore their pack to its former glory. This beginner-friendly guide will walk you through the entire process, getting you back on the trail in no time.
Why You Should Repair Your Broken Gear
Why bother repairing your outdoor gear when you could just buy a new one? First, high-quality camping and travel bags are expensive investments. A simple tear at the seam or a snapped webbing strap usually requires only a few dollars worth of thread and needles to repair.
Second, fixing your gear is incredibly rewarding and builds self-reliance. When you are deep in the wilderness, having the skills to mend your equipment ensures you stay safe and comfortable.
Finally, repairing items extends their lifespan, which is much better for the environment. Every repaired bag is one less bulky item sitting in a landfill. By dedicating a short amount of time to a minor mending project, you preserve your favorite travel companion for many more adventures.
7 Step-by-Step Guide: How to Fix Straps on a Backpack
Step 1: Assess the Damage
Before you start sewing, you need to examine the extent of the tear. Look closely at where the strap connects to the main body of the bag. Sometimes the fabric itself has frayed, while other times the thread has simply unraveled from the seam. Check if the padding is exposed or if the webbing has snapped entirely. Identifying the exact problem helps you gather the right materials for the job.
If the nylon fabric is severely shredded, you might need a patch, but a clean break along the seam line just requires heavy-duty stitching. Take a moment to stretch the material and ensure no other areas are close to tearing.
Step 2: Gather Your Repair Supplies
You cannot complete a durable repair with cheap hotel sewing kits. You need robust tools meant for outdoor gear. Get heavy-duty nylon thread, upholstery needles, a thimble, and fabric scissors. Standard cotton thread will snap under the heavy load of your camping gear. You may also want some seam sealer or fabric glue to reinforce the edges once you finish stitching.
If you are learning how to fix straps on a backpack for the first time, having the proper tools makes the process significantly easier. Keep all these items organized in a small pouch so you can easily access them while working on the thick material.
Step 3: Clean the Damaged Area
Working on a dirty bag makes it harder for needles to pass through the thick fabric and prevents adhesives from sticking. Take a damp cloth and gently wipe down the area around the broken strap. Remove any dried dirt, mud, or debris from your previous hiking trips.
If the edges of the tear are badly frayed, use your fabric scissors to trim away the loose threads. Creating a clean, neat edge prevents the rip from spreading further down the line. Let the material air dry completely before you begin stitching. This simple preparation step ensures your final repair looks neat and holds strong under pressure.
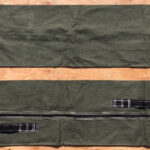
Step 4: Pin the Strap in Place
Once the fabric is clean and dry, align the broken pieces exactly where they belong. Push the end of the strap at least an inch deep into the seam of the bag to ensure a strong anchor. Use heavy-duty safety pins to hold the thick layers together. Regular sewing pins will bend or break against tough nylon webbing. Pinning the strap prevents the fabric from shifting while you sew, which is crucial for maintaining the proper alignment and weight distribution of your pack. Take a moment to try on the bag carefully to ensure the strap length feels even before you commit to sewing.
Step 5: Stitch the Primary Seam
Thread your upholstery needle with a double layer of heavy-duty nylon thread and tie a thick knot at the end. Push the needle through the inside of the bag outward, so the knot remains hidden. Use a tight backstitch technique to secure the strap to the bag body. A backstitch is incredibly strong because the threads overlap, making it ideal for load-bearing travel gear. Pull the thread tight after every single pass to ensure there is no slack. Continue sewing across the entire width of the strap. Take your time pushing the needle through the thick webbing, using your thimble to protect your fingers from sharp pokes.
Step 6: Create a Box X Stitch
A single straight line of stitching is rarely enough to support the heavy weight of camping equipment. To maximize strength, you need to sew a Box X pattern. Sew a square shape outlining the anchored portion of the strap, then stitch an “X” diagonally through the center of that square.
This specific pattern distributes the tension evenly across a wider area of the fabric, preventing the strap from ripping out again. Most outdoor gear manufacturers use this exact stitching method for load-bearing points. Passing the needle through the exact same holes multiple times reinforces the bond between the heavy nylon webbing and the bag body.
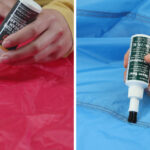
Step 7: Seal and Finish the Repair
After completing your sturdy Box X stitch, tie off the nylon thread securely on the inside of the bag. Cut off any excess thread with your sharp scissors. To give your repair maximum durability, apply a thin layer of seam sealer or specialized fabric glue over the exposed stitches. This liquid sealant prevents the heavy-duty thread from fraying and adds a layer of waterproofing to the puncture holes.
Allow the adhesive to cure completely according to the package instructions before loading up your gear. Your trusty travel companion is now fully restored and ready to tackle the toughest wilderness trails once again.
Frequently Asked Questions
What Is The Best Thread For Repairing Outdoor Gear?
For fixing heavy-duty outdoor equipment, you should always use a 100% heavy nylon or polyester thread. These materials resist rot, mold, and UV degradation. Cotton thread is too weak and will quickly break under the stress of heavy camping gear. Look for threads specifically labeled for upholstery, canvas, or outdoor gear repairs to guarantee maximum durability.
Can I Use Super Glue To Fix My Bag?
No, you should never rely solely on super glue to mend load-bearing gear. Cyanoacrylate adhesives dry hard and brittle. They will easily crack and snap when the fabric flexes. Instead, use proper needle and thread. If you want extra security, you can supplement your stitches with flexible fabric adhesives or polyurethane-based seam sealers.
How Do I Know If My Bag Is Beyond Repair?
Most broken straps are completely fixable. However, a bag might be beyond saving if the main body fabric is dry-rotted, severely sun-damaged, or tearing like paper. To test this, gently pull at the fabric near the tear. If it continues to shred with minimal effort, the material has degraded too much to hold new stitches.
Will Sewing Damage The Waterproofing Of My Pack?
Pushing a needle through your bag does create tiny holes, which can let moisture inside. However, this is very easy to fix. Once you finish your sewing repair, simply brush a specialized liquid seam sealer over the stitched area. This coats the threads and fills the needle punctures, completely restoring the waterproof barrier of your gear.
How Much Weight Can A Hand-Sewn Strap Hold?
If you use heavy-duty nylon thread and properly execute a Box X stitch, your hand-sewn repair can hold just as much weight as the original factory stitching. A well-done repair easily supports standard camping loads of 30 to 50 pounds. Just make sure your stitches are tight and that the strap is anchored deeply into solid fabric.
Conclusion
Fixing your own outdoor equipment is a highly rewarding skill that extends the life of your favorite gear. By taking the time to assess the damage, gathering the correct heavy-duty supplies, and utilizing strong techniques like the Box X stitch, you can handle almost any minor tear. Remember to take things slow and always reinforce your work for maximum durability on the trail.
Do not let a minor equipment failure keep you indoors. Grab a needle, find some tough nylon thread, and try out this guide on how to fix straps on a backpack for yourself. Your trusty travel bag still has thousands of miles left in it, and with a little bit of care, it will be ready for your next great adventure.
About Caleb
Caleb Merritt is a Virginia-based outdoor writer and gear analyst who has spent over a decade sleeping on the ground, crossing mountain passes, and obsessively shaving grams off his pack weight. He holds a Bachelor of Science in Environmental Science from James Madison University, where he also served as president of the university’s outdoor recreation club. After graduating, he spent three years as a wilderness educator with a backcountry youth program in the Shenandoah Valley — teaching Leave No Trace ethics, backcountry navigation, and campcraft — before moving into full-time writing in 2018.
His work focuses on one core belief: the best gear is the gear you understand. Whether he’s doing a side-by-side weight comparison of ultralight shelters or writing a beginner’s guide to building a sub-20-lb base weight kit, Caleb writes with the same directness you’d expect from a trusted trail partner. He has logged more than 4,000 miles across iconic routes including the John Muir Trail, the Wind River Range, Vermont’s Long Trail, and the Collegiate Peaks Loop in Colorado.
Areas of Expertise
- Ultralight backpacking systems and base weight optimization
- Tent, tarp, and shelter testing across three-season and shoulder-season conditions
- Sleeping bag and quilt temperature rating verification
- Backpacking nutrition, meal planning, and calorie-per-ounce analysis
- Leave No Trace principles and wilderness ethics
- Campfire safety, bear country protocols, and water treatment methods
- Gear care, repair, and long-term durability assessment
Education
James Madison University — B.S. in Environmental Science, 2015
During his time at JMU, Caleb served as President of the Outdoor Recreation Club, where he planned and led more than 30 backcountry trips annually across the Blue Ridge Mountains and Appalachian Trail corridor. The role sharpened his ability to assess gear performance under real conditions, manage group safety in remote environments, and develop the kind of practical trail knowledge that no classroom can teach.
Professional Experience
Gear Writer & Senior Contributor — [Your Website Name]
Produces in-depth gear reviews, buyer’s guides, and how-to content across backpacking, camping, and ultralight hiking categories. Tests all gear in real field conditions before publishing recommendations.
Wilderness Educator & Trip Leader — Shenandoah Backcountry Youth Program — 2015–2018 Led multi-day backcountry expeditions for teens and young adults throughout Shenandoah National Park and George Washington National Forest. Taught LNT principles, orienteering, first aid awareness, and campcraft fundamentals.
Outdoor Recreation Club President — James Madison University — 2013–2015 Organized and led university-sponsored hiking, backpacking, and camping trips in the Blue Ridge Mountains and Appalachian Trail corridor. Managed club budget, safety protocols, and trip logistics for a membership of 120+ students.
Editorial Standards
Every piece of gear Caleb recommends has been personally tested in the field — not just unboxed and described. His review process includes a minimum of two overnight trips per shelter, a full-season evaluation for sleep systems, and side-by-side comparisons wherever possible. He does not accept payment for positive reviews. Affiliate relationships, where they exist, are always disclosed in accordance with FTC guidelines.
All factual claims about gear specifications, trail distances, and safety recommendations are cross-referenced against manufacturer data sheets and established sources such as the Leave No Trace Center for Outdoor Ethics and the American Hiking Society before publication.