Bringing home a new boat is an exciting moment for any outdoor enthusiast. However, figuring out where to put it can quickly become a frustrating challenge. Leaving your gear on the floor takes up valuable floor space and exposes it to potential damage from vehicles, pests, or accidental bumps. That is why learning how to hang kayak in garage spaces is a game-changer for beginners and seasoned travelers alike.
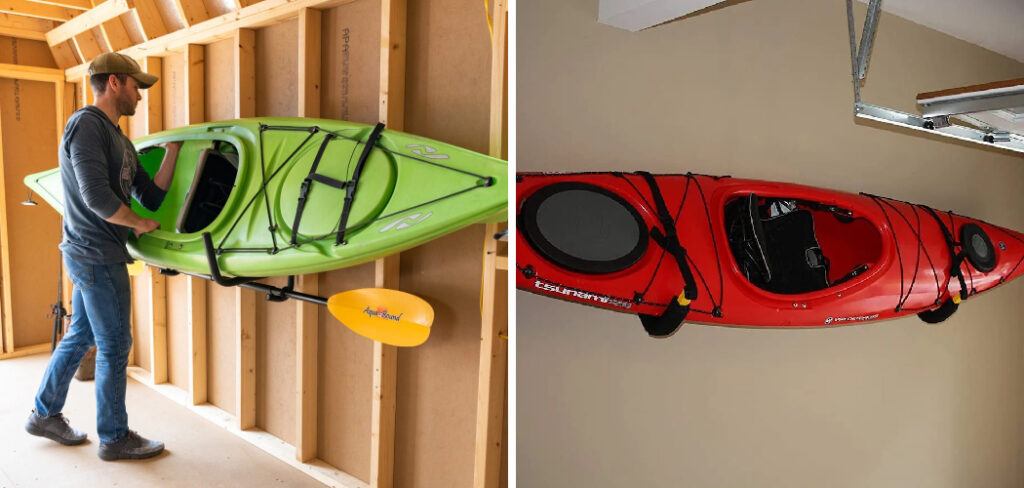
Proper overhead or wall storage keeps your equipment safe, preserves its hull shape, and frees up precious room for your car and camping gear. In this guide, we will walk you through the entire process from start to finish. You will learn everything you need to know to secure your vessel properly, ensuring it remains in perfect condition for your next big adventure on the water.
Why Hang Your Kayak in the Garage
Storing your vessel properly is essential for extending its lifespan and maintaining its performance on the water. When you leave a heavy boat resting on hard concrete, the hull can deform over time, especially in warmer climates. Elevating it eliminates this pressure and prevents flat spots from ruining your tracking ability during your next paddling trip.
Furthermore, utilizing your wall or ceiling space drastically improves your home organization. You regain precious square footage for parking your vehicle, organizing travel gear, or setting up a workbench. Wall mounts and ceiling hoists also keep your equipment out of reach from curious pets and rodents looking for a nesting spot. By getting your vessel off the ground, you create a safer, cleaner, and more efficient environment that makes packing for your next camping trip much easier.
7 Step-by-Step Guide: How to Hang Kayak in Garage
Step 1: Choose the Right Storage System
Before grabbing your tools, you need to decide which suspension system works best for your specific layout. Ceiling hoists are fantastic for rooms with tall ceilings, allowing you to pull the vessel completely out of the way. Wall-mounted racks work beautifully if you have plenty of bare wall space and want quick, standing access to your boat. Consider the weight of your equipment and the strength of your overhead joists when making this decision. Taking the time to evaluate your available room ensures you purchase the correct hardware. This prevents frustrating returns and guarantees a smooth installation process from the very beginning.
Step 2: Gather Your Tools and Hardware
Once you select your ideal mounting system, gather all necessary tools to prevent interruptions during the project. You will typically need a reliable power drill, a tape measure, a stud finder, a sturdy ladder, and safety glasses. Most retail suspension kits come with their own lag bolts and pulleys, but it is always smart to double-check the packaging before you begin. Having an extra set of sturdy screws on hand can save the day if the included hardware seems flimsy. Lay everything out on a clean workbench or blanket so you can easily reach each item while standing on your ladder.
Step 3: Locate the Wall Studs or Ceiling Joists
Finding a solid anchoring point is the most critical part of this entire project. Drywall alone cannot support the weight of a heavy plastic or fiberglass vessel. Run a high-quality stud finder along the surface to pinpoint the exact center of your wooden supports. Mark these locations clearly with a pencil so you know exactly where to drill. If you are working on the ceiling, make sure the joists run in a direction that accommodates the length of your boat. Taking your time to find the true center of the wood guarantees maximum holding strength for your heavy outdoor gear.
Step 4: Measure and Mark the Mounting Points
With your sturdy wooden joists located, you must measure the distance between your mounting brackets carefully. The straps or hooks should support the vessel at its strongest points, which is usually about one-third of the way in from the bow and the stern. Refer to your specific boat manual, as some manufacturers recommend supporting the vessel near the bulkheads. Use your tape measure to space the brackets evenly, ensuring the load remains perfectly balanced. Double-check your measurements before making any holes. A balanced setup prevents the boat from slipping and eliminates unnecessary stress on the hull during the off-season.
Step 5: Drill Pilot Holes for the Hardware
After confirming your measurements, use your power drill to create pilot holes at every pencil mark. Select a drill bit that is slightly smaller than the diameter of your lag bolts. Drilling pilot holes prevents the wooden joists from splitting when you drive the thick metal hardware into the ceiling or wall. This small extra effort significantly increases the structural integrity of your entire suspension system. Keep your drill perfectly straight to ensure the bolts will sit flush against the metal brackets. Wear your safety glasses during this step to protect your eyes from falling sawdust and debris.
Step 6: Secure the Brackets and Pulleys
Now it is time to attach the main hardware components to your sturdy wooden supports. Place the metal bracket over your pilot hole and drive the lag bolts in firmly using a socket wrench or impact driver. Make sure every bolt is tight, but avoid over-tightening, which can strip the wood fibers and weaken the connection. If you are installing a ceiling hoist, thread the ropes through the pulley system exactly as the manufacturer instructions dictate. Give every bracket a firm tug with your hands to verify that the assembly feels completely rock-solid before you introduce the heavy equipment.
Step 7: Hoist and Secure Your Boat
The final phase of learning how to hang kayak in garage spaces involves physically lifting your vessel into position. Carefully lift the boat and slide the support straps under the hull, ensuring they rest flat without twisting. If you are using a hoist, pull the rope slowly and steadily to raise the boat evenly toward the ceiling. Once elevated, tie off the main rope securely to the provided wall cleat. Take a moment to inspect the straps and make sure the vessel sits level. You have now successfully secured your equipment, keeping it protected and ready for travel.
Frequently Asked Questions (FAQ)
Can I Leave My Kayak Hanging All Winter?
Yes, you can safely leave your vessel suspended throughout the winter months. Just ensure your storage space is protected from extreme temperature fluctuations and direct sunlight. To prevent damage, keep the straps positioned near the bulkheads where the hull is strongest. You might also want to cover the boat with a breathable tarp to keep dust and spiders out during the off-season.
Is It Better to Store a Kayak Vertically or Horizontally?
Horizontal storage is generally the safest method for most modern vessels. Hanging your boat horizontally evenly distributes the weight, which prevents the plastic from warping over time. Vertical storage can work for shorter boats if resting on their stern, but it puts unnecessary pressure on one specific end. Whenever possible, opt for horizontal wall mounts or overhead ceiling hoists.
How Much Weight Can a Ceiling Hoist Hold?
Most commercially available ceiling hoists are rated to hold between 75 and 100 pounds. This weight capacity easily accommodates standard recreational and touring models. However, heavy fishing models equipped with pedals and motors can sometimes exceed 120 pounds. Always check the specific weight rating on your hardware packaging and ensure your ceiling joists can handle the extra load.
Do I Need Special Straps to Suspend My Boat?
You should always use wide, flat nylon straps rather than thin ropes or bungee cords. Thin ropes create pressure points that can permanently dent or deform the plastic hull of your vessel. High-quality nylon webbing distributes the load evenly across a wider surface area. Many suspension kits include padded straps specifically designed to protect your equipment from scratches.
Should I Store My Boat Upside Down or Right Side Up?
When resting your vessel on horizontal rack arms, it is usually best to store it upside down resting on its deck. The deck is reinforced and less prone to oil-canning or denting than the bottom hull. If you are using flexible suspension straps, storing it right side up is perfectly acceptable since the straps conform to the hull shape safely without causing damage.
Conclusion
Proper storage is the key to enjoying your paddling adventures for years to come. By moving your vessel off the floor, you protect the hull from devastating damage, keep pests at bay, and reclaim valuable room for your car and camping gear. Getting your equipment organized might require a Saturday afternoon of effort, but the peace of mind is entirely worth it.
Do not let limited square footage stop you from enjoying the great outdoors. Grab your tools, find those ceiling joists, and finally master how to hang kayak in garage environments today. You will love the streamlined look of your newly organized space, and your boat will be perfectly preserved and ready whenever the water calls.

About Caleb
Caleb Merritt is a Virginia-based outdoor writer and gear analyst who has spent over a decade sleeping on the ground, crossing mountain passes, and obsessively shaving grams off his pack weight. He holds a Bachelor of Science in Environmental Science from James Madison University, where he also served as president of the university’s outdoor recreation club. After graduating, he spent three years as a wilderness educator with a backcountry youth program in the Shenandoah Valley — teaching Leave No Trace ethics, backcountry navigation, and campcraft — before moving into full-time writing in 2018.
His work focuses on one core belief: the best gear is the gear you understand. Whether he’s doing a side-by-side weight comparison of ultralight shelters or writing a beginner’s guide to building a sub-20-lb base weight kit, Caleb writes with the same directness you’d expect from a trusted trail partner. He has logged more than 4,000 miles across iconic routes including the John Muir Trail, the Wind River Range, Vermont’s Long Trail, and the Collegiate Peaks Loop in Colorado.
Areas of Expertise
- Ultralight backpacking systems and base weight optimization
- Tent, tarp, and shelter testing across three-season and shoulder-season conditions
- Sleeping bag and quilt temperature rating verification
- Backpacking nutrition, meal planning, and calorie-per-ounce analysis
- Leave No Trace principles and wilderness ethics
- Campfire safety, bear country protocols, and water treatment methods
- Gear care, repair, and long-term durability assessment
Education
James Madison University — B.S. in Environmental Science, 2015
During his time at JMU, Caleb served as President of the Outdoor Recreation Club, where he planned and led more than 30 backcountry trips annually across the Blue Ridge Mountains and Appalachian Trail corridor. The role sharpened his ability to assess gear performance under real conditions, manage group safety in remote environments, and develop the kind of practical trail knowledge that no classroom can teach.
Professional Experience
Gear Writer & Senior Contributor — [campeox.com]
Produces in-depth gear reviews, buyer’s guides, and how-to content across backpacking, camping, and ultralight hiking categories. Tests all gear in real field conditions before publishing recommendations.
Wilderness Educator & Trip Leader — Shenandoah Backcountry Youth Program — 2015–2018 Led multi-day backcountry expeditions for teens and young adults throughout Shenandoah National Park and George Washington National Forest. Taught LNT principles, orienteering, first aid awareness, and campcraft fundamentals.
Outdoor Recreation Club President — James Madison University — 2013–2015 Organized and led university-sponsored hiking, backpacking, and camping trips in the Blue Ridge Mountains and Appalachian Trail corridor. Managed club budget, safety protocols, and trip logistics for a membership of 120+ students.
Editorial Standards
Every piece of gear Caleb recommends has been personally tested in the field — not just unboxed and described. His review process includes a minimum of two overnight trips per shelter, a full-season evaluation for sleep systems, and side-by-side comparisons wherever possible. He does not accept payment for positive reviews. Affiliate relationships, where they exist, are always disclosed in accordance with FTC guidelines.
All factual claims about gear specifications, trail distances, and safety recommendations are cross-referenced against manufacturer data sheets and established sources such as the Leave No Trace Center for Outdoor Ethics and the American Hiking Society before publication.