

Planning your very first camping trip is an exciting milestone. You have your sleeping bag, your favorite trail snacks, and a beautiful destination in mind. However, nothing causes campsite anxiety quite like staring at a pile of nylon and aluminum poles. Figuring out how to set up a tent correctly can feel like solving a complex puzzle. Do not worry.
We have all been that frustrated camper wrestling with rainflies in the wind. This guide breaks the process down into simple, manageable pieces. By following these straightforward instructions, you will transform that confusing bag of fabric into a sturdy, comfortable shelter. You can spend less time stressing over instructions and more time enjoying the great outdoors. Let us dive right in and turn you into a confident camper.
Why Mastering Your Shelter Matters
Building your outdoor shelter properly does much more than just give you a place to sleep. A well-pitched structure protects you from unexpected weather, keeps pesky insects outside, and ensures you wake up rested. When you understand the basics of securing guylines and staking corners, you create a reliable barrier against wind and rain.
This skill builds tremendous confidence for future outdoor adventures. You will never have to cut a trip short because of a collapsed roof or a flooded floor. Plus, quickly assembling your campsite leaves you with plenty of extra daylight. You can spend those precious hours exploring trails, starting a campfire, or simply relaxing under the trees. Knowing the mechanics of your gear is the foundation of a safe, enjoyable wilderness experience.
8 Step-by-Step Guide on How to Set Up a Tent
Step 1: Unpack and Inventory Your Gear
Before you actually begin learning how to set up a tent, you must know what components you are working with. Empty the carry bag completely onto a dry patch of grass. Take a few minutes to identify the main body, the rainfly, the poles, and the stakes. Laying everything out ensures you are not missing any crucial pieces before you start building.
You want to make sure your fiberglass or aluminum poles are intact and the shock cords snap together easily. Separate the stakes into a small pile so you do not lose them in the tall grass. Doing a quick inventory prevents frustration later in the process and helps you understand how the different parts will eventually connect together to form your structure.
Step 2: Choose the Perfect Campsite Location
Finding the right patch of ground makes a massive difference in your sleeping comfort. Look for a flat, even area completely free of sharp rocks, large roots, and low-lying depressions that might collect rainwater. You want to avoid pitching directly under dead tree branches, known as widow-makers, for safety reasons.
Natural windbreaks like large boulders or dense bushes provide excellent protection against strong evening breezes. Clear the chosen footprint area of pinecones and loose twigs before laying anything down. Taking the extra five minutes to select and prepare a premium piece of real estate ensures a much better night of rest. A smooth, flat surface protects your delicate nylon floor from punctures and keeps you from rolling off your sleeping pad.
Step 3: Lay Down the Ground Tarp
Your footprint or ground cloth serves as the crucial barrier between your fragile shelter floor and the rough earth. Spread this protective tarp flat over the cleared area you just prepared. The footprint protects against abrasive dirt, sharp pebbles, and ground moisture that can seep upward during the night. Tuck any edges of the tarp that extend beyond the main floor area underneath itself.
If the footprint sticks out beyond the edges, it will catch rainwater and funnel it directly underneath your sleeping area. Smoothing out the wrinkles ensures a flat interior floor and maximizes the waterproof benefits of the material. This simple barrier extends the lifespan of your expensive camping gear by preventing unnecessary wear and tear.
Step 4: Position the Main Body
Unfold the main fabric shell and place it directly on top of your smoothed footprint. Orient the main door facing your preferred direction, usually away from the prevailing wind or toward a scenic morning view. Pull the four corners outward so the floor pulls relatively taut and flat across the ground tarp.
Some campers prefer to stake these four corners down loosely right now to prevent a sudden gust of wind from blowing the fabric away. Ensure the pole sleeves or clips are facing upward and are easily accessible. Smoothing out the floor at this stage makes the rest of the assembly much easier. Proper alignment over the footprint guarantees that your waterproof barrier functions correctly throughout the night.
Step 5: Assemble and Thread the Poles
Carefully assemble the segmented poles by letting the internal shock cord guide the sections together. Ensure each segment seats completely into the adjoining metal ferrule to prevent splintering or snapping under tension. Most modern freestanding designs use two main poles that cross in the center to form an X shape.
Slide these long poles through the designated fabric sleeves on the top of the structure. If your model uses plastic clips instead of sleeves, lay the poles in the correct crossing pattern over the top. Always push the poles through the sleeves rather than pulling them. Pulling can cause the sections to separate inside the fabric, which creates frustrating snags and potential damage to the delicate mesh material.
Step 6: Raise the Structure
Now comes the exciting part where your pile of nylon finally takes shape. Insert the end of one pole into the grommet or pin located at the corresponding corner of the floor. Walk to the opposite corner and gently bend the pole upward in an arch while inserting that end into its matching grommet. The fabric will lift off the ground and create a dome shape.
Repeat this exact process with the second pole. If you have a clip system, snap the plastic hooks onto the raised arches. Secure the center point where the poles cross with the provided tie or clip. The walls should stand firm, giving you a clear view of your temporary wilderness home.
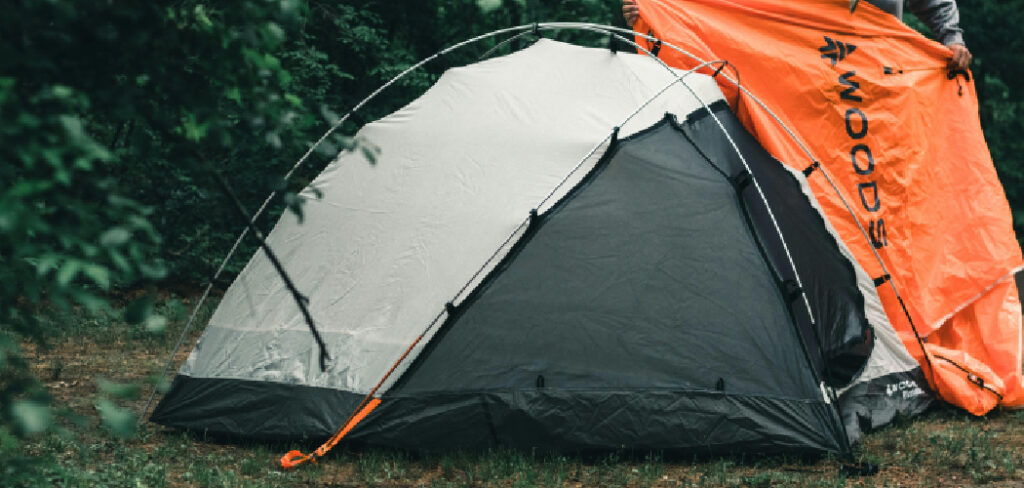
Step 7: Attach the Waterproof Rainfly
Even if the sky looks perfectly clear, you should always attach your rainfly. Weather changes rapidly in the outdoors, and the fly also prevents evening condensation from soaking your sleeping bag. Drape the waterproof cover over the raised pole structure, ensuring the doors align with the main entryways below. Secure the corners of the fly to the corresponding base grommets using the attached buckles or hooks. Reach underneath the fly and attach any Velcro loops directly to the poles for added structural stability. Cinch the corner straps tightly so the fabric pulls taut across the entire dome. A tight rainfly sheds water efficiently and prevents annoying flapping noises when the evening breeze picks up.
Step 8: Stake and Guy Out the Corners
The final phase ensures your shelter remains anchored securely to the earth. Drive metal stakes through the corner webbing loops at a forty-five-degree angle pointing away from the structure. Push them deep into the soil until the hook firmly holds the loop. Next, unroll the guylines attached to the sides of the rainfly.
Pull these thin cords outward and stake them down firmly. Tighten the tensioners on the lines to pull the rainfly away from the inner mesh walls. This separation allows proper airflow and stops condensation from building up inside the cabin. Taking the time to properly anchor every line guarantees your campsite will survive unexpected storms and heavy winds without collapsing.
Frequently Asked Questions (FAQ)
How Do I Clean My Gear After A Trip?
When you return home, immediately unpack your gear to prevent mold and mildew growth. Sweep out any loose dirt from the interior floor. Use a soft sponge and mild, non-detergent soap to gently spot-clean any mud or tree sap. Rinse the area with clean water.
- Never put the fabric in a washing machine
- Hang everything out to dry completely in the shade
- Store loosely in a breathable mesh bag
What Is The Best Way To Keep The Interior Warm?
Retaining heat during chilly nights depends heavily on proper insulation from the cold ground. Choose a sleeping pad with a high R-value to block the freezing temperatures radiating from the earth.
- Keep the rainfly attached to trap body heat
- Close the upper mesh vents slightly to reduce drafts
- Bring a proper sleeping bag rated for the expected temperatures
Avoid using gas heaters inside due to severe safety risks.
Can I Pitch My Shelter On Sand Or Snow?
Yes, but standard thin metal stakes will not hold in loose surfaces like sand or snow. You must purchase specialized wide stakes or snow anchors designed specifically for these environments.
- Dig down to find firmer ground if possible
- Bury heavy items like rocks or logs attached to the guylines
- Pack snow down firmly before laying your footprint
Securing your lines tightly is vital in these conditions.
How Can I Stop Condensation From Forming Inside?
Condensation happens when your warm breath hits the cold outer fabric, turning into water droplets. The most effective way to combat this annoying issue is through maximum ventilation.
- Open the roof vents on your rainfly entirely
- Leave the top portion of the main door unzipped if possible
- Ensure the rainfly is pulled tight and away from the inner walls
Good airflow carries the moisture out.
What Should I Do If A Pole Breaks?
A snapped pole does not necessarily mean your trip is completely ruined. Most modern kits include a small, hollow metal tube called a repair splint.
- Slide the splint over the broken section of the pole
- Wrap the area tightly with heavy-duty repair tape
- If you lack a splint, bind a sturdy stick to the break
Replace the damaged segment properly once you return home.
Conclusion
Mastering campsite setup transforms outdoor adventures from stressful chores into deeply rewarding experiences. We covered everything from choosing a safe, flat footprint to securing your guylines against unpredictable weather. By unpacking carefully, threading the poles gently, and anchoring the rainfly securely, you build a reliable and comfortable home in nature. Now that you understand the mechanics of guy-out lines and protective ground covers, you are completely ready for your next big adventure.
Do not let a pile of nylon hold you back from exploring beautiful trails and quiet forests. Gather your gear, pick a stunning destination, and practice how to set up a tent in your own backyard first. With a little bit of patience and this simple guide, you will pitch your shelter like a seasoned outdoor expert in no time.
About Caleb
Caleb Merritt is a Virginia-based outdoor writer and gear analyst who has spent over a decade sleeping on the ground, crossing mountain passes, and obsessively shaving grams off his pack weight. He holds a Bachelor of Science in Environmental Science from James Madison University, where he also served as president of the university’s outdoor recreation club. After graduating, he spent three years as a wilderness educator with a backcountry youth program in the Shenandoah Valley — teaching Leave No Trace ethics, backcountry navigation, and campcraft — before moving into full-time writing in 2018.
His work focuses on one core belief: the best gear is the gear you understand. Whether he’s doing a side-by-side weight comparison of ultralight shelters or writing a beginner’s guide to building a sub-20-lb base weight kit, Caleb writes with the same directness you’d expect from a trusted trail partner. He has logged more than 4,000 miles across iconic routes including the John Muir Trail, the Wind River Range, Vermont’s Long Trail, and the Collegiate Peaks Loop in Colorado.
Areas of Expertise
- Ultralight backpacking systems and base weight optimization
- Tent, tarp, and shelter testing across three-season and shoulder-season conditions
- Sleeping bag and quilt temperature rating verification
- Backpacking nutrition, meal planning, and calorie-per-ounce analysis
- Leave No Trace principles and wilderness ethics
- Campfire safety, bear country protocols, and water treatment methods
- Gear care, repair, and long-term durability assessment
Education
James Madison University — B.S. in Environmental Science, 2015
During his time at JMU, Caleb served as President of the Outdoor Recreation Club, where he planned and led more than 30 backcountry trips annually across the Blue Ridge Mountains and Appalachian Trail corridor. The role sharpened his ability to assess gear performance under real conditions, manage group safety in remote environments, and develop the kind of practical trail knowledge that no classroom can teach.
Professional Experience
Gear Writer & Senior Contributor — [campeox.com]
Produces in-depth gear reviews, buyer’s guides, and how-to content across backpacking, camping, and ultralight hiking categories. Tests all gear in real field conditions before publishing recommendations.
Wilderness Educator & Trip Leader — Shenandoah Backcountry Youth Program — 2015–2018 Led multi-day backcountry expeditions for teens and young adults throughout Shenandoah National Park and George Washington National Forest. Taught LNT principles, orienteering, first aid awareness, and campcraft fundamentals.
Outdoor Recreation Club President — James Madison University — 2013–2015 Organized and led university-sponsored hiking, backpacking, and camping trips in the Blue Ridge Mountains and Appalachian Trail corridor. Managed club budget, safety protocols, and trip logistics for a membership of 120+ students.
Editorial Standards
Every piece of gear Caleb recommends has been personally tested in the field — not just unboxed and described. His review process includes a minimum of two overnight trips per shelter, a full-season evaluation for sleep systems, and side-by-side comparisons wherever possible. He does not accept payment for positive reviews. Affiliate relationships, where they exist, are always disclosed in accordance with FTC guidelines.
All factual claims about gear specifications, trail distances, and safety recommendations are cross-referenced against manufacturer data sheets and established sources such as the Leave No Trace Center for Outdoor Ethics and the American Hiking Society before publication.


