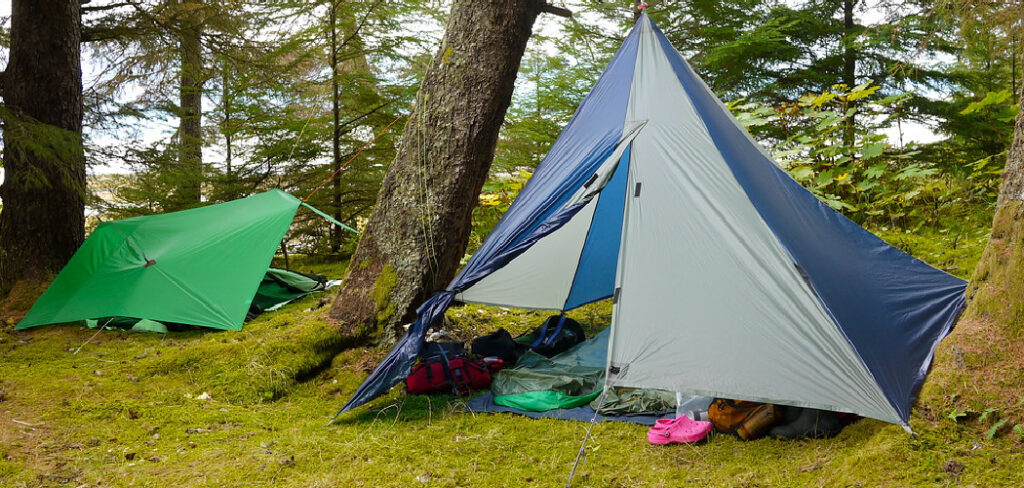
Camping brings us closer to nature, but carrying heavy gear can quickly exhaust even the most enthusiastic hikers. If you want to lighten your backpack while still enjoying excellent protection from the elements, learning how to make a tarp tent is an absolute game-changer. This minimalist shelter approach provides incredible versatility, allowing you to adapt to changing weather conditions on the fly.
You do not need expensive, complicated equipment to stay dry and comfortable in the wild. With just a few basic materials and a bit of practice, you can build a sturdy, reliable shelter almost anywhere. In this guide, we will walk you through the entire process from start to finish. You will discover exactly what gear you need, where to pitch your setup, and the techniques required to sleep soundly under the stars.
Why You Should Master the Art of Minimalist Shelters
Creating your own wilderness shelter offers incredible benefits that go far beyond simply dropping pack weight. A standard cabin-style tent locks you into one specific shape and footprint, which can be tricky to pitch on uneven or rocky terrain. A basic canvas or nylon canopy, on the other hand, gives you the ultimate freedom to customize your footprint based on the landscape around you.
When you understand the fundamentals of this outdoor skill, you become much more adaptable. You can configure a low-profile windbreak during a sudden storm or string up a highly ventilated canopy on a hot summer night. Furthermore, this method connects you deeply with your environment. You learn to read the wind, respect the terrain, and utilize natural anchors like trees and boulders. Embracing this lightweight camping style saves you money on expensive gear and drastically increases your overall wilderness survival confidence.
8 Step-by-Step Guide on How to Make a Tarp Tent
Step 1: Gather Your Essential Gear and Materials
Before heading into the woods, you must assemble the right equipment. You will need a high-quality, waterproof canopy, ideally measuring at least eight by ten feet to provide adequate coverage for a single sleeper and their gear. Next, gather about forty feet of strong paracord to serve as your main suspension system and guy lines.
You should also pack at least six lightweight aluminum stakes to pin everything down tightly to the earth. Finally, bringing a small groundsheet or bivy sack is crucial for keeping your sleeping bag clean and dry. Having these exact items organized in your pack ensures you will not be scrambling for makeshift solutions when the sun starts to set over your campsite.
Step 2: Choose the Perfect Campsite Location
Finding the right spot to pitch your shelter is half the battle. You want to look for relatively flat ground that is free from sharp rocks, thick roots, and low-lying depressions where rainwater might pool. Scan the area for two sturdy, living trees spaced about ten to fifteen feet apart. These will act as the foundational pillars for your setup.
Always look up to ensure there are no dead branches, commonly known as widow-makers, hanging directly above your chosen sleeping zone. Furthermore, try to position your setup perpendicular to the prevailing wind direction. This orientation prevents powerful gusts from blowing straight into your sleeping area, keeping you significantly warmer and safer throughout the night.
Step 3: Learn How to Make a Tarp Tent Ridge Line
The foundation of your entire shelter relies on creating a tight, dependable ridge line. This is the horizontal rope suspended between your two chosen trees that will support the roof of your shelter. Take your main piece of paracord and wrap one end around the first tree at about waist or chest height, depending on how much headroom you want.
Secure this end using a reliable knot, like a bowline, which holds firm under pressure but remains easy to untie later. Walk the remaining cord over to the second tree, ensuring the line is free of tangles. Pull the rope as tight as humanly possible. A sagging roof will collect rainwater and eventually collapse on top of you, so tension is absolutely critical here.
Step 4: Secure the Rope Using a Trucker’s Hitch
To get that main suspension line tight enough to support your canopy, you should utilize a specific mechanical advantage knot known as the trucker’s hitch. Once you have looped the cord around your second tree, create a small loop in the line about two feet away from the trunk. Pass the tail end of your rope through this loop and pull back toward the tree.
This pulley-like action allows you to crank the suspension line incredibly taut. Once you achieve a tight, guitar-string-like tension, pinch the cord and tie it off securely with a couple of half-hitches. Practice tying this specific knot a few times in your backyard before your trip, as it makes setting up your wilderness bedroom much easier and faster.
Step 5: Drape and Position Your Canopy
With your main suspension cord pulled tight between the trees, it is time to lay out your roof. Carefully drape your waterproof fabric evenly over the suspended rope. You generally want an equal amount of material hanging down on both sides to create a classic A-frame shape, which is highly effective at shedding heavy rain and deflecting wind.
Position the material so that the center crease aligns perfectly with the rope. Take a moment to smooth out any heavy wrinkles or folds. If your fabric has center tie-out loops along the spine, you can use small pieces of twine or prusik knots to attach these loops directly to the suspended cord. This prevents the fabric from sliding back and forth during sudden gusts of wind.
Step 6: Master How to Make a Tarp Tent Base Secure
Now that the roof is resting on the rope, you must anchor the bottom edges to the ground to form the walls. Start at one of the four corners. Pull the fabric out away from the center line until it is reasonably tight, and drive an aluminum stake through the corner grommet or tie-out loop at a forty-five-degree angle away from the shelter.
Move to the opposite corner on the same side and repeat the process, ensuring the wall is flat and taut. Once one side is securely anchored, walk around to the other side and do the exact same thing. Driving the stakes deep into firm soil ensures your temporary home will remain firmly planted even if a midnight storm rolls through the valley.
Step 7: Attach Guy Lines for Extra Stability
Sometimes, pinning the corners directly to the earth does not give you enough interior headroom. To create a more spacious living area, you can attach short pieces of paracord, known as guy lines, to the corner loops instead of staking the fabric straight to the dirt. Tie a three-foot length of cord to each corner grommet.
Pull the cord outward and stake the end of the line into the ground. Doing this lifts the side walls slightly off the earth, allowing fresh air to circulate beneath the edges. This increased airflow heavily reduces interior condensation, keeping your sleeping bag dry from morning dew while also giving your shoulders a bit more room to move around inside.
Step 8: Adjust the Tension for Weather Protection
The final step is to walk around your completed setup and make necessary adjustments to the tension. A well-pitched shelter should look crisp, with no loose, flapping material. If you spot a sagging wall, simply pull the corresponding stake out of the dirt, stretch the guy line a little further, and drive the stake back down.
If rain is expected, you might want to lower the main suspension rope on the trees to bring the roof closer to the ground, trapping more body heat inside. Conversely, on clear, starry nights, you can pitch one side high up like an awning to enjoy the view. Always double-check your knots and stakes before crawling into your sleeping bag for the night.
Frequently Asked Questions (FAQ)
What Size Tarp Is Best For A Solo Camper?
For a single person, an 8×10 foot canopy is widely considered the sweet spot. This dimension offers several distinct advantages:
- Provides ample room to sleep comfortably without touching the wet walls.
- Leaves enough dry space to store your backpack and boots.
- Allows for multiple pitching configurations, including A-frames and lean-tos.
Anything smaller might expose your feet to rain, while larger sizes simply add unnecessary weight to your pack.
Can A Tarp Shelter Protect Me From Heavy Rain?
Yes, it can offer phenomenal protection from heavy downpours if pitched correctly. The secret lies in creating a steep roof angle to shed water quickly and pulling the fabric extremely taut so water cannot pool. You should also ensure you pitch your setup on a slight incline so runoff water drains away from your sleeping pad rather than flowing underneath you.
Do I Need Special Knots To Set Up A Tarp Shelter?
While you do not need to be a master sailor, knowing three basic knots makes the process infinitely easier. You should practice the following:
- The Bowline: For creating a secure, non-slip loop at the first tree.
- The Trucker’s Hitch: For pulling the main suspension line incredibly tight.
- The Taut-Line Hitch: For easily adjusting the tension on your corner guy lines.
What Type Of Rope Is Best For The Ridge Line?
Standard 550 paracord is the most popular choice among backpackers. It is inexpensive, widely available, and boasts a 550-pound breaking strength, which is more than enough to support your roof in high winds. Alternatively, you can use high-tech UHMWPE cordage like Amsteel or Zing-It. These advanced ropes are much thinner, lighter, and have practically zero stretch, keeping your setup tight all night long.
How Can I Keep Bugs Away In A Tarp Shelter?
Because this shelter style lacks a built-in floor and mesh walls, dealing with insects requires a bit of extra preparation. Here are the best methods:
- Hang a specialized bug net from your overhead suspension cord.
- Use a lightweight, water-resistant bivy sack that features a mesh face panel.
- Apply a reliable insect repellent before bed and pitch your setup away from stagnant water.
Conclusion
Transitioning away from heavy, enclosed tents opens up an entirely new world of outdoor exploration. By carrying a simple piece of waterproof fabric and some sturdy cord, you dramatically reduce your pack weight and increase your connection to the surrounding environment. We have covered the essential gear, the best knots, and the exact process required to pitch a sturdy, reliable shelter in any condition. Now it is time for you to take these skills into the field.
Grab some paracord, head out to your backyard or a local forest, and practice how to make a tarp tent for yourself. The more you experiment with different shapes, angles, and knots, the more confident you will become for your next big wilderness adventure. Stay dry, have fun, and enjoy the great outdoors!
About Caleb
Caleb Merritt is a Virginia-based outdoor writer and gear analyst who has spent over a decade sleeping on the ground, crossing mountain passes, and obsessively shaving grams off his pack weight. He holds a Bachelor of Science in Environmental Science from James Madison University, where he also served as president of the university’s outdoor recreation club. After graduating, he spent three years as a wilderness educator with a backcountry youth program in the Shenandoah Valley — teaching Leave No Trace ethics, backcountry navigation, and campcraft — before moving into full-time writing in 2018.
His work focuses on one core belief: the best gear is the gear you understand. Whether he’s doing a side-by-side weight comparison of ultralight shelters or writing a beginner’s guide to building a sub-20-lb base weight kit, Caleb writes with the same directness you’d expect from a trusted trail partner. He has logged more than 4,000 miles across iconic routes including the John Muir Trail, the Wind River Range, Vermont’s Long Trail, and the Collegiate Peaks Loop in Colorado.
Areas of Expertise
- Ultralight backpacking systems and base weight optimization
- Tent, tarp, and shelter testing across three-season and shoulder-season conditions
- Sleeping bag and quilt temperature rating verification
- Backpacking nutrition, meal planning, and calorie-per-ounce analysis
- Leave No Trace principles and wilderness ethics
- Campfire safety, bear country protocols, and water treatment methods
- Gear care, repair, and long-term durability assessment
Education
James Madison University — B.S. in Environmental Science, 2015
During his time at JMU, Caleb served as President of the Outdoor Recreation Club, where he planned and led more than 30 backcountry trips annually across the Blue Ridge Mountains and Appalachian Trail corridor. The role sharpened his ability to assess gear performance under real conditions, manage group safety in remote environments, and develop the kind of practical trail knowledge that no classroom can teach.
Professional Experience
Gear Writer & Senior Contributor — [Your Website Name]
Produces in-depth gear reviews, buyer’s guides, and how-to content across backpacking, camping, and ultralight hiking categories. Tests all gear in real field conditions before publishing recommendations.
Wilderness Educator & Trip Leader — Shenandoah Backcountry Youth Program — 2015–2018 Led multi-day backcountry expeditions for teens and young adults throughout Shenandoah National Park and George Washington National Forest. Taught LNT principles, orienteering, first aid awareness, and campcraft fundamentals.
Outdoor Recreation Club President — James Madison University — 2013–2015 Organized and led university-sponsored hiking, backpacking, and camping trips in the Blue Ridge Mountains and Appalachian Trail corridor. Managed club budget, safety protocols, and trip logistics for a membership of 120+ students.
Editorial Standards
Every piece of gear Caleb recommends has been personally tested in the field — not just unboxed and described. His review process includes a minimum of two overnight trips per shelter, a full-season evaluation for sleep systems, and side-by-side comparisons wherever possible. He does not accept payment for positive reviews. Affiliate relationships, where they exist, are always disclosed in accordance with FTC guidelines.
All factual claims about gear specifications, trail distances, and safety recommendations are cross-referenced against manufacturer data sheets and established sources such as the Leave No Trace Center for Outdoor Ethics and the American Hiking Society before publication.