Nothing beats the thrill of a weekend camping trip, but returning home with dirty, smelly gear can quickly dampen your spirits. Over time, sweat, body oils, camp smoke, and dirt build up inside your cozy nighttime retreat. This buildup degrades the insulating materials, leaving you cold and uncomfortable during your next outdoor adventure.
Taking proper care of your gear ensures it lasts longer and performs better. You might feel nervous about tossing such a bulky, delicate item into an appliance, but the process is surprisingly simple once you know the basics. If you want to learn how to wash sleeping bags in washing machine safely, you are in the right place. We will walk you through exactly what you need to do to refresh your favorite piece of camping equipment without ruining its loft or fabric.
Why Proper Maintenance Matters for Your Gear
Many campers assume their heavy-duty outdoor gear can withstand anything, but insulation requires specific care. Down and synthetic fills rely on trapped air to keep you warm. When oils and grime coat these fibers, they clump together and lose their ability to retain heat. Regular cleaning restores this vital loft and extends the lifespan of your investment.
You do not need to clean your gear after every single trip. For most casual campers, a thorough yearly cleaning works perfectly. Frequent washers risk wearing out the delicate shell fabrics and stressing the internal baffles. However, when you notice lingering odors or visible grime around the hood and collar, it is time to take action. Understanding the proper cleaning methods saves you money on expensive replacements and guarantees a warm, comfortable night under the stars.
8 Step-by-Step Guide on How to Wash Sleeping Bags in Washing Machine
Step 1: Read the Manufacturer Care Label
Before you do anything else, locate the care tag attached to your gear. Every brand uses different shell materials and insulation types, meaning they have unique care requirements. The manufacturer knows exactly what their product can handle. This tiny tag tells you the maximum water temperature, whether you should use delicate cycles, and if machine drying is permitted. Ignoring these instructions often leads to melted fabrics or ruined insulation. Take a few minutes to read and understand these symbols. If the tag has worn off over the years, check the manufacturer’s website for digital manuals. Proceeding without this essential knowledge risks completely destroying your expensive camping equipment before the cleaning process even truly begins.
Step 2: Pre-Treat Stubborn Stains and Dirt
You will likely find heavy soil around the hood, collar, and footbox of your gear. These areas absorb the most sweat and oils while you sleep. Grab a soft-bristled toothbrush and a small amount of heavy-duty specialized technical wash. Gently work this soap into the worst stains. Scrubbing too aggressively can tear the thin nylon shell, so use a light touch. Allow this pre-treatment to sit for about fifteen minutes. This extra attention breaks down tough campfire soot and body oils that a standard wash cycle might miss. Taking the time to pre-treat ensures the final result is completely fresh and ready for your next big outdoor excursion.
Step 3: Secure All Zippers and Fasteners
A loose zipper acts like a tiny saw blade inside a spinning drum. Before loading your gear, zip up all the main zippers completely. Fasten any velcro straps, close all pocket snaps, and tie up loose drawstrings. Leaving these items unsecured allows them to catch on the delicate nylon fabric, causing permanent rips or tears. Additionally, an unzipped bag can twist and tangle around itself, preventing the water and detergent from circulating properly. Securing everything creates a compact, safe bundle that moves smoothly through the water. This simple preventative step takes only a few seconds but prevents disastrous snags that could ruin your favorite piece of camping gear forever.
Step 4: Choose the Right Washing Appliance
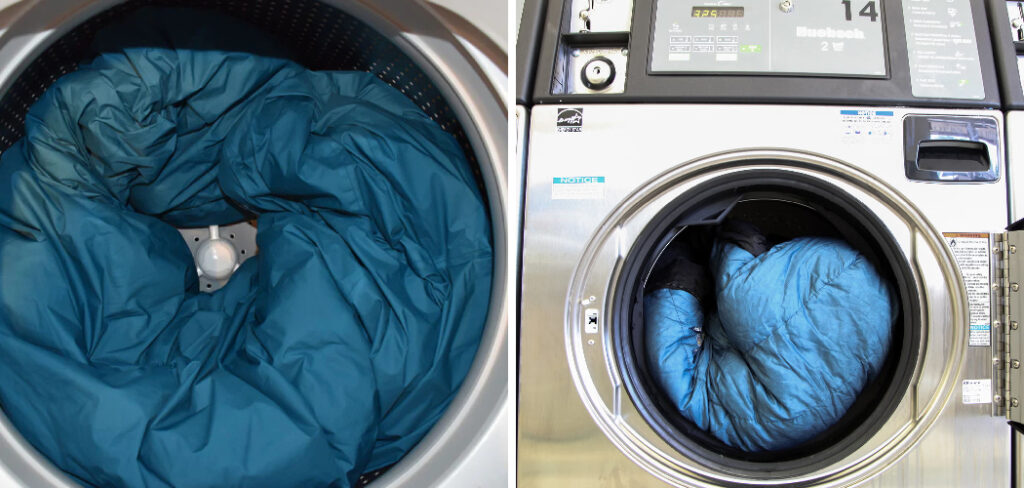
Never use an appliance with a center agitator for this task. Those tall plastic spindles found in top-loading models easily grab, twist, and rip delicate nylon shells. Instead, you must use a large-capacity front-loading model. If you only have a top-loader with an agitator at home, you will need to take a quick trip to your local laundromat. Commercial front-loaders offer plenty of space for bulky items to tumble freely. The drum must be large enough that the item does not feel completely crammed inside. Adequate space allows water and soap to penetrate the thick insulation thoroughly, ensuring a completely clean and refreshed final product.
Step 5: Add the Correct Specialty Detergent
Standard household laundry detergents contain harsh chemicals, heavy perfumes, and brighteners that strip essential natural oils from down feathers. They also leave behind a sticky residue on synthetic fibers. You must purchase a specialized technical cleaner designed specifically for your type of insulation. Pour the exact amount recommended on the detergent bottle into the dispenser drawer. Using too much soap makes it incredibly difficult to rinse out completely, which leaves the insulation flat and useless. Investing in the proper cleaning solution protects the delicate water-repellent coating on the exterior shell and keeps the internal fibers fluffy, warm, and ready for extreme weather conditions.
Step 6: Select a Gentle Wash Cycle
Set your appliance to the delicate or gentle cycle. You want the drum to rotate slowly and carefully. Use cold or lukewarm water, as hot water can melt synthetic fibers and destroy the waterproof adhesives holding the seams together. A slow spin speed is absolutely crucial during this step. High-speed spinning creates intense centrifugal force that can literally tear the internal baffles right out of the shell. You want the machine to handle the heavy, waterlogged fabric as gently as possible. Taking a conservative approach with your machine settings prevents unnecessary wear and tear, keeping your gear perfectly intact throughout the entire cleaning process.
Step 7: Run an Additional Rinse Cycle
Thick insulation traps soap exceptionally well. Even if you used the correct amount of specialty detergent, a single rinse cycle rarely removes all the suds. Leaving soap residue inside the baffles causes the filling to clump tightly together, entirely ruining its ability to trap body heat. Program your appliance to run at least one extra rinse cycle. If you peek through the glass door and still see bubbles during the second rinse, run it a third time. The water must run completely clear before you move on to the drying phase. This extra step guarantees maximum fluffiness and restores your gear to its original, factory-fresh condition.
Step 8: Dry the Gear Slowly and Carefully
Moving a soaking wet, heavy bag requires extreme care. Support the entire weight from underneath so you do not pop any internal stitches. Place it into a large commercial dryer on the lowest heat setting available. Toss in three clean tennis balls to help break up clumps of wet insulation as the drum turns. Check the progress every thirty minutes, manually pulling apart any stubborn clumps you feel through the fabric. This process can take several hours, but patience is vital. High heat melts nylon instantly, so keep the temperature low and steady until the entire item feels completely dry and fluffy to the touch.
Frequently Asked Questions
Can I Use Normal Laundry Detergent?
No, you should avoid standard household detergents entirely. Normal soaps contain harsh chemicals, artificial fragrances, and brighteners that damage delicate fabrics. They strip natural oils from down feathers and leave a heavy residue on synthetic fibers. Always purchase a specialized technical wash to protect your gear.
- Use down-specific wash for feather fills.
- Use synthetic-specific wash for polyester fills.
How Often Should I Clean My Gear?
Most average campers only need to clean their gear once a year, usually at the end of the camping season. Washing it too frequently causes unnecessary wear on the fabric and internal baffles. Only clean it mid-season if it smells bad, feels noticeably flat, or has heavy visible dirt.
Is Dry Cleaning a Safe Alternative?
Dry cleaning is incredibly damaging to outdoor camping equipment. The harsh industrial solvents used in the dry cleaning process strip the natural oils from down feathers and dissolve the durable water-repellent (DWR) coating on the outer shell. You should never take your outdoor sleep equipment to a professional dry cleaner.
Should I Store It in a Stuff Sack Afterward?
Never store your gear compressed in a stuff sack long-term. Keeping the insulation tightly crushed for months ruins its ability to loft and trap heat. Instead, store it loosely inside a large, breathable cotton storage sack, or hang it up in a dry closet to maintain maximum warmth.
What Should I Do if the Zipper Gets Stuck During Washing?
If you forgot to zip up your gear and it gets caught inside the machine, do not pull aggressively. Stop the machine immediately and gently work the fabric out of the zipper teeth. Pushing and pulling forcefully will tear the thin nylon shell, requiring expensive professional repairs.
Conclusion
Taking care of your outdoor equipment does not have to be a stressful or complicated chore. By using the right specialty soaps, choosing a front-loading machine, and drying everything on a low heat setting, you can easily maintain your gear for years to come. Properly maintained insulation keeps you significantly warmer, ensuring you wake up well-rested and ready to tackle the hiking trails.
Now that you know the exact steps, it is time to grab your dirty gear and give it the refresh it desperately needs before your next big trip. Do not let dirt and camp smoke ruin your investment. Once you master how to wash sleeping bags in washing machine, you will never have to worry about shivering through a cold night at the campsite again. Gather your supplies, check those care labels, and enjoy the feeling of climbing into a fresh, fluffy, and clean bed under the stars.

About Caleb
Caleb Merritt is a Virginia-based outdoor writer and gear analyst who has spent over a decade sleeping on the ground, crossing mountain passes, and obsessively shaving grams off his pack weight. He holds a Bachelor of Science in Environmental Science from James Madison University, where he also served as president of the university’s outdoor recreation club. After graduating, he spent three years as a wilderness educator with a backcountry youth program in the Shenandoah Valley — teaching Leave No Trace ethics, backcountry navigation, and campcraft — before moving into full-time writing in 2018.
His work focuses on one core belief: the best gear is the gear you understand. Whether he’s doing a side-by-side weight comparison of ultralight shelters or writing a beginner’s guide to building a sub-20-lb base weight kit, Caleb writes with the same directness you’d expect from a trusted trail partner. He has logged more than 4,000 miles across iconic routes including the John Muir Trail, the Wind River Range, Vermont’s Long Trail, and the Collegiate Peaks Loop in Colorado.
Areas of Expertise
- Ultralight backpacking systems and base weight optimization
- Tent, tarp, and shelter testing across three-season and shoulder-season conditions
- Sleeping bag and quilt temperature rating verification
- Backpacking nutrition, meal planning, and calorie-per-ounce analysis
- Leave No Trace principles and wilderness ethics
- Campfire safety, bear country protocols, and water treatment methods
- Gear care, repair, and long-term durability assessment
Education
James Madison University — B.S. in Environmental Science, 2015
During his time at JMU, Caleb served as President of the Outdoor Recreation Club, where he planned and led more than 30 backcountry trips annually across the Blue Ridge Mountains and Appalachian Trail corridor. The role sharpened his ability to assess gear performance under real conditions, manage group safety in remote environments, and develop the kind of practical trail knowledge that no classroom can teach.
Professional Experience
Gear Writer & Senior Contributor — [campeox.com]
Produces in-depth gear reviews, buyer’s guides, and how-to content across backpacking, camping, and ultralight hiking categories. Tests all gear in real field conditions before publishing recommendations.
Wilderness Educator & Trip Leader — Shenandoah Backcountry Youth Program — 2015–2018 Led multi-day backcountry expeditions for teens and young adults throughout Shenandoah National Park and George Washington National Forest. Taught LNT principles, orienteering, first aid awareness, and campcraft fundamentals.
Outdoor Recreation Club President — James Madison University — 2013–2015 Organized and led university-sponsored hiking, backpacking, and camping trips in the Blue Ridge Mountains and Appalachian Trail corridor. Managed club budget, safety protocols, and trip logistics for a membership of 120+ students.
Editorial Standards
Every piece of gear Caleb recommends has been personally tested in the field — not just unboxed and described. His review process includes a minimum of two overnight trips per shelter, a full-season evaluation for sleep systems, and side-by-side comparisons wherever possible. He does not accept payment for positive reviews. Affiliate relationships, where they exist, are always disclosed in accordance with FTC guidelines.
All factual claims about gear specifications, trail distances, and safety recommendations are cross-referenced against manufacturer data sheets and established sources such as the Leave No Trace Center for Outdoor Ethics and the American Hiking Society before publication.