Getting ready for your first wilderness adventure brings plenty of excitement, but staring at a pile of gear can quickly feel overwhelming. One of the biggest hurdles beginners face is figuring out how to fit a bulky shelter inside their bag without taking up every inch of space. You need your gear to sit comfortably against your back so you can hike miles without pain.
We will walk through the exact process experienced hikers use to distribute weight evenly and protect their shelters. Learning how to pack a tent in a backpack properly transforms an awkward, heavy load into a manageable, balanced carry. By the time you finish reading, you will understand the mechanics of weight distribution and gear compression. This guide exists to teach you the specific techniques required to stow your shelter efficiently, ensuring a comfortable hike from the trailhead to your campsite.
Why Mastering Pack Organization Matters
Hitting the trail with a poorly loaded bag turns a beautiful hike into a miserable struggle. When heavy items sit in the wrong place, they pull you backward or shift your center of gravity. This constant imbalance forces your muscles to work harder, draining your energy much faster than necessary. Proper weight distribution keeps you stable on rocky terrain and prevents shoulder pain.
Organizing your gear correctly also protects your expensive equipment from damage. Shoving fabric blindly into a bag can bend poles, tear mesh screens, or snap fragile stakes. When you load your bag methodically, you shield delicate materials from friction and weather. Developing a consistent packing system saves you time at camp, letting you set up your shelter quickly before the sun goes down or the rain starts falling.
Tools and Materials You’ll Need
Before you start rolling fabric and organizing gear, gather everything in a clean, dry area. Having all your components laid out prevents you from forgetting crucial pieces at home. You do not need much, but preparing your equipment beforehand makes the entire process smooth and frustration-free.
Here are the essentials you need to gather:
- Your complete tent system, including the main body and rainfly
- The manufacturer-provided storage sack or a separate dry bag
- Collapsible support poles
- Ground stakes and their designated storage pouch
- A ground footprint or protective tarp
- Your hiking backpack with a capacity of at least forty liters
- Compression straps (optional, but highly recommended for squeezing out extra air)
9 Step-by-Step Guide on How to Pack a Tent in a Backpack
Step 1 – Clean and Dry Your Fabric Properly
Before you even think about putting your shelter inside your bag, you must ensure the fabric is completely clean and dry. Moisture trapped inside tightly rolled nylon breeds mildew rapidly, ruining the waterproof coating and creating terrible odors. Shake out the fabric to remove dirt, pine needles, and stray pebbles that could puncture the delicate floor material.
If you just returned from a damp trip, hang the fabric over a shower rod or clothesline until every inch feels bone dry to the touch. Pay special attention to the seams and corners, as water tends to hide in these reinforced areas. Spending a few extra minutes drying your gear prevents long-term damage and keeps your equipment smelling fresh. You want your shelter in pristine condition before you begin the packing process.
Step 2 – Fold the Main Body and Rainfly
Once everything is completely dry, lay the main body flat on the ground and smooth out any wrinkles. Push all the air toward the door openings so the fabric lies as flat as possible. Place the rainfly directly on top of the main body, aligning the edges to create a single, uniform rectangle.
Fold the edges inward toward the center, creating a long, narrow strip that matches the length of your support poles. Keeping the width consistent is critical here, as a messy fold results in a lopsided roll that wastes valuable space. Take your time to create crisp, clean lines, smoothing the material down after every single fold. Understanding how to pack a tent in a backpack requires mastering this exact folding technique to eliminate trapped air pockets.
Step 3 – Roll the Fabric Tightly
With your fabric folded into a neat, uniform strip, place your bagged poles at one end of the rectangle. You will use the sturdy poles as a central core to roll the fabric around, providing structure and making the rolling process much easier. Begin rolling the fabric tightly over the pole bag, applying firm, even pressure with both hands.
As you roll, use your knees to press down on the material, forcing any remaining air out through the edges. The tighter you make this roll, the smaller the final package becomes, leaving you with much more room for food and extra clothing. If the roll becomes loose or uneven, unroll it and start over. A sloppy, loose bundle will expand inside your bag and consume necessary space.
Step 4 – Secure the Bundle in a Storage Sack
Carefully slide your tightly rolled cylinder into its designated storage sack or a waterproof dry bag. If you find yourself fighting to get the bundle inside, your roll was likely too wide or too loose, and you should try rolling it again. Once the fabric is inside, slide the small pouch containing your stakes down the side of the bag.
Cinch the top of the storage sack completely closed, ensuring no fabric hangs out of the opening. If your sack features compression straps, pull them tight to squeeze out the absolute last bit of excess air. This compressed, solid package is now ready to be loaded safely into your main carrying system. A properly secured sack prevents the material from unrolling and shifting while you hike over rough terrain.
Step 5 – Load Your Sleeping Bag First
Before placing your shelter inside, you must build a solid foundation at the very bottom of your bag. Your sleeping bag should always go in first, acting as a soft, shock-absorbing base for the heavier items above it. Stuff your sleeping bag into the bottom compartment, pressing it firmly into the corners to eliminate dead space.
This bottom layer provides a cushion that prevents rigid items from jabbing into your lower back while you walk. It also keeps your sleeping bag separated from anything heavy or dirty. Creating this sturdy base is a critical rule of backpack organization, ensuring the overall load remains stable. With the base established, you are ready to position your heaviest gear right where it belongs.
Step 6 – Position the Shelter Against Your Spine
Now it is time to load your shelter into the bag, placing it directly on top of your sleeping bag. Position the heavy cylindrical bundle vertically, keeping it as close to the back panel—and therefore your spine—as possible. Keeping dense weight close to your center of gravity prevents the bag from pulling you backward on steep inclines.
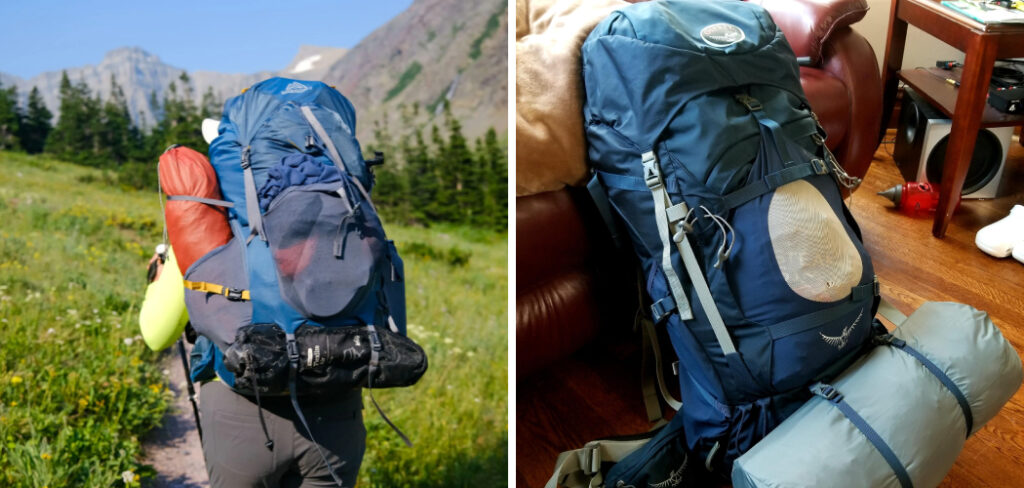
Knowing exactly how to pack a tent in a backpack means never strapping the heaviest items to the outside of your bag. When you keep the heavy shelter centered and close to your body, your hips carry the weight naturally and comfortably. Pack your clothing and cooking gear around the shelter to hold it firmly in place. This creates a locked-in, stable load that moves precisely with your body.
Step 7 – Store the Poles Separately if Necessary
Sometimes a rolled shelter is simply too wide to fit horizontally or vertically inside a smaller bag. When this happens, remove the poles from the center of the roll and pack the fabric and poles separately. Stuff the fabric tightly into the bottom of your bag to fill awkward empty spaces around your bear canister or clothing.
Take the rigid poles and slide them vertically down the interior side of the bag, close to the back panel. Alternatively, you can slide the poles into an exterior side pocket, securing them tightly with your bag’s side compression straps. Splitting the components up offers incredible flexibility, especially when managing a multi-day loadout in a smaller volume bag. Always ensure external poles are strapped down tightly so they do not snag on passing branches.
Step 8 – Perform a Balance Check
After loading the rest of your food, water, and clothing, pick up the entire bag by the top haul loop. Lift it slightly off the ground and observe how it hangs in your hand. If the bag tilts heavily to the left or right, you need to unpack and shift your gear to equalize the weight.
Put the bag on your back, buckle the hip belt tightly, and walk around your living room for a few minutes. You should not feel anything sharp poking your back, and the load should sit squarely on your hips, not your shoulders. A perfectly balanced bag feels much lighter than it actually is, saving your energy for the trail. Making these adjustments at home prevents misery and constant repacking once you are deep in the woods.
Common Mistakes When Packing a Tent
Many beginners completely ignore weight distribution and strap their shelter to the very bottom of their backpack. Putting a heavy object on the outside bottom swings violently as you walk, throwing off your balance and straining your shoulders. External mounting also exposes delicate nylon to sharp rocks, thorny bushes, and sudden rainstorms that can ruin your trip.
Another frequent mistake involves rolling the fabric while it is still damp from morning dew or condensation. Trapping moisture inside a stuff sack creates a perfect environment for mold, which destroys waterproof coatings and leaves permanent, terrible odors. Failing to sweep out the interior before rolling is equally destructive. Sharp twigs, small rocks, or even pine needles left inside will puncture holes through the expensive floor material when tightly compressed.
Finally, people often fold the fabric identically every single time they put it away. Folding along the exact same crease lines repeatedly weakens the material and eventually causes the waterproof treatment to flake off. You should vary your folds slightly or simply stuff the fabric randomly into the sack to avoid permanent creases.
Expert Tips
Experienced backpackers often ditch the factory-provided storage sacks entirely to save weight and maximize internal space. Instead of rolling the fabric, they aggressively stuff the main body and rainfly directly into the bottom of their bag around their sleeping system. This filling method molds the flexible fabric into every empty corner, eliminating dead air space completely.
If you expect heavy rain, line your backpack with a heavy-duty trash compactor bag before stuffing your shelter inside. This creates an impenetrable waterproof barrier that keeps your sleeping gear and dry clothes perfectly safe from wet fabric. You should also pack your rainfly near the very top of your bag if the weather looks threatening. Having immediate access to the rainfly lets you set up quick coverage without exposing the rest of your gear to a downpour.
Frequently Asked Questions
Can I attach my shelter to the outside of my bag?
You should avoid attaching heavy shelters to the outside of your bag whenever possible. External mounting shifts your center of gravity outward, causing shoulder strain and poor balance on uneven terrain. It also exposes your expensive equipment to sharp branches, abrasive rocks, and unexpected weather. Always try to fit your heaviest gear internally.
Should I roll or stuff the fabric?
Both methods work exceptionally well, but they serve different packing styles. Rolling the fabric tightly around the poles creates an organized, compact cylinder that is easy to manage. Stuffing the fabric loosely fills empty voids in your bag, maximizing every square inch of available volume. Choose the method that best fits your specific storage needs.
Where exactly should the heavy gear sit?
Heavy gear must always sit close to your spine and exactly in the middle back area of your bag. This positioning anchors the weight directly over your hips, which are the strongest muscles in your body. Placing heavy items too high makes you top-heavy, while placing them too low drags you backward.
How do I stop my poles from breaking in my bag?
Always store your poles completely broken down and neatly bundled in their designated protective sleeve. Place them vertically near the sturdy back panel of your bag where they cannot be bent by other gear. Never force or bend your bag forcefully if the rigid poles are obstructing the closure.
What do I do with a wet rainfly?
When forced to hike with a soaking wet rainfly, never pack it inside with your dry sleeping gear. Store the wet fly in a waterproof exterior pocket or the outside mesh stretch pocket of your bag. During your lunch break, spread the wet fabric out in direct sunlight to dry before setting up camp again.
Conclusion
Heading out into the wilderness feels incredible when your gear works with you instead of against you. By keeping your heavy items centered and protecting your fragile fabrics, you ensure a comfortable journey and a dry, safe shelter at the end of the day. Every hiker eventually discovers a system that works perfectly for their specific equipment and body shape.
Take the time to practice these techniques in your living room before you ever step foot on a trail. When you learn how to pack a tent in a backpack through repetition, it becomes second nature and speeds up your morning routine at camp. Keep adjusting your loadout, balance your weight carefully, and enjoy the freedom of the outdoors. With a perfectly balanced load on your back, you are completely ready to hit the trail and explore the backcountry with confidence.

About Caleb
Caleb Merritt is a Virginia-based outdoor writer and gear analyst who has spent over a decade sleeping on the ground, crossing mountain passes, and obsessively shaving grams off his pack weight. He holds a Bachelor of Science in Environmental Science from James Madison University, where he also served as president of the university’s outdoor recreation club. After graduating, he spent three years as a wilderness educator with a backcountry youth program in the Shenandoah Valley — teaching Leave No Trace ethics, backcountry navigation, and campcraft — before moving into full-time writing in 2018.
His work focuses on one core belief: the best gear is the gear you understand. Whether he’s doing a side-by-side weight comparison of ultralight shelters or writing a beginner’s guide to building a sub-20-lb base weight kit, Caleb writes with the same directness you’d expect from a trusted trail partner. He has logged more than 4,000 miles across iconic routes including the John Muir Trail, the Wind River Range, Vermont’s Long Trail, and the Collegiate Peaks Loop in Colorado.
Areas of Expertise
- Ultralight backpacking systems and base weight optimization
- Tent, tarp, and shelter testing across three-season and shoulder-season conditions
- Sleeping bag and quilt temperature rating verification
- Backpacking nutrition, meal planning, and calorie-per-ounce analysis
- Leave No Trace principles and wilderness ethics
- Campfire safety, bear country protocols, and water treatment methods
- Gear care, repair, and long-term durability assessment
Education
James Madison University — B.S. in Environmental Science, 2015
During his time at JMU, Caleb served as President of the Outdoor Recreation Club, where he planned and led more than 30 backcountry trips annually across the Blue Ridge Mountains and Appalachian Trail corridor. The role sharpened his ability to assess gear performance under real conditions, manage group safety in remote environments, and develop the kind of practical trail knowledge that no classroom can teach.
Professional Experience
Gear Writer & Senior Contributor — [campeox.com]
Produces in-depth gear reviews, buyer’s guides, and how-to content across backpacking, camping, and ultralight hiking categories. Tests all gear in real field conditions before publishing recommendations.
Wilderness Educator & Trip Leader — Shenandoah Backcountry Youth Program — 2015–2018 Led multi-day backcountry expeditions for teens and young adults throughout Shenandoah National Park and George Washington National Forest. Taught LNT principles, orienteering, first aid awareness, and campcraft fundamentals.
Outdoor Recreation Club President — James Madison University — 2013–2015 Organized and led university-sponsored hiking, backpacking, and camping trips in the Blue Ridge Mountains and Appalachian Trail corridor. Managed club budget, safety protocols, and trip logistics for a membership of 120+ students.
Editorial Standards
Every piece of gear Caleb recommends has been personally tested in the field — not just unboxed and described. His review process includes a minimum of two overnight trips per shelter, a full-season evaluation for sleep systems, and side-by-side comparisons wherever possible. He does not accept payment for positive reviews. Affiliate relationships, where they exist, are always disclosed in accordance with FTC guidelines.
All factual claims about gear specifications, trail distances, and safety recommendations are cross-referenced against manufacturer data sheets and established sources such as the Leave No Trace Center for Outdoor Ethics and the American Hiking Society before publication.