

Powering your devices efficiently starts with mastering basic battery maintenance. We depend on portable power for everything from flashlights to GPS devices, yet many people discard reusable power cells simply because they lack the proper knowledge to maintain them. Understanding exactly how to recharge rechargeable batteries saves you money and keeps toxic waste out of local landfills.
You will find that keeping your electronics powered up is a straightforward process once you know the basics of voltage and charger compatibility. Whether you are preparing for a long camping trip or just organizing your home electronics, this fundamental skill gives you peace of mind and reliable performance. This guide exists to teach beginners the exact steps needed to safely and effectively replenish their reusable power cells.
Why Learning to Recharge Batteries Helps Campers and Outdoor Beginners
Heading into the wilderness requires careful preparation and reliable gear. As a camper or outdoor beginner, your safety often depends on battery-powered equipment like headlamps, emergency radios, and navigation tools. Learning how to manage your power supply ensures you never end up stranded in the dark with a dead flashlight.
Reusable power cells offer incredible value for outdoor enthusiasts who need consistent energy over multiple trips without hauling heavy packs of single-use alkaline cells. When you master battery maintenance, you gain independence from camp stores and reduce your overall pack weight. Furthermore, investing in portable solar panels alongside reusable cells allows you to create a self-sustaining power loop entirely off the grid. You gain confidence and safety when you take control of your mobile power needs.
Tools and Materials You’ll Need
Before you begin the charging process, you need to gather a few essential items. Having the right equipment ensures your power cells receive a safe, efficient charge without risking damage to the cells or the charger itself. Gather these items on a clean, flat surface:
- A high-quality smart charger compatible with your specific cell chemistry (NiMH or Lithium-ion)
- Fully depleted or partially depleted reusable power cells (AA, AAA, or standard sizes)
- A stable wall outlet or a reliable portable power station
- A clean microfiber cloth to wipe down contact points
- Optional: A digital battery tester to check the exact voltage capacity before and after charging
Step-by-Step Guide on Recharging Batteries
Step 1 – Match the battery to the correct charger
The foundation of safe power management begins with matching your cells to the proper charging unit. Different cell chemistries require entirely different voltage curves to replenish safely. You must read the label on your power cell to determine if it is Nickel-Metal Hydride (NiMH) or Lithium-ion. Next, look at the back of your charging unit to verify it supports that exact chemistry. Using an incompatible charging base can cause severe overheating or completely destroy the internal structure of the cell. Many modern units support multiple formats, but you should never assume compatibility without checking the manufacturer specifications first. Taking sixty seconds to verify your equipment prevents dangerous accidents and ensures a long lifespan for your gear.
Step 2 – Inspect the cells for physical damage
Before applying any electrical current, you must thoroughly examine your power cells for signs of wear and tear. Look closely at the protective wrapper surrounding the cylinder to ensure there are no tears, dents, or burn marks. You must also check the metal contact points at the top and bottom for any crusty white residue, which indicates a chemical leak. If you want to know how to recharge rechargeable batteries safely, you must accept that damaged cells belong in a recycling bin, not a charging bay. Attempting to force current into a compromised cylinder creates a massive fire hazard. A quick visual inspection guarantees that you only put healthy, capable cells into your charging rotation.
Step 3 – Clean the contact points
Dirty metal contacts prevent electricity from flowing efficiently between the charging bay and the cell. Over time, natural oils from your fingers, dust, and microscopic oxidation build up on the positive and negative terminals. You need to grab a clean, dry microfiber cloth and briskly rub the metal ends of each cylinder. You should also wipe down the metal prongs inside the charging bay itself. Ensuring a clean connection reduces charging time and prevents the unit from falsely reading the cell as completely dead. This simple maintenance habit maximizes the efficiency of the electrical transfer and keeps your equipment running at peak performance. Do not use water or liquid cleaners during this process.
Step 4 – Check the polarity alignment
Every cylindrical power cell features a positive end and a negative end. The positive end usually has a slight bump or raised button, while the negative end remains completely flat. You must match these ends to the corresponding symbols etched into the plastic of your charging bay. Look for the plus sign (+) and the minus sign (-) before inserting anything. Forcing a cell in backward can trigger a short circuit, though modern smart chargers usually feature reverse-polarity protection that simply prevents the unit from activating. Taking a moment to align everything correctly ensures the electrical current flows in the right direction. Always double-check your alignment if you are setting up your gear in a dimly lit environment like a dark tent.
Step 5 – Insert the batteries securely
Once you align the positive and negative ends correctly, you need to press the cells firmly into the charging slots. Most bays use a spring-loaded mechanism on the negative terminal to hold the cylinder tightly in place. Push the flat end against the spring first, then snap the positive end down into the slot. You should feel a solid click and notice that the cell does not wiggle or sit at an angle. A loose connection disrupts the flow of electricity and leaves you with partially filled cells. Ensure every cylinder sits flush against the plastic backing of the unit. This secure fit guarantees a steady, uninterrupted flow of current from the wall outlet into your power cells.
Step 6 – Connect the charger to a reliable power source
With the cells securely seated in their slots, you can now plug the base unit into your power source. You should always use a standard wall outlet or a high-quality portable power station rather than a cheap extension cord. You will see indicator lights flash or a digital screen turn on as soon as the base unit receives electricity. Understanding how to recharge rechargeable batteries efficiently means giving the charging unit a stable, consistent flow of electricity. Avoid plugging the unit into a crowded surge protector that already powers heavy appliances, as voltage drops can confuse the microprocessors inside your charging bay. A dedicated outlet provides the cleanest energy transfer for your reusable gear.
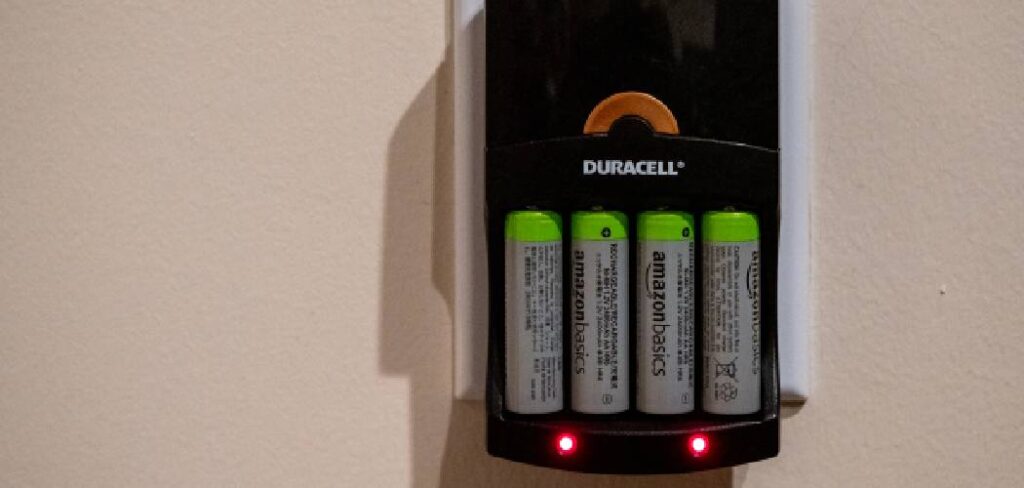
Step 7 – Monitor the indicator lights
Your charging bay communicates the status of your cells through LED lights or a digital display screen. You need to watch these lights when you first plug the unit in to confirm the charging cycle has officially started. A solid red light typically indicates an active charge, while a flashing light might warn you of a defective cell or a poor connection. You do not need to sit and stare at the unit for hours, but you should glance at it occasionally to ensure the cycle continues normally. Modern smart units transition to a green light or turn off completely when the cylinders reach maximum capacity. Learning to read these signals takes the guesswork out of your power management routine.
Step 8 – Remove and store the charged batteries safely
As soon as the indicator lights signal a full capacity, you should unplug the base unit and carefully remove the cylinders. While smart chargers stop sending heavy current to full cells, leaving them in a plugged-in bay for days slowly degrades their internal chemistry. Pull back the spring-loaded negative terminal and lift the cell straight out of the slot. You must store your freshly filled power cells in a protective plastic case rather than throwing them loosely into a drawer or backpack. A plastic case prevents the metal terminals from accidentally touching loose coins or keys, which could cause a dangerous short circuit. Proper storage ensures your power remains ready and safe until your next outdoor adventure.
Common Mistakes When Recharging Batteries
Many beginners ruin their reusable power cells by mixing different brands, capacities, or chemistry types in the same charging bay. When you place a high-capacity cell next to a low-capacity cell, the charging unit often struggles to read the voltage correctly. This confusion usually results in the smaller cell overcharging while the larger cell remains half empty. You should always group identical cells together to ensure an even, balanced distribution of electrical current.
Another frequent error involves exposing the charging equipment to extreme temperatures. Placing your charging bay in direct sunlight, near a heavy heat source, or inside a freezing garage severely damages the chemical stability of the cylinders. High heat causes the internal pressure to build, which drastically shortens the overall lifespan of the gear. You must always conduct your power maintenance in a dry, room-temperature environment to protect your investment.
Finally, beginners often drain their cells completely dead before plugging them in. While old nickel-cadmium technology required this deep discharge to prevent memory effects, modern NiMH and Lithium-ion cells prefer partial discharges. Running your modern gear down to absolute zero actively stresses the internal components. You get far more life out of your equipment by topping them off when they reach twenty or thirty percent capacity.
Expert Tips for Recharging Batteries
To get the absolute best performance from your power gear, you should invest in a conditioning smart charger. These advanced units feature a specific “refresh” mode that cycles the power up and down to break up crystalline formations inside older cells. Running this cycle once every few months restores lost capacity and keeps your gear running like new.
You should also implement a clear rotation system for your equipment. Use a permanent marker to write a small number or date on the side of each cylinder. This allows you to use your gear evenly rather than overworking one specific pair while the others gather dust. Keeping your rotation balanced ensures you always have reliable power when heading out on the trail.
Frequently Asked Questions
Can I recharge regular alkaline batteries?
You must never attempt to put standard single-use alkaline cells into a charging bay. Alkaline chemistry lacks the structural design to absorb electrical current safely. Forcing electricity into these single-use cylinders causes the internal chemicals to boil, leading to severe leaks, ruptures, or fires. You should only use cells specifically labeled as reusable by the manufacturer.
How long does it take to charge a battery fully?
The total time depends entirely on the capacity of the cell and the output speed of your base unit. A high-speed smart unit can fill a standard AA cylinder in about two hours. Slower, overnight units might take up to eight hours to achieve the same result. You should always trust the indicator lights rather than a specific clock time.
Is it safe to leave batteries in the charger overnight?
Modern smart units utilize advanced microprocessors that automatically cut off the electrical current once maximum capacity is reached. Because of this built-in protection, leaving your gear plugged in overnight poses very little risk. However, you should avoid leaving them seated in the base unit for multiple days, as a constant trickle charge slowly degrades their lifespan.
Why do my rechargeable batteries get warm?
A slight increase in temperature is a completely normal byproduct of the chemical reaction happening inside the cylinder as it absorbs electrical current. The metal casing conducts this heat, making the cell feel warm to the touch. However, if the cylinder becomes too hot to hold comfortably, you must unplug the unit immediately and safely discard the damaged cell.
How many times can you reuse a rechargeable battery?
High-quality NiMH cells typically offer between five hundred and one thousand complete charging cycles before their capacity severely diminishes. If you top them off weekly, a good set easily lasts for three to five years of regular use. You will know it is time to replace them when they drain rapidly in your devices despite receiving a full cycle.
Conclusion
Taking the time to master mobile power management transforms the way you approach outdoor adventures and household electronics. You no longer have to worry about buying expensive single-use packs every time your flashlight dims or your camping radio loses signal. By inspecting your gear, maintaining clean contact points, and respecting the chemistry of your cells, you guarantee top-tier performance from your equipment. Remembering exactly how to recharge rechargeable batteries gives you the confidence to rely on your tools when you need them the most. Gather your depleted cells today, set up a safe, room-temperature charging station, and begin building a more sustainable, reliable power routine for all your favorite devices.
About Caleb
Caleb Merritt is a Virginia-based outdoor writer and gear analyst who has spent over a decade sleeping on the ground, crossing mountain passes, and obsessively shaving grams off his pack weight. He holds a Bachelor of Science in Environmental Science from James Madison University, where he also served as president of the university’s outdoor recreation club. After graduating, he spent three years as a wilderness educator with a backcountry youth program in the Shenandoah Valley — teaching Leave No Trace ethics, backcountry navigation, and campcraft — before moving into full-time writing in 2018.
His work focuses on one core belief: the best gear is the gear you understand. Whether he’s doing a side-by-side weight comparison of ultralight shelters or writing a beginner’s guide to building a sub-20-lb base weight kit, Caleb writes with the same directness you’d expect from a trusted trail partner. He has logged more than 4,000 miles across iconic routes including the John Muir Trail, the Wind River Range, Vermont’s Long Trail, and the Collegiate Peaks Loop in Colorado.
Areas of Expertise
- Ultralight backpacking systems and base weight optimization
- Tent, tarp, and shelter testing across three-season and shoulder-season conditions
- Sleeping bag and quilt temperature rating verification
- Backpacking nutrition, meal planning, and calorie-per-ounce analysis
- Leave No Trace principles and wilderness ethics
- Campfire safety, bear country protocols, and water treatment methods
- Gear care, repair, and long-term durability assessment
Education
James Madison University — B.S. in Environmental Science, 2015
During his time at JMU, Caleb served as President of the Outdoor Recreation Club, where he planned and led more than 30 backcountry trips annually across the Blue Ridge Mountains and Appalachian Trail corridor. The role sharpened his ability to assess gear performance under real conditions, manage group safety in remote environments, and develop the kind of practical trail knowledge that no classroom can teach.
Professional Experience
Gear Writer & Senior Contributor — [campeox.com]
Produces in-depth gear reviews, buyer’s guides, and how-to content across backpacking, camping, and ultralight hiking categories. Tests all gear in real field conditions before publishing recommendations.
Wilderness Educator & Trip Leader — Shenandoah Backcountry Youth Program — 2015–2018 Led multi-day backcountry expeditions for teens and young adults throughout Shenandoah National Park and George Washington National Forest. Taught LNT principles, orienteering, first aid awareness, and campcraft fundamentals.
Outdoor Recreation Club President — James Madison University — 2013–2015 Organized and led university-sponsored hiking, backpacking, and camping trips in the Blue Ridge Mountains and Appalachian Trail corridor. Managed club budget, safety protocols, and trip logistics for a membership of 120+ students.
Editorial Standards
Every piece of gear Caleb recommends has been personally tested in the field — not just unboxed and described. His review process includes a minimum of two overnight trips per shelter, a full-season evaluation for sleep systems, and side-by-side comparisons wherever possible. He does not accept payment for positive reviews. Affiliate relationships, where they exist, are always disclosed in accordance with FTC guidelines.
All factual claims about gear specifications, trail distances, and safety recommendations are cross-referenced against manufacturer data sheets and established sources such as the Leave No Trace Center for Outdoor Ethics and the American Hiking Society before publication.


