Finding a leak in your favorite boat can ruin a perfectly good camping trip. You pack your gear, drive to the lake, and suddenly notice water seeping into the hull. Panic sets in rapidly. But do not worry, because fixing this type of damage is much easier than you might think.
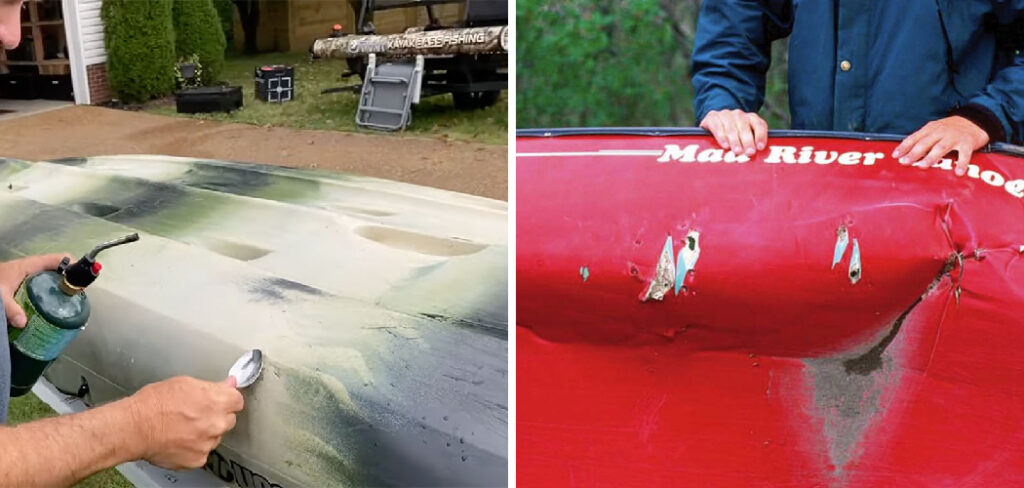
Whether you scraped a hidden rock or dropped your boat during transport, you can fix the damage yourself without spending a fortune on professional services. In this guide, we will show you exactly how to repair a hole in a kayak using simple tools and basic techniques. You will learn the best methods for plastic welding, patching, and sealing so you can get back out on the water safely. Let us dive into the simple process of restoring your vessel to its former glory.
Why Fixing Hull Damage Should Be Your Top Priority
Ignoring hull damage compromises your safety and ruins your travel experience. A tiny puncture might seem harmless at first, but water pressure expands small cracks rapidly once you paddle out into open water. If you leave damage untreated, your boat will take on water, making it heavy, difficult to steer, and ultimately prone to sinking miles away from your campsite. Taking the time to patch things up ensures your vessel remains buoyant and reliable for your next big adventure.
Furthermore, prompt repairs prevent internal mold growth and structural decay over time. Fixing hull issues early saves you money because minor fixes require cheap supplies like plastic welding rods or marine sealant. If you wait too long, you might have to replace the entire boat entirely. Protect your investment by handling structural issues the moment you notice them. Your future self will thank you for taking action quickly.
7 Step-by-Step Guide: How to Repair a Hole in a Kayak
Step 1: Locate the Exact Source of the Leak
Before you can fix anything, you must locate the exact location of the damage. Sometimes a crack is obvious, but hairline fractures hide easily along the hull. To find sneaky leaks, fill the inside of your boat with a small amount of water and a few drops of dish soap. Lift the boat and tilt it back and forth.
Watch the exterior carefully to see where the soapy water bubbles out. Once you spot the culprit, mark the area with a permanent marker so you do not lose track of it once the surface dries. This simple trick ensures you target the right spot and prevents you from missing secondary damage nearby. Taking accurate measurements of the breach also helps you determine exactly how much patching material you will need.
Step 2: Clean and Prep the Damaged Area
A successful patch requires a completely clean surface. Dirt, algae, and saltwater residue prevent patching materials from bonding to the polyethylene plastic. Grab a bucket of warm soapy water and a scrub brush to clean the hull thoroughly. Scrub the marked zone vigorously, extending a few inches past the actual puncture.
After washing away the grime, rinse the area with fresh water and wipe it down with rubbing alcohol to remove any lingering oils. You must let the plastic dry completely before moving forward. Any trapped moisture will ruin the adhesive bond or cause bubbling during the plastic welding process. Working in a shaded, dry area ensures the sun does not heat the hull unevenly while you work.
Step 3: Sand the Surface for Better Adhesion
Smooth plastic creates a slippery surface that rejects sealants and patches. To solve this, you need to rough up the exterior slightly. Take a piece of medium-grit sandpaper and gently sand the area surrounding the puncture. Focus on creating a textured surface extending roughly one inch around the damage.
This added texture gives your epoxy or melted plastic something to grip onto, ensuring a permanent seal. Wipe away the plastic dust with a clean, dry rag. Taking your time with this preparation step makes a massive difference for learning how to repair a hole in a kayak properly. Sanding also removes oxidized plastic layers, revealing fresh material underneath for better bonding.
Step 4: Choose the Right Repair Material
Most modern boats consist of high-density polyethylene, meaning standard glues and epoxies will simply peel right off after a few days in the water. For a true, lasting fix, you need compatible materials. Plastic welding is the most reliable method for sealing polyethylene hulls.
You will need scrap plastic of the same material, which you can often get by shaving a tiny piece from the inside rim of the cockpit. If you cannot harvest scrap material from your vessel, you can purchase high-density polyethylene welding rods from a local hardware store. Matching the plastic type guarantees a strong, flexible bond. If you choose the wrong plastic composition, the patch will simply flake off the moment it encounters cold river water or minor friction.
Step 5: Heat the Damaged Area
You are now ready to apply heat to the hull. Put on heat-resistant gloves and grab a heat gun or a small butane torch. Hold your heat source a few inches away from the damaged plastic. Move the heat gun in continuous circular motions to avoid scorching or melting right through the hull.
You want the plastic to become soft and slightly glossy, but it should never catch fire or turn black. Warming the base material allows it to accept the new plastic patch seamlessly. Patience is crucial here, as rushing with high heat causes permanent warping. Keep your heat source moving consistently to maintain a perfectly even temperature across the entire work area before moving to the next phase.
Step 6: Apply the Patch Material
Once the hull becomes soft and glossy, introduce your filler material to the heat. Hold the welding rod or scrap plastic over the puncture and direct the heat gun onto the tip of the rod. As the filler material begins to melt, press it firmly into the crevice. Use a metal putty knife or a flat screwdriver to spread the gooey plastic smoothly over the entire gap.
Make sure the melted material overlaps the sanded edges of the damage. Knowing how to repair a hole in a kayak relies entirely on creating this airtight, overlapping seal. Push firmly to remove any trapped air pockets inside the melted plastic, as bubbles will weaken the final structure.
Step 7: Smooth and Cure the New Seal
With the melted plastic pressed into the gap, you need to flatten the surface before it cools and hardens. Take your metal putty knife and gently scrape it across the warm patch. Blend the edges of the new plastic flat against the original hull to prevent snags when you drag your boat across the beach.
Let the repair cure completely in a dry, shaded area for at least twenty-four hours. Never rush the cooling process by pouring cold water over the hot plastic, as rapid temperature changes make the material brittle and highly prone to cracking again. Allow nature to take its course for the best possible finish.
Frequently Asked Questions
Can I Use Duct Tape To Fix A Kayak Leak?
Duct tape is strictly a temporary, emergency fix. If you suffer a puncture while out on the water, a heavy-duty waterproof tape can help you paddle back to shore safely. However, tape will not hold up to long-term water exposure, UV rays, or scraping against rocks. You must apply a permanent plastic weld once you get home to ensure your vessel remains seaworthy.
What Is The Best Glue For Polyethylene Plastic?
Standard glues simply do not bond with high-density polyethylene. Instead of regular super glue, you must use specialized products. The best options include:
- Marine-grade epoxy designed specifically for plastics
- Polyurethane marine sealants
- Melted polyethylene welding rods
Welding remains the strongest method, but specialized two-part marine epoxies work well for minor surface scrapes.
How Long Does A Plastic Weld Take To Dry?
A melted plastic weld cools and hardens relatively quickly, usually within thirty to sixty minutes. However, you should not put the boat back into the water immediately. It is highly recommended to let the newly bonded plastic rest in a cool, shaded environment for a full twenty-four hours. This waiting period ensures maximum durability.
Will Flex Seal Work On A Cracked Hull?
Flex Seal and similar spray-on coatings offer a convenient waterproofing layer, but they do not provide structural strength. If you have a deep crack or a large puncture, the pressure of the water will push right through the flexible rubber. These products might stop a tiny pinhole leak temporarily, but they are not recommended for proper marine repairs.
Can I Fix A Large Gouge That Penetrates Completely?
Yes, you can fix larger gouges, but the process requires additional reinforcement. For substantial damage, you should place a piece of stainless steel wire mesh over the gap before melting your plastic filler over it. The mesh acts like rebar in concrete, giving the melted plastic a strong skeleton to grip. This technique prevents the large patch from popping out.
Conclusion
Fixing hull damage might seem intimidating at first, but it is a highly rewarding skill for any outdoor enthusiast. By properly locating the leak, cleaning the surface, and using the correct plastic welding techniques, you can save your favorite boat from the landfill. Preparing the surface carefully and taking your time with the heat gun guarantees a strong, watertight bond that will withstand future adventures.
We highly encourage you to try tackling this project yourself before paying for expensive professional services. Once you master how to repair a hole in a kayak, you will feel much more confident navigating shallow rivers and rocky shorelines. Grab your heat gun, gather your materials, and get ready to enjoy countless more trips out on the beautiful open water.

About Caleb
Caleb Merritt is a Virginia-based outdoor writer and gear analyst who has spent over a decade sleeping on the ground, crossing mountain passes, and obsessively shaving grams off his pack weight. He holds a Bachelor of Science in Environmental Science from James Madison University, where he also served as president of the university’s outdoor recreation club. After graduating, he spent three years as a wilderness educator with a backcountry youth program in the Shenandoah Valley — teaching Leave No Trace ethics, backcountry navigation, and campcraft — before moving into full-time writing in 2018.
His work focuses on one core belief: the best gear is the gear you understand. Whether he’s doing a side-by-side weight comparison of ultralight shelters or writing a beginner’s guide to building a sub-20-lb base weight kit, Caleb writes with the same directness you’d expect from a trusted trail partner. He has logged more than 4,000 miles across iconic routes including the John Muir Trail, the Wind River Range, Vermont’s Long Trail, and the Collegiate Peaks Loop in Colorado.
Areas of Expertise
- Ultralight backpacking systems and base weight optimization
- Tent, tarp, and shelter testing across three-season and shoulder-season conditions
- Sleeping bag and quilt temperature rating verification
- Backpacking nutrition, meal planning, and calorie-per-ounce analysis
- Leave No Trace principles and wilderness ethics
- Campfire safety, bear country protocols, and water treatment methods
- Gear care, repair, and long-term durability assessment
Education
James Madison University — B.S. in Environmental Science, 2015
During his time at JMU, Caleb served as President of the Outdoor Recreation Club, where he planned and led more than 30 backcountry trips annually across the Blue Ridge Mountains and Appalachian Trail corridor. The role sharpened his ability to assess gear performance under real conditions, manage group safety in remote environments, and develop the kind of practical trail knowledge that no classroom can teach.
Professional Experience
Gear Writer & Senior Contributor — [campeox.com]
Produces in-depth gear reviews, buyer’s guides, and how-to content across backpacking, camping, and ultralight hiking categories. Tests all gear in real field conditions before publishing recommendations.
Wilderness Educator & Trip Leader — Shenandoah Backcountry Youth Program — 2015–2018 Led multi-day backcountry expeditions for teens and young adults throughout Shenandoah National Park and George Washington National Forest. Taught LNT principles, orienteering, first aid awareness, and campcraft fundamentals.
Outdoor Recreation Club President — James Madison University — 2013–2015 Organized and led university-sponsored hiking, backpacking, and camping trips in the Blue Ridge Mountains and Appalachian Trail corridor. Managed club budget, safety protocols, and trip logistics for a membership of 120+ students.
Editorial Standards
Every piece of gear Caleb recommends has been personally tested in the field — not just unboxed and described. His review process includes a minimum of two overnight trips per shelter, a full-season evaluation for sleep systems, and side-by-side comparisons wherever possible. He does not accept payment for positive reviews. Affiliate relationships, where they exist, are always disclosed in accordance with FTC guidelines.
All factual claims about gear specifications, trail distances, and safety recommendations are cross-referenced against manufacturer data sheets and established sources such as the Leave No Trace Center for Outdoor Ethics and the American Hiking Society before publication.