Whether you are heading out for a brisk morning walk, commuting to the office, or packing emergency supplies for your household, carrying your gear safely is crucial. Many people suffer from avoidable shoulder and neck pain simply because they never learned the proper mechanics of adjusting their gear. Poor posture from heavy loads can lead to long-term health issues that affect your everyday life.
This guide is designed specifically for beginners and safety-conscious individuals who want to protect their spines while carrying daily necessities. We will break down exactly how to wear a backpack so you can stay comfortable and pain-free. By mastering these foundational steps, you protect your body from unnecessary strain and ensure a healthier, more active lifestyle.
Why Proper Positioning Saves Your Spine
Understanding the mechanics behind load distribution is essential for anyone prioritizing personal health and home safety. When you carry weight on your shoulders, gravity immediately pulls you backward. To compensate, your body naturally leans forward, creating unnatural curvature in your lower spine. Over time, this poor posture contributes to chronic muscle fatigue, tension headaches, and severe lower back pain.
A properly fitted bag keeps the center of gravity close to your own body, minimizing that dangerous backward pull. This optimal alignment allows your strongest muscles—your core and your legs—to handle the weight instead of your fragile neck and shoulder muscles. Taking the time to adjust your gear properly transforms a heavy, painful burden into a secure, comfortable extension of your body.
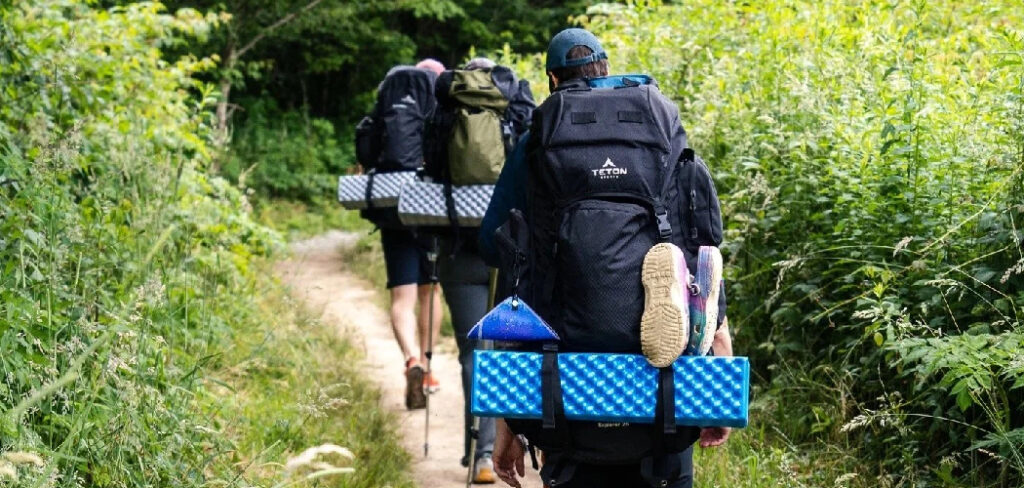
8 Step-by-Step Guide on How to Wear a Backpack
Step 1: Empty and Loosen Every Single Strap
Before you can achieve the perfect fit, you must start with a completely blank slate. Take your empty bag and systematically loosen the shoulder straps, the hip belt, the sternum strap, and the load lifters located at the top. Putting on a bag with pre-tightened straps forces your body to adapt to the bag, rather than making the bag adapt to your body.
By loosening everything first, you ensure that each adjustment you make moving forward is custom-tailored to your unique torso length and shoulder width. This fundamental first move prevents the common mistake of settling for an uncomfortable, asymmetrical fit that puts undue stress on one side of your spine.
Step 2: Pack Smartly to Distribute Weight Evenly
Proper load management begins long before you put the bag on your shoulders. You must pack your heaviest items closest to your back and center them vertically. This keeps the heaviest part of your load aligned perfectly with your natural center of gravity. Place lighter, bulky items like jackets or soft emergency supplies at the very bottom to create a stable base.
Keep medium-weight items toward the top and front. If you place heavy objects too far away from your body, they will act like a lever, violently pulling your shoulders backward and straining your lower back. A well-packed bag feels significantly lighter and much more stable when you are moving around.
Step 3: Fasten and Adjust the Hip Belt First
For any bag equipped with a hip belt, this must always be your very first point of adjustment. Put the bag on your shoulders, position the padded sections of the hip belt directly over your hip bones, and buckle it securely. Tighten the straps evenly on both sides so the belt feels snug but does not restrict your breathing.
An astonishing eighty percent of the bag’s total weight should be supported entirely by your hips and legs, not your fragile shoulders. If the hip belt sits too high on your waist or too low on your thighs, it will fail to transfer the weight properly, leaving your upper body to bear the brunt of the heavy load.
Step 4: Tighten the Shoulder Straps Smoothly
Once your hips are securely supporting the bulk of the weight, gently pull down and back on the shoulder straps. You want them to wrap comfortably around your shoulders, holding the bag closely against your back panel without lifting the weight off your hip belt.
The shoulder straps are primarily designed to keep the load stabilized against your torso, preventing the bag from swaying side to side as you walk. If you pull these straps too tightly, you will incorrectly transfer the weight back up to your neck and shoulders, completely defeating the purpose of the hip belt. The padding should rest smoothly across your collarbones without causing any pinching or painful friction.
Step 5: Secure the Sternum Strap Across Your Chest
Locate the small strap that connects your two shoulder straps across your chest. Slide this sternum strap up or down until it rests comfortably about an inch below your collarbones.
Buckle it together and tighten it just enough to pull the shoulder straps slightly inward. This small adjustment works wonders by keeping the shoulder straps from sliding off your shoulders, especially if you have a narrower frame. It also gives your arms a wider, freer range of motion, which is vital for maintaining balance. Make absolutely sure the chest strap is not pulled so tight that it restricts your deep breathing, as you need full lung capacity when walking with a heavy load.
Step 6: Engage the Load Lifter Straps
If you are using a larger bag, look for the small straps connecting the top of the shoulder straps to the main body of the pack. Gently pull these load lifter straps forward until they form a roughly forty-five-degree angle. This crucial step pulls the upper portion of the bag closer to your body, pulling the weight directly over your center of gravity.
Properly adjusted load lifters will literally lift the shoulder straps slightly off the top of your collarbones, immediately relieving downward pressure on your neck. Stop tightening the moment you feel the weight shift comfortably off your shoulders; over-tightening them will cause painful friction on the front of your chest.
Step 7: Perform a Final Comfort and Movement Check
Now that all your straps are dialed in, walk around your home to test the overall fit. Understanding the complete mechanics of how to wear a backpack requires active movement, not just standing completely still. Lean forward, bend your knees, and twist your torso gently from side to side.
The bag should feel like a secure extension of your own body, moving seamlessly with you rather than swinging independently. If you feel any awkward rubbing, pinching, or localized pressure points, stop immediately and readjust the corresponding straps. Taking five extra minutes to refine this custom fit will save you from enduring hours of agonizing discomfort during your daily commute or weekend hiking excursion.
Step 8: Practice Safe Lifting Techniques Always
The safest fitting process is entirely useless if you injure your spine while lifting the bag off the floor. Never bend over at the waist and heave a heavy bag directly onto your shoulders using your back muscles. Instead, bend your knees, grab the sturdy top haul loop, and lift the bag using the immense power of your legs.
Slide the bag onto your dominant knee first, creating a safe resting shelf, before slipping your arms through the shoulder straps one at a time. This methodical lifting technique protects your vulnerable lumbar discs from sudden, twisting stress and ensures your safety journey begins before the bag is even fully secured on your back.
Frequently Asked Questions
What Is The Maximum Weight I Should Carry?
For optimal home safety and physical health, experts recommend never carrying more than ten to fifteen percent of your total body weight in a daily bag.
- Weigh your loaded bag on a home scale.
- Remove non-essential items if it exceeds this limit.
- Children should carry even less to protect their developing spines.
Consistently hauling an overloaded bag can cause severe, long-term musculoskeletal damage.
Can I Wear My Bag On Just One Shoulder?
Slinging a heavy bag over a single shoulder is one of the most common and dangerous habits for your spine.
- It forces your spine to curve laterally.
- It causes one shoulder to elevate unnaturally.
- It leads to severe muscle spasms and posture issues.
Always use both straps to ensure the weight remains symmetrical across your entire back and core muscles.
How High Should The Bottom Of The Bag Rest?
Proper vertical alignment is absolutely critical for preventing lower back pain.
- The bottom edge should rest in the curve of your lower back.
- It should sit no more than two inches below your waistline.
If the bag hangs loosely over your buttocks, it will constantly pull your shoulders backward, forcing you to lean forward awkwardly to compensate for the displaced weight.
How Do I Know If My Straps Are Too Tight?
While a snug fit is important for stability, over-tightened straps can cause serious circulatory and nerve issues.
- You should easily slide two fingers under the shoulder straps.
- Your arms and hands should never feel tingly or numb.
- Deep breathing should feel completely unrestricted.
If you experience any pinching or red marks on your skin, loosen the straps immediately to restore proper blood flow.
Should I Wash My Bag Regularly For Hygiene?
Yes, maintaining the cleanliness of your daily carry gear is an often-overlooked aspect of personal health and safety.
- Sweat and dead skin cells accumulate in the porous back panels.
- Spot clean stains with mild soap and warm water.
- Air dry completely in a well-ventilated area.
Keeping the fabric clean prevents harmful bacterial growth and significantly extends the usable life of the straps and padding.
Conclusion
Taking a few extra moments to adjust your gear properly is an investment in your long-term health and daily comfort. Whether you are a beginner building a household emergency kit or simply commuting to work, prioritizing spinal safety changes everything. You now know exactly where every strap should rest and why weight distribution matters so much.
We strongly encourage you to grab your favorite bag right now, empty it out, and practice these steps in front of a mirror. Once you experience the difference, you will confidently know how to wear a backpack the right way every single day. Stay safe, protect your spine, and enjoy the comfort of a perfectly fitted load.
About Caleb
Caleb Merritt is a Virginia-based outdoor writer and gear analyst who has spent over a decade sleeping on the ground, crossing mountain passes, and obsessively shaving grams off his pack weight. He holds a Bachelor of Science in Environmental Science from James Madison University, where he also served as president of the university’s outdoor recreation club. After graduating, he spent three years as a wilderness educator with a backcountry youth program in the Shenandoah Valley — teaching Leave No Trace ethics, backcountry navigation, and campcraft — before moving into full-time writing in 2018.
His work focuses on one core belief: the best gear is the gear you understand. Whether he’s doing a side-by-side weight comparison of ultralight shelters or writing a beginner’s guide to building a sub-20-lb base weight kit, Caleb writes with the same directness you’d expect from a trusted trail partner. He has logged more than 4,000 miles across iconic routes including the John Muir Trail, the Wind River Range, Vermont’s Long Trail, and the Collegiate Peaks Loop in Colorado.
Areas of Expertise
- Ultralight backpacking systems and base weight optimization
- Tent, tarp, and shelter testing across three-season and shoulder-season conditions
- Sleeping bag and quilt temperature rating verification
- Backpacking nutrition, meal planning, and calorie-per-ounce analysis
- Leave No Trace principles and wilderness ethics
- Campfire safety, bear country protocols, and water treatment methods
- Gear care, repair, and long-term durability assessment
Education
James Madison University — B.S. in Environmental Science, 2015
During his time at JMU, Caleb served as President of the Outdoor Recreation Club, where he planned and led more than 30 backcountry trips annually across the Blue Ridge Mountains and Appalachian Trail corridor. The role sharpened his ability to assess gear performance under real conditions, manage group safety in remote environments, and develop the kind of practical trail knowledge that no classroom can teach.
Professional Experience
Gear Writer & Senior Contributor — [campeox.com]
Produces in-depth gear reviews, buyer’s guides, and how-to content across backpacking, camping, and ultralight hiking categories. Tests all gear in real field conditions before publishing recommendations.
Wilderness Educator & Trip Leader — Shenandoah Backcountry Youth Program — 2015–2018 Led multi-day backcountry expeditions for teens and young adults throughout Shenandoah National Park and George Washington National Forest. Taught LNT principles, orienteering, first aid awareness, and campcraft fundamentals.
Outdoor Recreation Club President — James Madison University — 2013–2015 Organized and led university-sponsored hiking, backpacking, and camping trips in the Blue Ridge Mountains and Appalachian Trail corridor. Managed club budget, safety protocols, and trip logistics for a membership of 120+ students.
Editorial Standards
Every piece of gear Caleb recommends has been personally tested in the field — not just unboxed and described. His review process includes a minimum of two overnight trips per shelter, a full-season evaluation for sleep systems, and side-by-side comparisons wherever possible. He does not accept payment for positive reviews. Affiliate relationships, where they exist, are always disclosed in accordance with FTC guidelines.
All factual claims about gear specifications, trail distances, and safety recommendations are cross-referenced against manufacturer data sheets and established sources such as the Leave No Trace Center for Outdoor Ethics and the American Hiking Society before publication.